Lab 6: Create a System API to Access Salesforce Health Cloud

Overview
Scenario
In order to enable synchronization of appointment and other data between Epic and Salesforce Health Cloud a new System API must be created to provide access to Salesforce. In this lab you will again search for existing assets that you can reuse. Upon finding a Salesforce connector you will be able to deliver this new API more quickly compared to having to build it from scratch.
Learning Objectives
Lab participants will be introduced to the following features:
-
The ability to use Anypoint Exchange to locate prebuilt assets that will enable quick integration with Salesforce Health Cloud.
-
The use the MuleSoft Salesforce connector to quickly implement connectivity to Salesforce.
-
The use of Anypoint Studio to implement the System API as well test its functions via the APIKit console.
Setup Information
-
Locate the AppointmentMetadata.txt file by navigating to: C:\Users\workshop\mulesoft\HLSWorkshop in your remote desktop session.
Step 1: Locate the API Specification in Anypoint Exchange
-
Go to https://anypoint.mulesoft.com/ and sign into your account using your credentials.
-
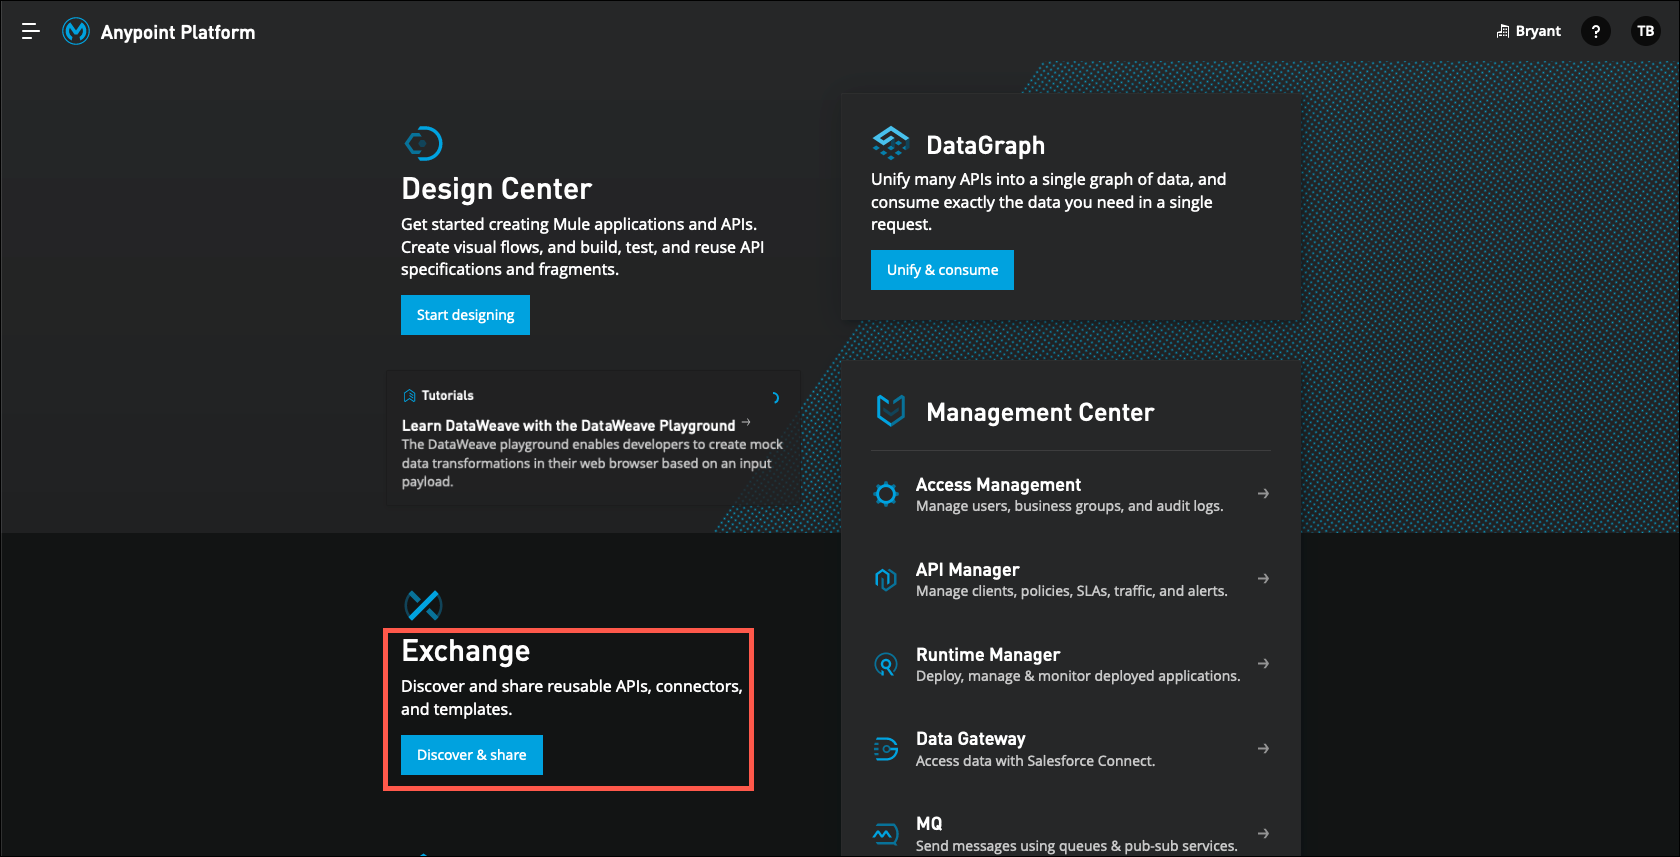
Click on the Discover & share button immediately below Exchange.
-
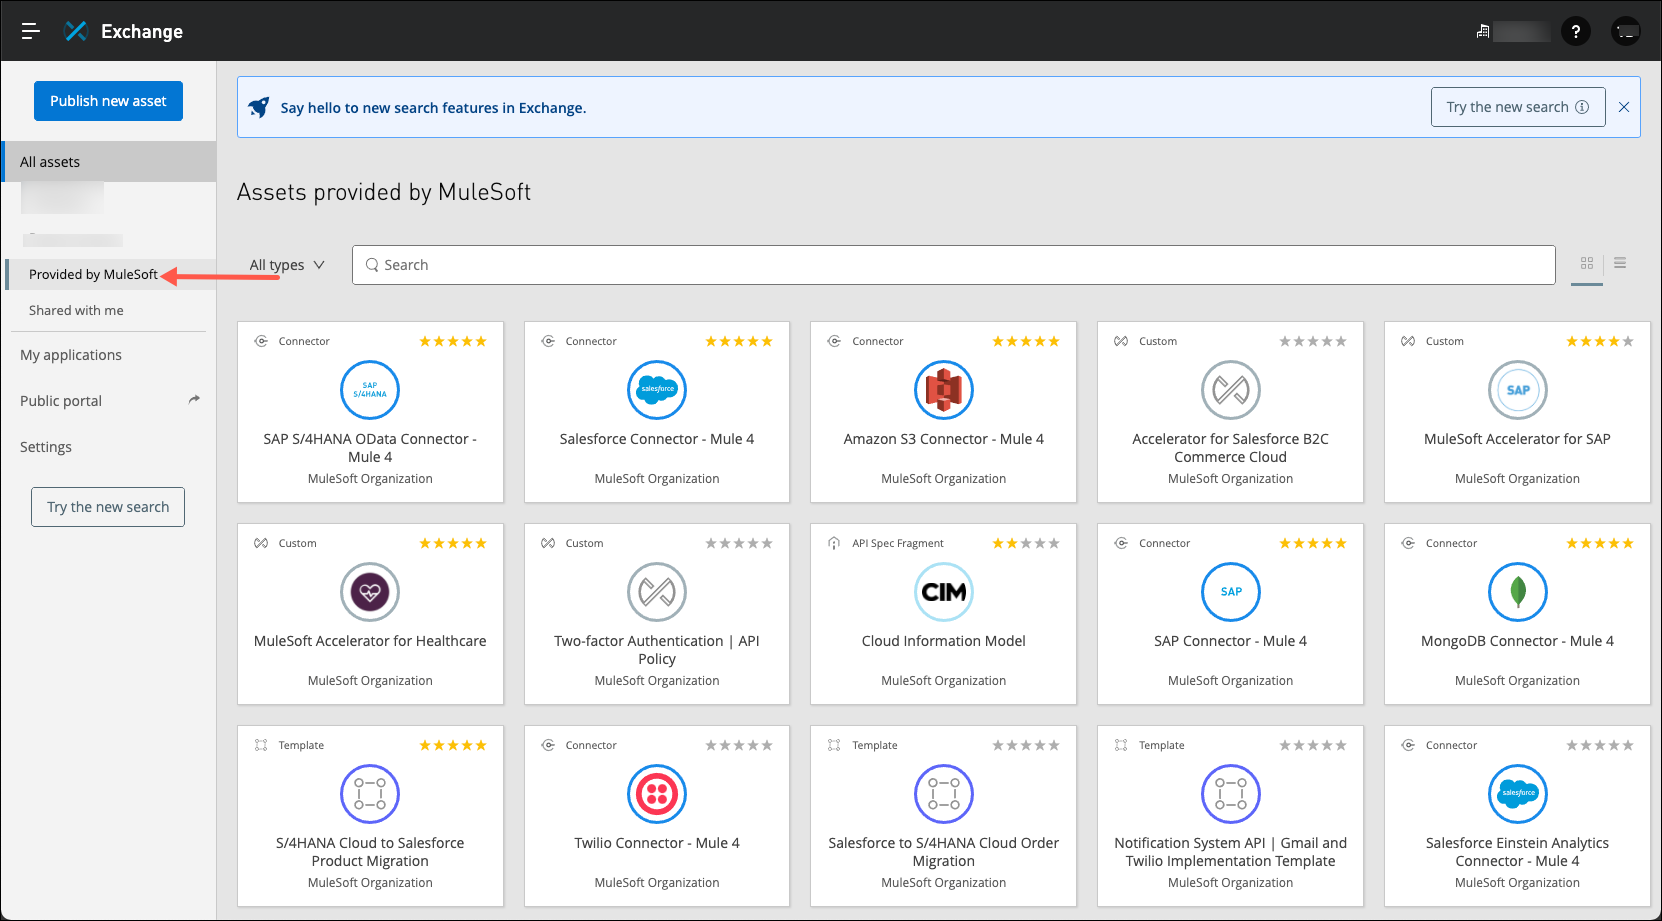
On the left side of the screen, select Provided by MuleSoft. This is where all MuleSoft provided assets can be found, including connectors, templates, APIs, and more.
-
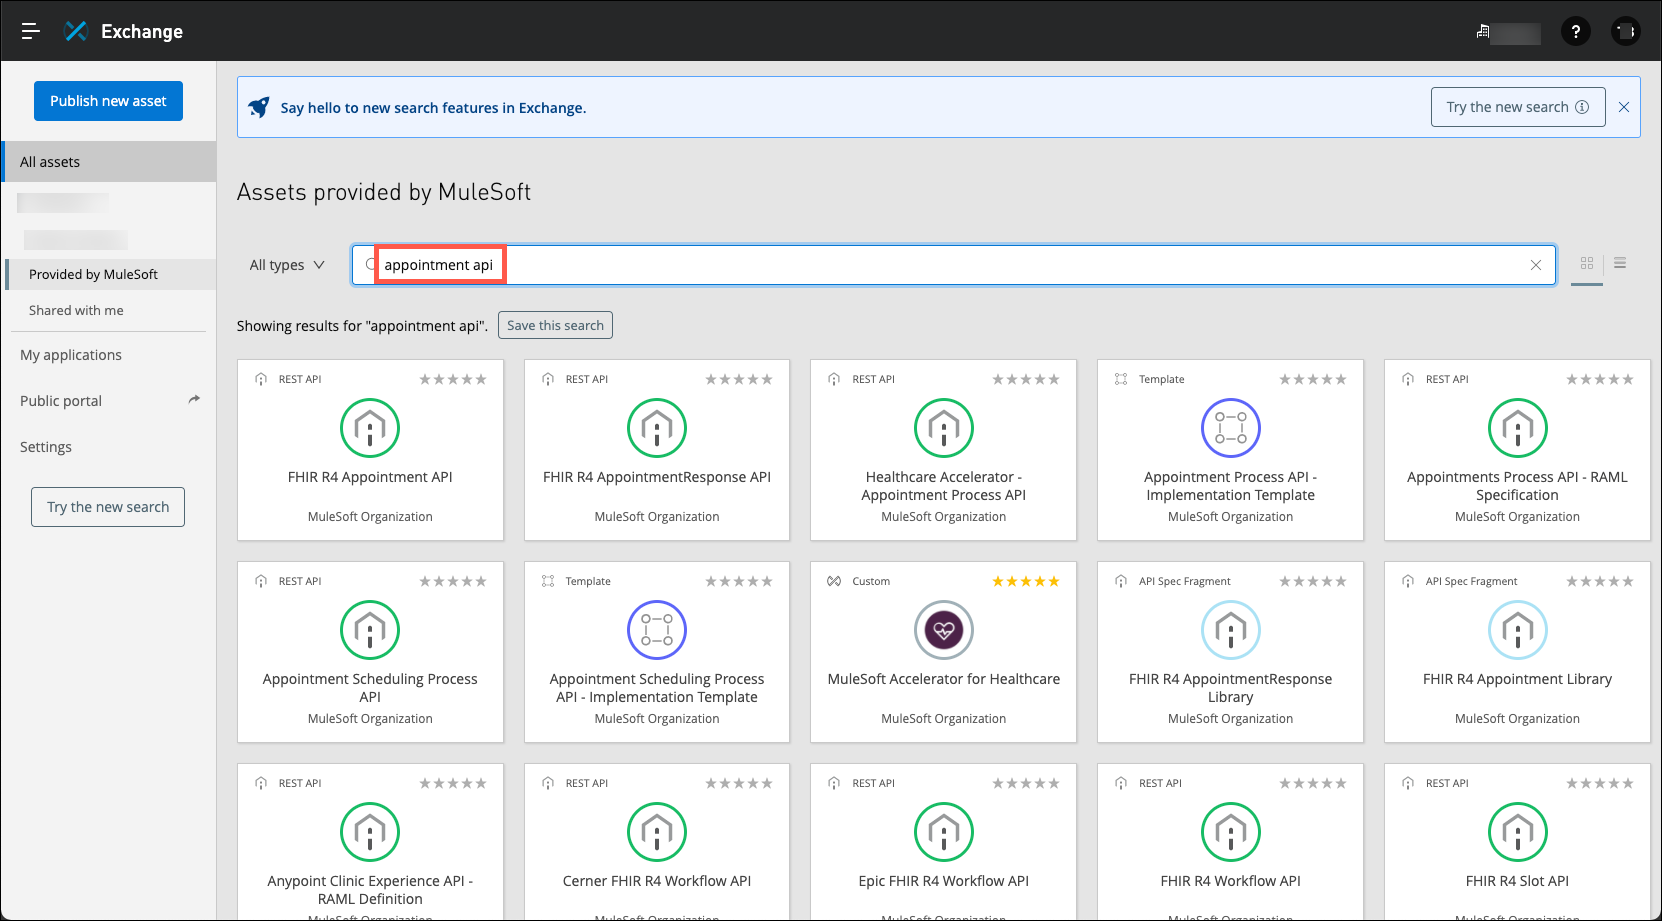
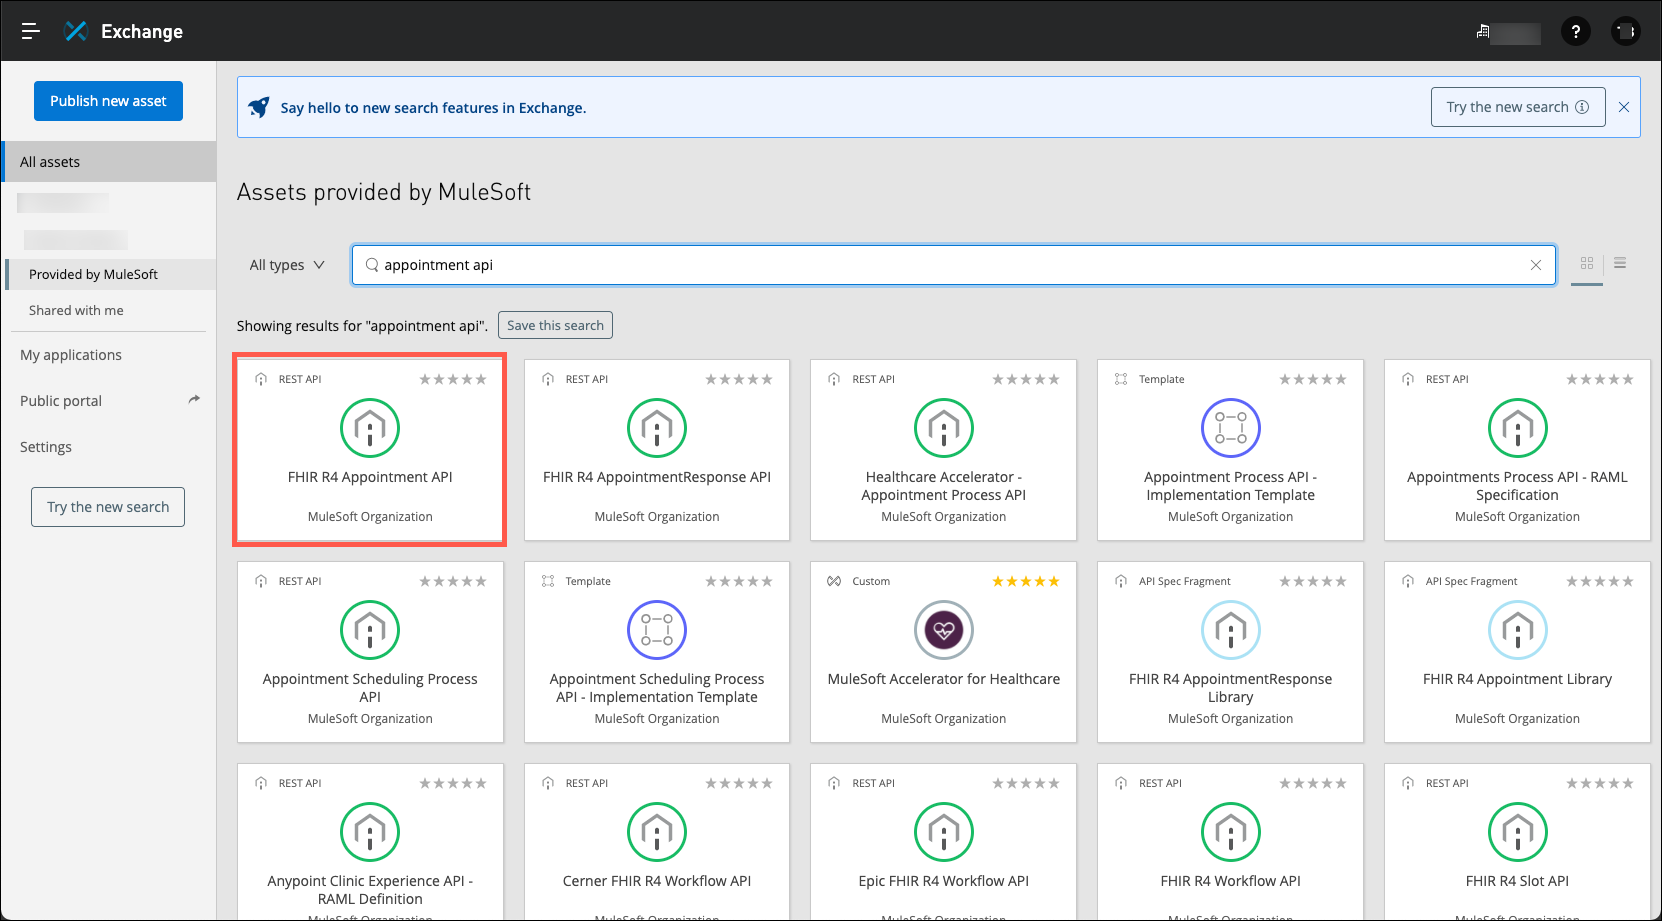
You are looking for an API specification that will enable you to build a system API on Salesforce that will allow the user of this API to schedule appointments. In the search bar, type and enter appointment api to view what resources may be a good fit.
-
The first search result is the FHIR R4 Appointment API. Click on this to see more about it in order to determine if this is a good fit for your project.
-
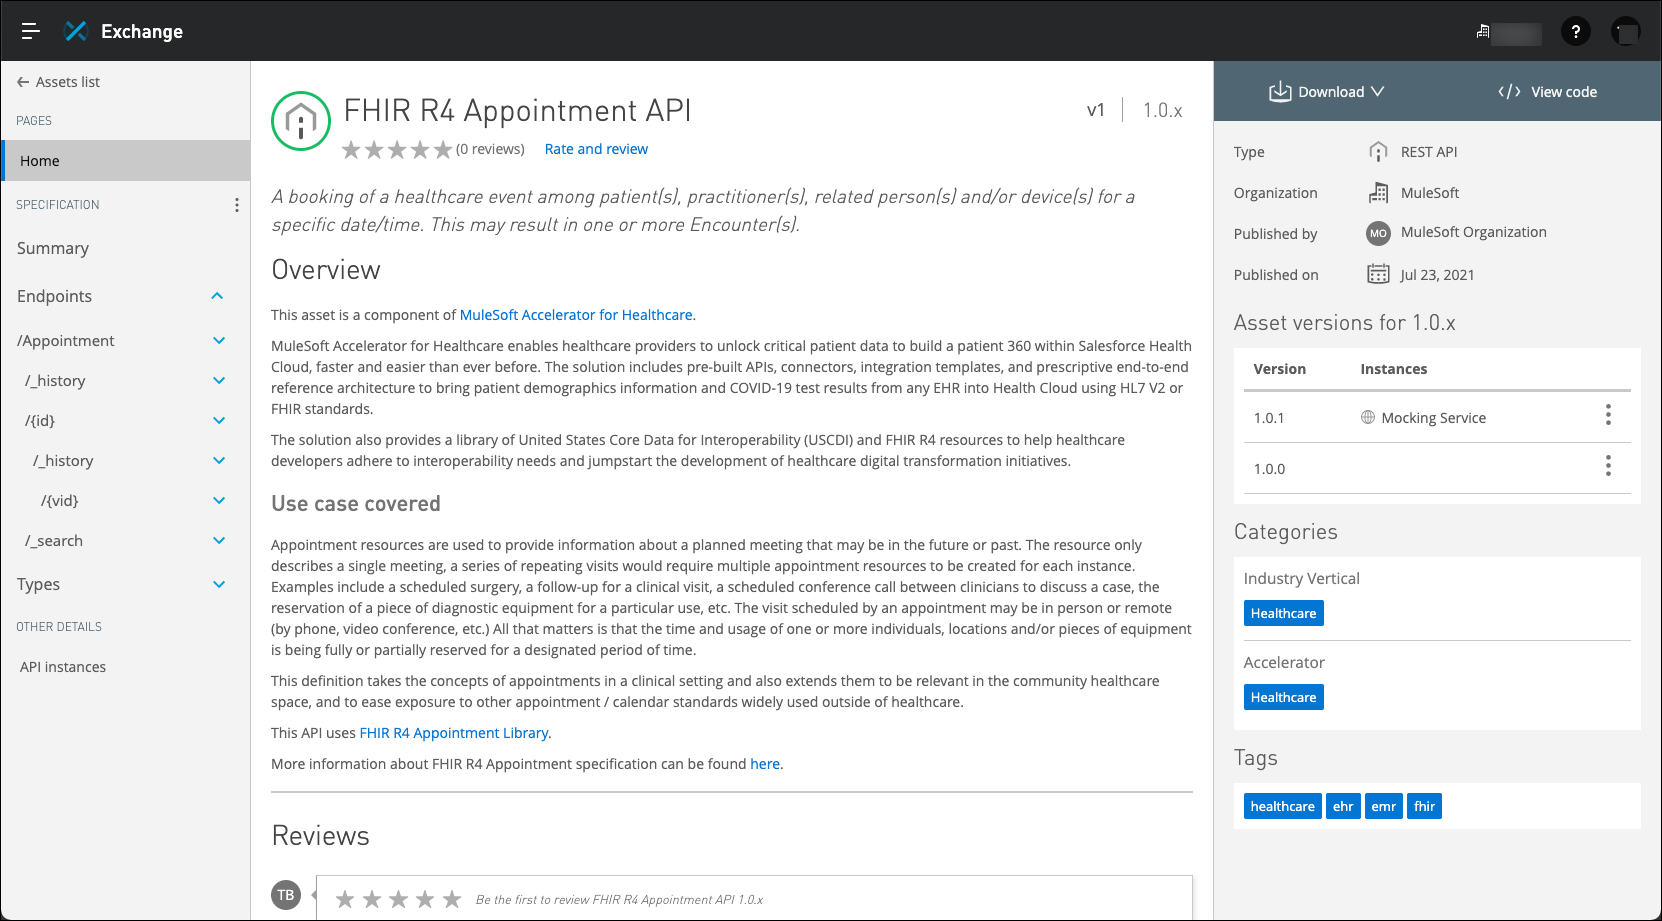
Review the description of this API. You can see this API is part of the MuleSoft’s Accelerator for Healthcare! This is perfect to securely get data in/out of Makana’s Salesforce Health Cloud instance using HL7 / FHIR standards.
Step 2: Import the FHIR R4 Appointment API into Anypoint Studio
-
Implementing the API in Anypoint Studio
-
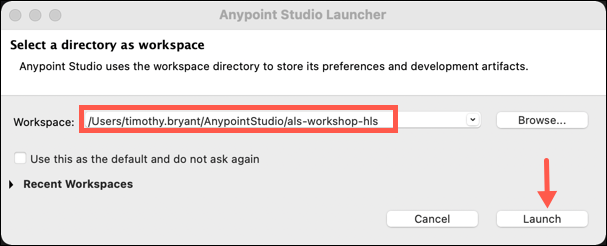
Open Anypoint Studio and specify a workspace for your project. (You are free to use whatever name you want for a new workspace.) A workspace is where your project files will be stored on your machine. Once you have entered your workspace, click Launch.
Note: You may see an introductory page if you are creating a new workspace. Simply click on the Continue to Studio button to continue.
-
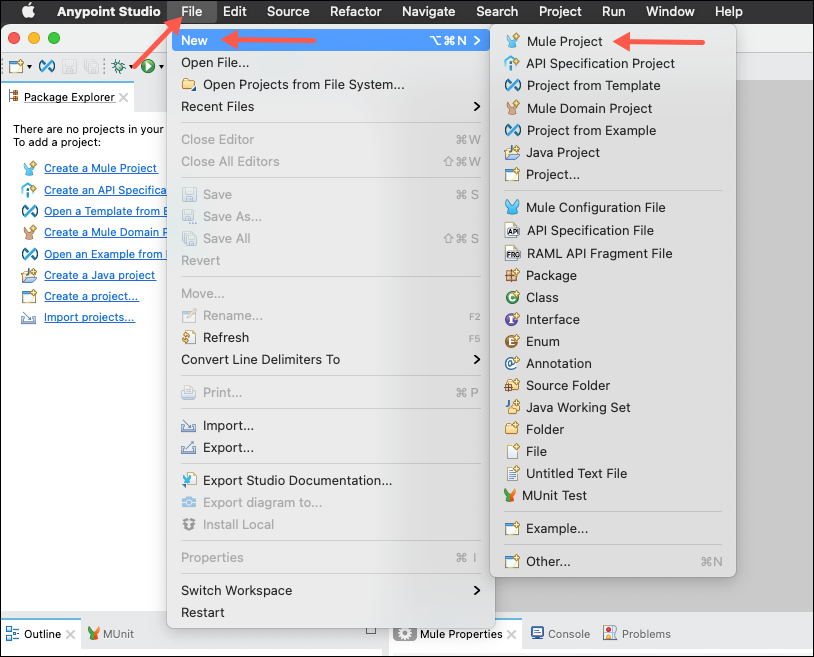
Once Studio opens, click File | New | Mule Project. The New Mule Project dialog will appear.
-
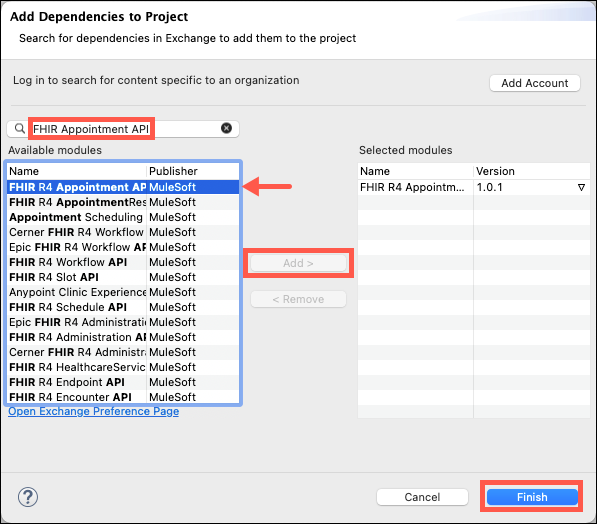
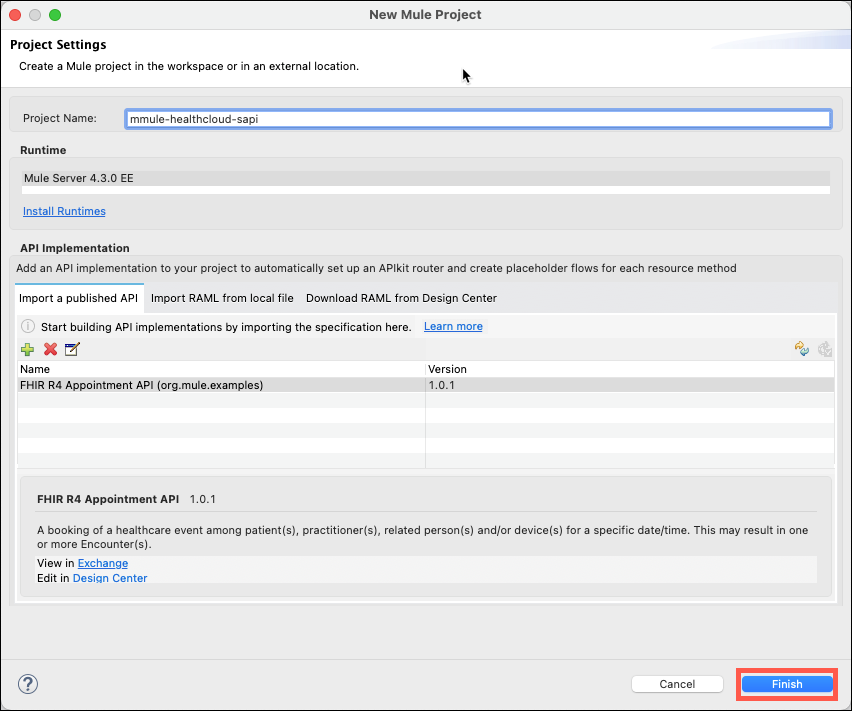
Name your project <initial-lastname>-healthcloud-sapi (ex. m-mule-healthcloud-sapi). Under API Implementation, click on the green plus icon and select from Exchange. A box will appear titled Add Dependencies to Project.

Note: If prompted with Log in to search for content specific to an organization, click Add Account. A window will open prompting you to log into the Anypoint Platform and will close upon successfully logging in.
-
In the Search bar of the Add Dependencies to Project box, type in FHIR R4 Appointment API and press enter. Select the FHIR R4 Appointment API published by MuleSoft, and then click the Add button. Next, click the Finish button. Your project space will be created and your specification outline will be displayed on the screen.
-
Now that the FHIR R4 Appointment API has been selected for your project click on the Finish button to have Studio start the scaffolding process.
Note: Your API outline can be located in the package explorer by expanding your project, expanding src/main/mule, and then selecting the fhir-r4-appointment-api.xml file.
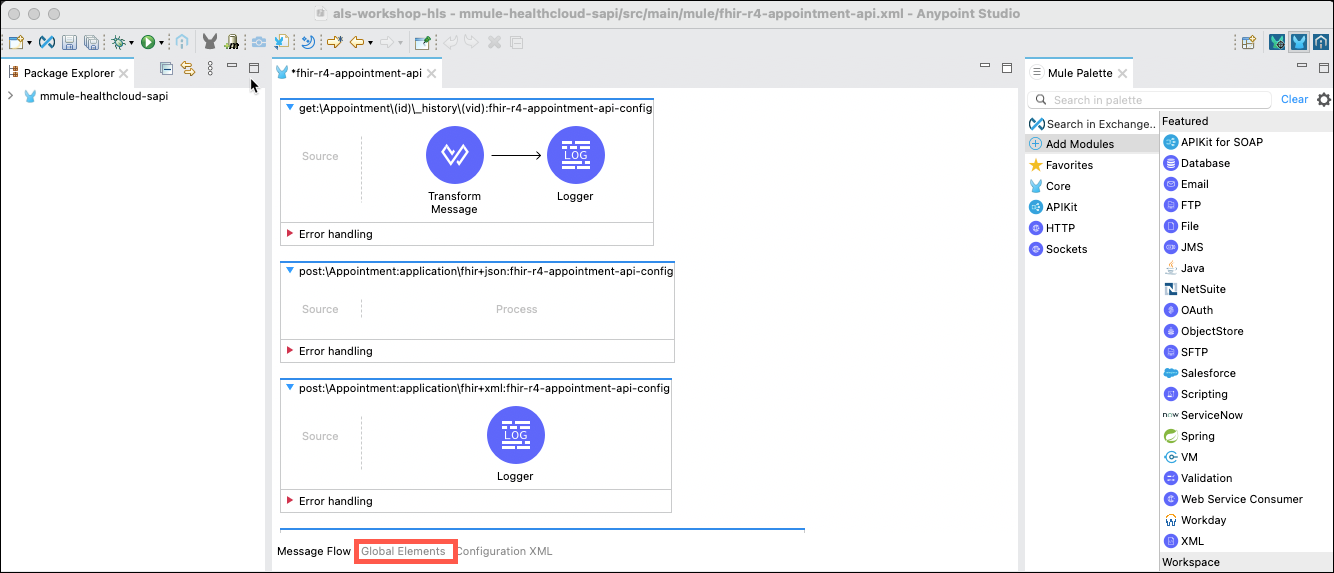
Step 3: Review the Scaffolded Project.
Take a couple of minutes to review what functions are provided by the FHIR R4 Appointment API. As you will discover, the MuleSoft’s Accelerator for Healthcare provides a number of APIs that include common functions required for the various resources and methods that customers commonly need when integrating applications.
Complete the following steps to implement the POST /appointment Method
-
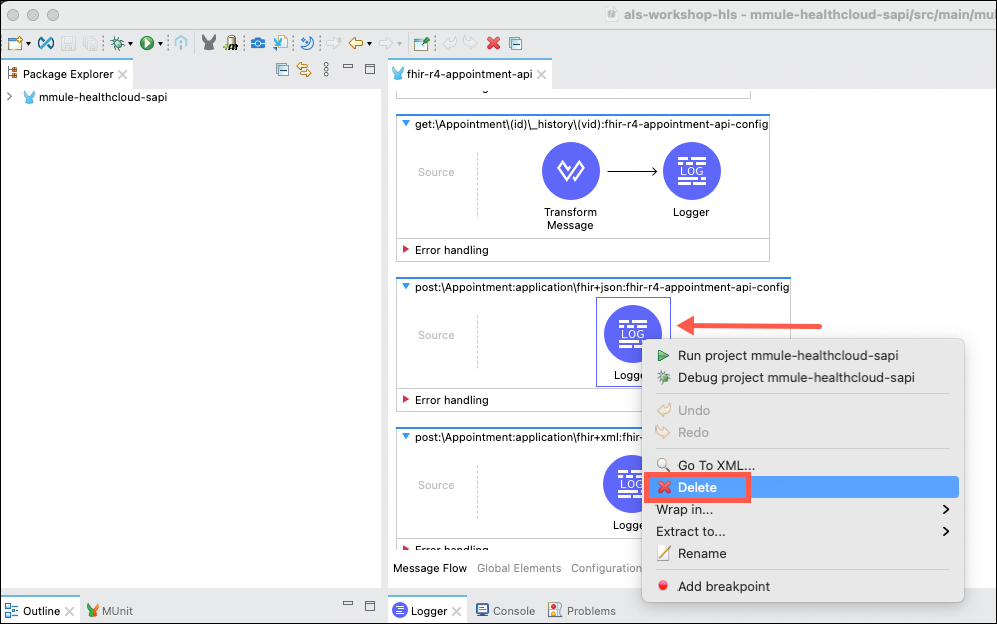
In the main canvas, scroll down to locate the post:\Appointment:application\fhir+json:fhir-r4-appointment-api-config flow. This method will receive appointment information and create an appointment for the indicated patient in Salesforce Health cloud.

-
Initially, there will be a Logger in this flow that you won’t need to use. Delete this by right clicking on the Logger and selecting Delete.
-
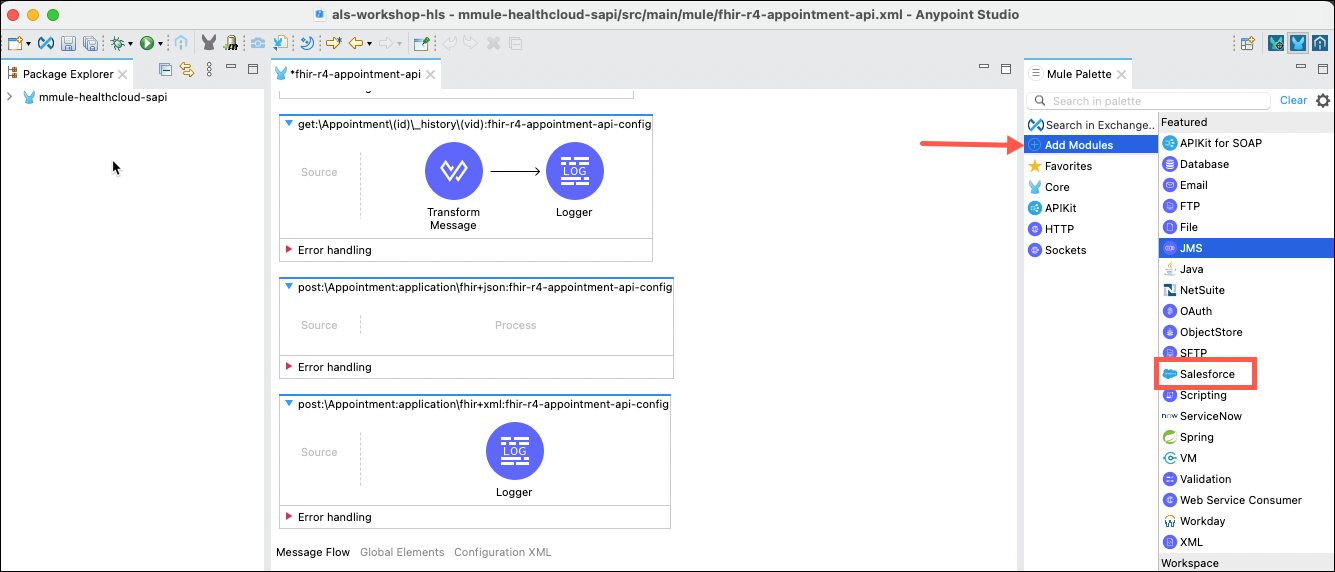
Next you will need to add the Salesforce Connector to this flow. On the right side of the screen in the Mule Palette, click Add Modules. Locate the Salesforce module. Then click on it and drag it into the left section that will change to say: Drag and drop here to add to project.
Note: Select the latest version of the connector if prompted.
Step 4: Configure the Salesforce Connector
-
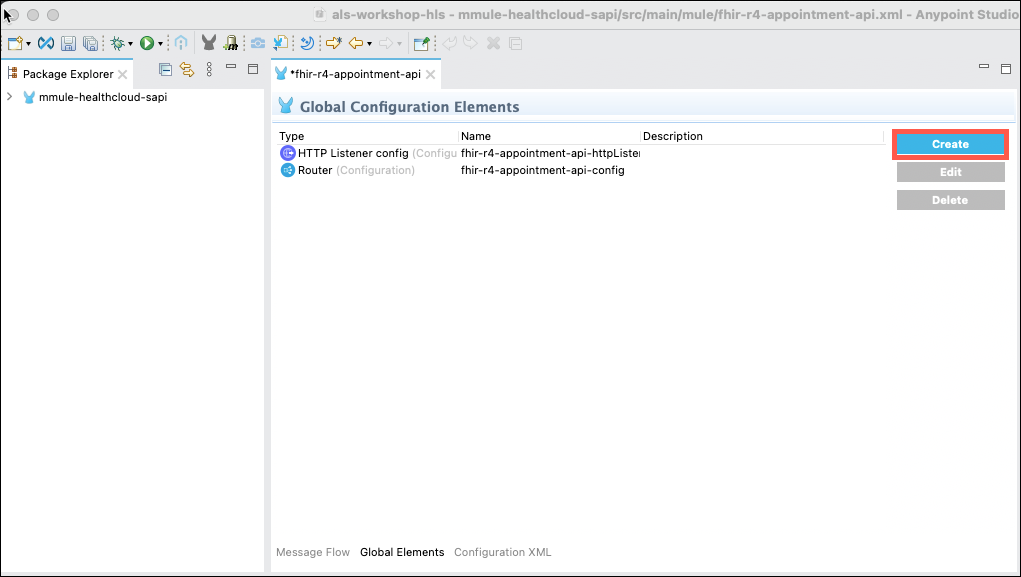
Next you need to configure the connector to connect to the Salesforce instance. Click on the Global Elements tab at the bottom of the flow editor pane.
-
Now click on the Create button to create a new connector configuration for Salesforce.
-
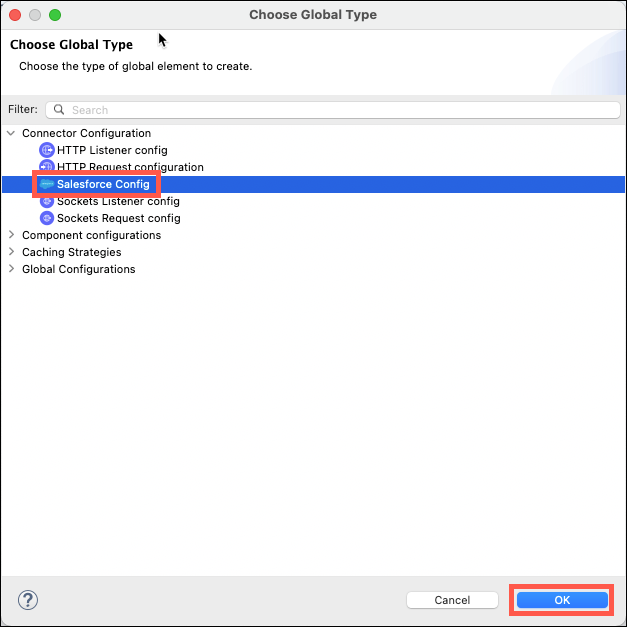
Expand Connector Configuration and then select Salesforce Config and then click OK.
-
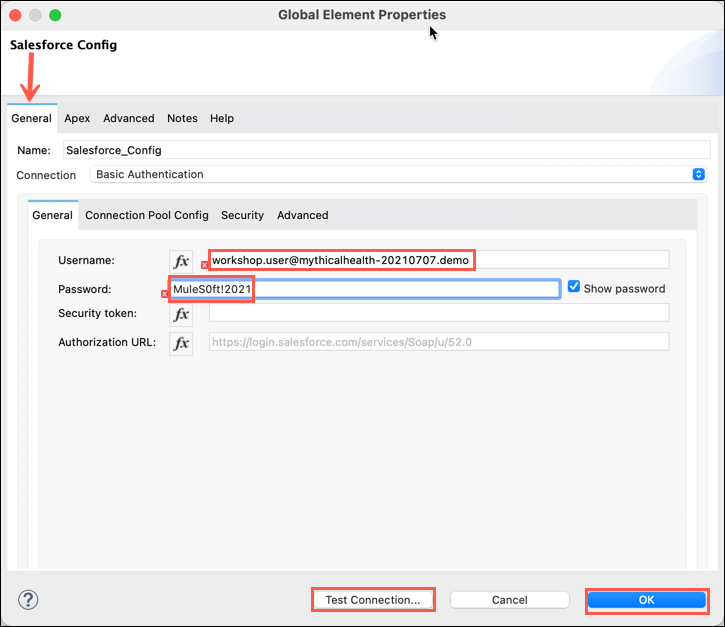
Under the general tab, enter in the username and password for the Salesforce org in the respective fields. This information may be found in the Workshop Setup section of this lab guide.
-
Once entered, click on the Test Connection… button and you should get a successful connection message. Click on the OK button to continue.
-
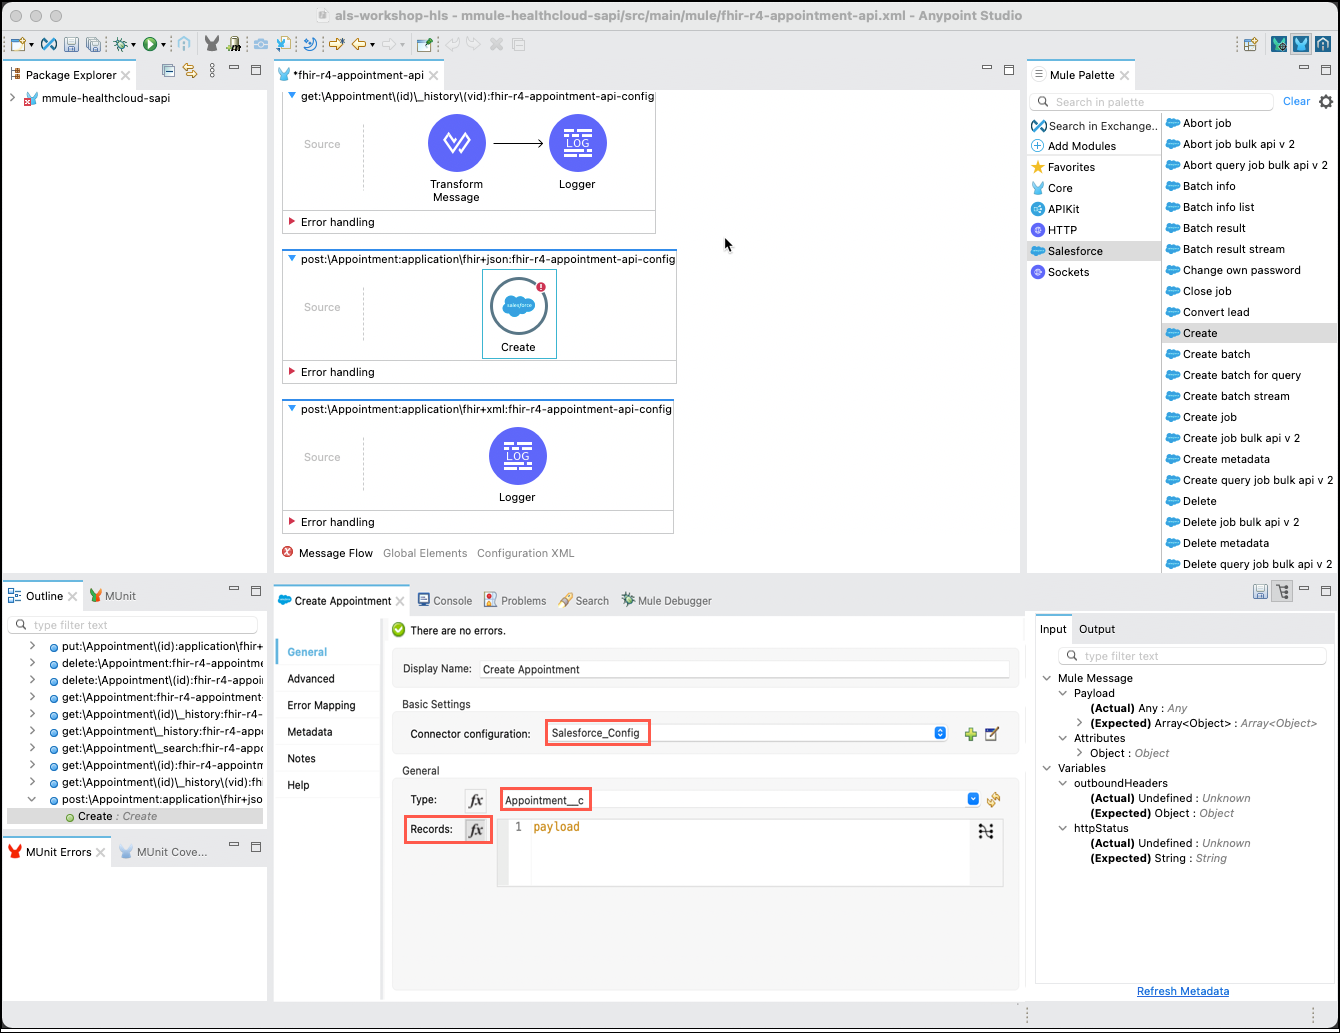
Next, you will need to add a Salesforce Create operation to the flow. Click on the Message Flow tab at the bottom of the flow editor pane. Next, click on Salesforce in the Mule Palette and locate the Create operation. Click and drag the Create operations into the empty post:\Appointment:application\fhir+json:fhir-r4-appointment-api-config flow.

-
Click on the Create connector that you just inserted in order to configure this connector. Note that the Connector configuration is already configured to the Salesforce org that you had set up in the previous step! Set the rest of the values as follows:
Display Name
Create - Appointment
Type
Appointment__c
Records
Payload
Note: Make sure that the fx button next to the Records: field is selected and the word payload appears in orange.
Step 5: Add a Transform Message component
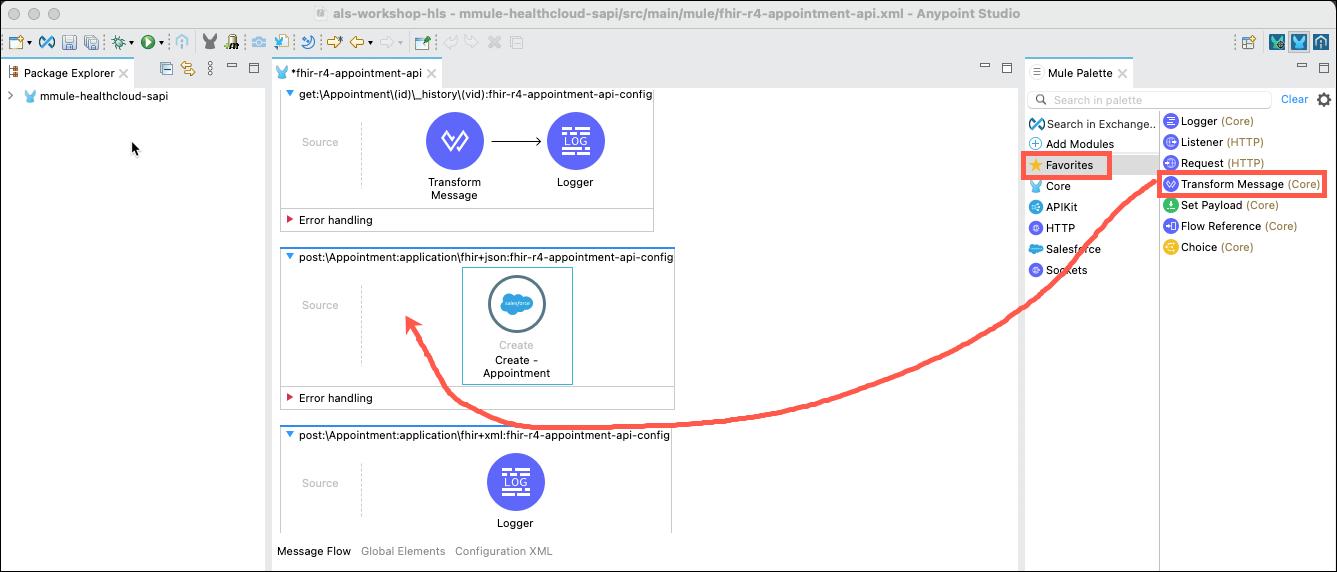
Before you send the payload into the Create - Appointment component you will need to correctly format the payload so Salesforce can accept it. To do this, you will need to add a Transform Message component to format the payload before you send the appointment details to Salesforce Health Cloud.
-
In the Mule palette, click on the Favorites category and then locate the Transform Message component. Drag and drop the Transform Message component immediately before the Create - Appointment component. The component should appear wired to the Create - Appointment component.
-
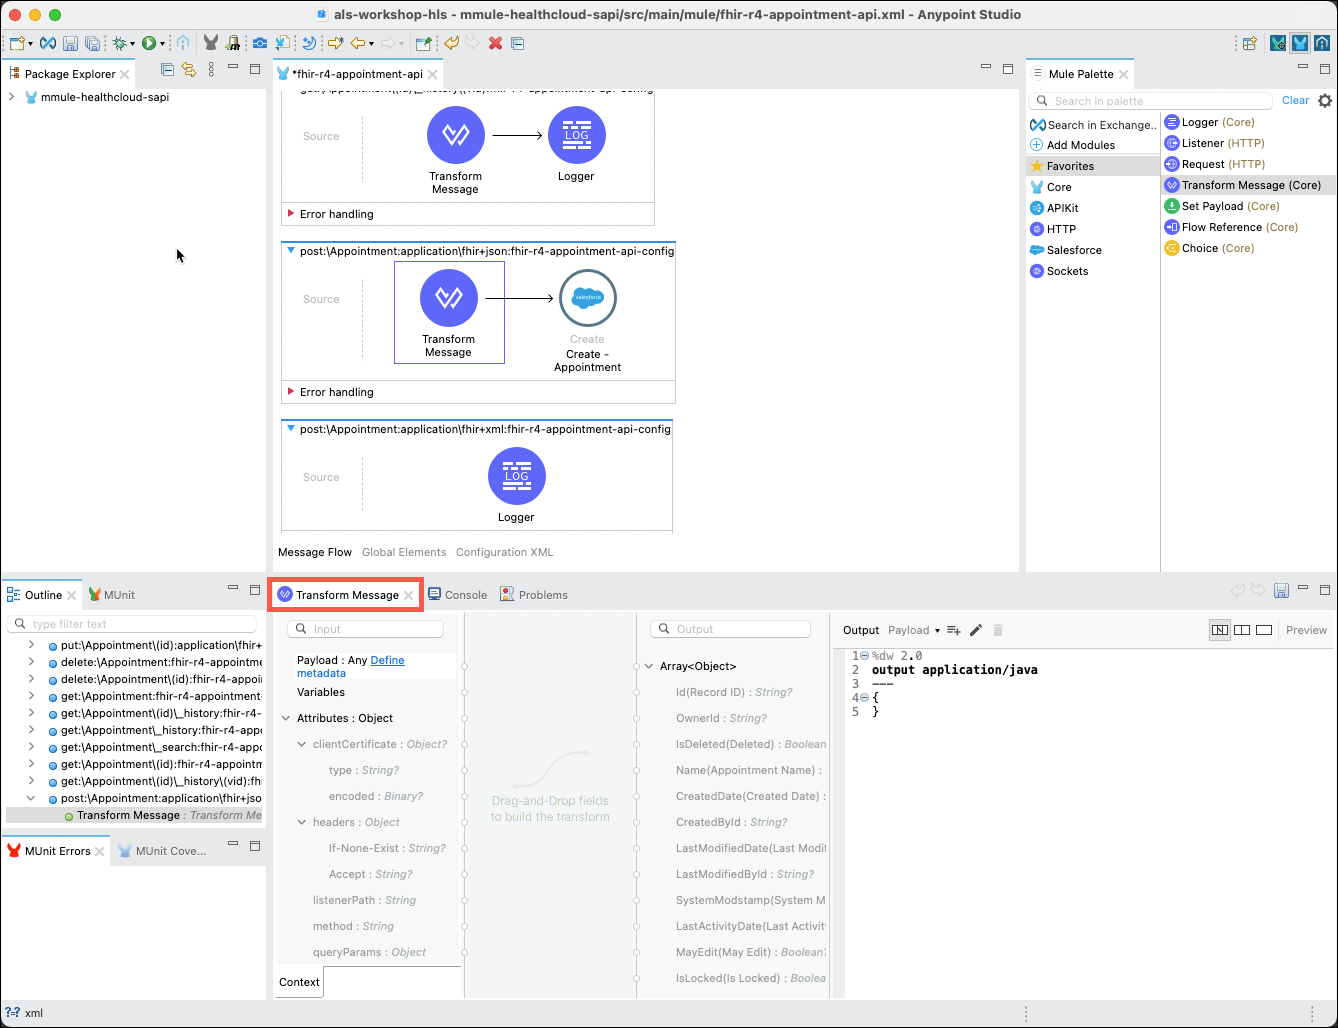
The Transform Messaage property editor should also be displayed. Cick on the Transform Message component if the property editor is not shown.
Step 6: Define or Set Metadata
Although it is not mandatory to add metadata when mapping input data to the output message, adding metadata to the mapping editor enables drag and drop mapping capabilities as well as automatic statement completion in the DataWeave editor.
Metadata may be automatically discovered from adding connectors or API specifications to your project. It is also possible to manually add metadata if none has been automatically discovered or if you would like to add custom metadata to your project. In this case, we will add custom appointment metadata to our project.
Complete the following steps to add metadata to the input side of the Transform Message component.
-
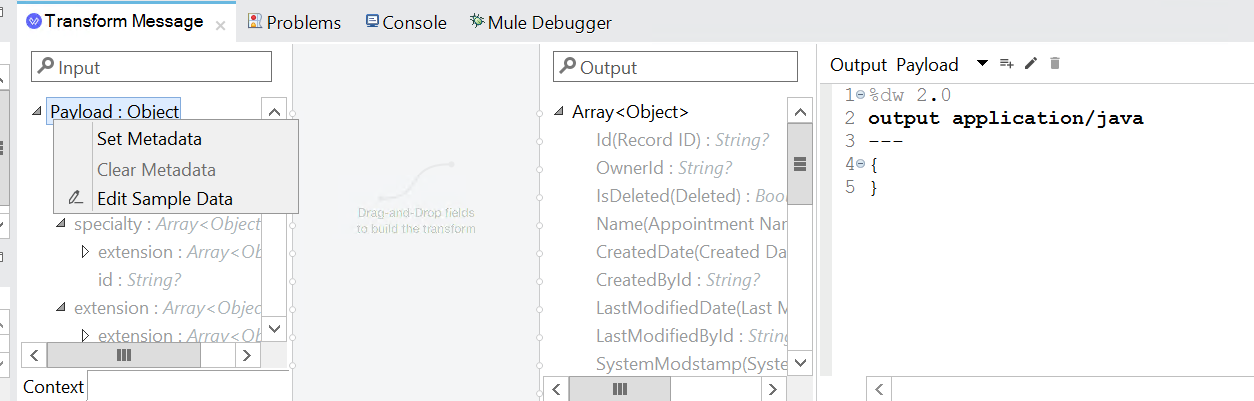
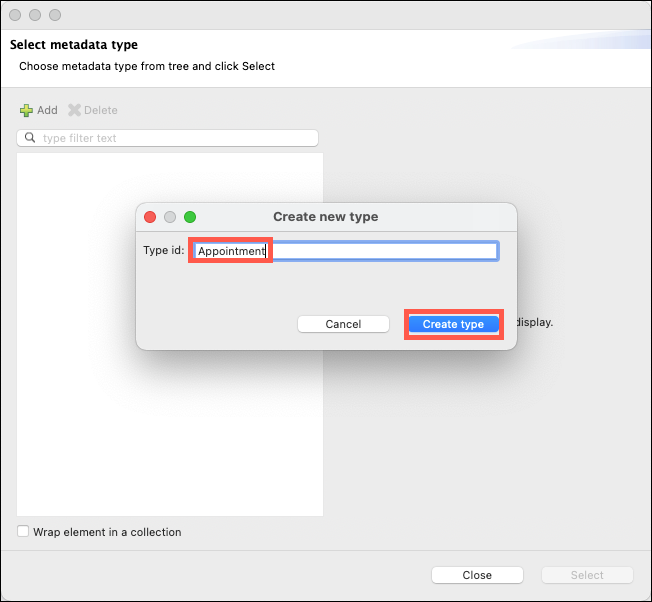
On the left side of the property editor right-click on Payload:Object, then select the Set Metadata link. The Select metadata type window will appear.
-
Click on the Add icon. Enter Appointment in the Type id: field and then click on the Create Type button.
-
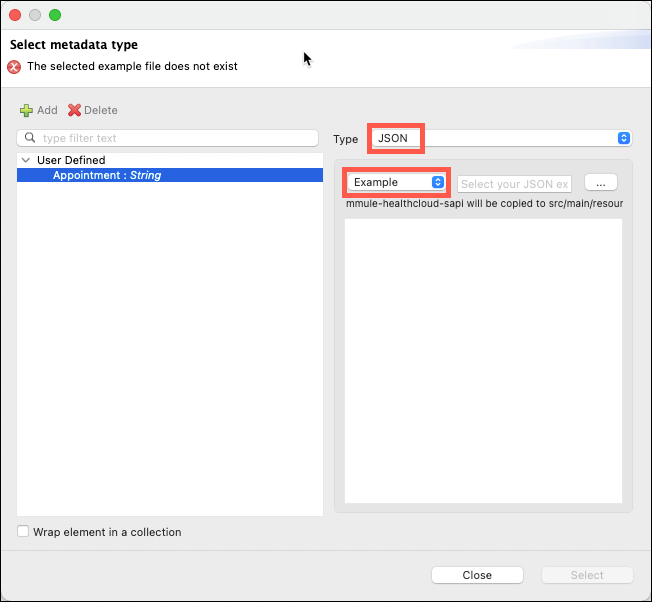
The window will now include additional fields that will enable you to define the metadata. Click on the upper Type drop down list and then select JSON as the type. Once JSON has been selected click on the drop down list that currently has Schema selected and change it to Example.
-
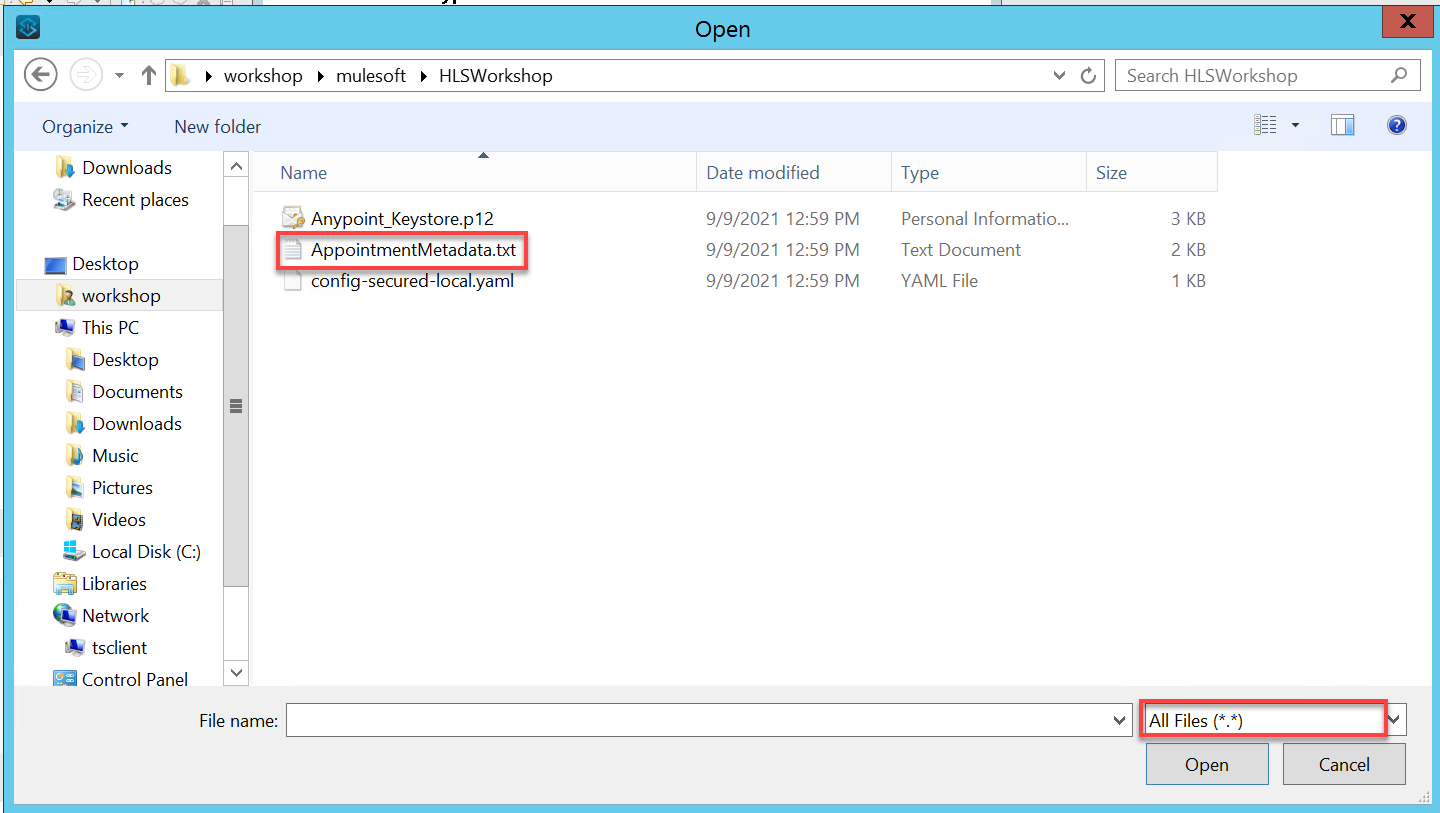
Click on the … (elipse) at the right of the Example drop down list and then choose the AppointmentMetadata.txt file that is in the C:\Users\workshop\mulesoft\HLSWorkshop folder. Click Open. Finish by clicking the Select button.
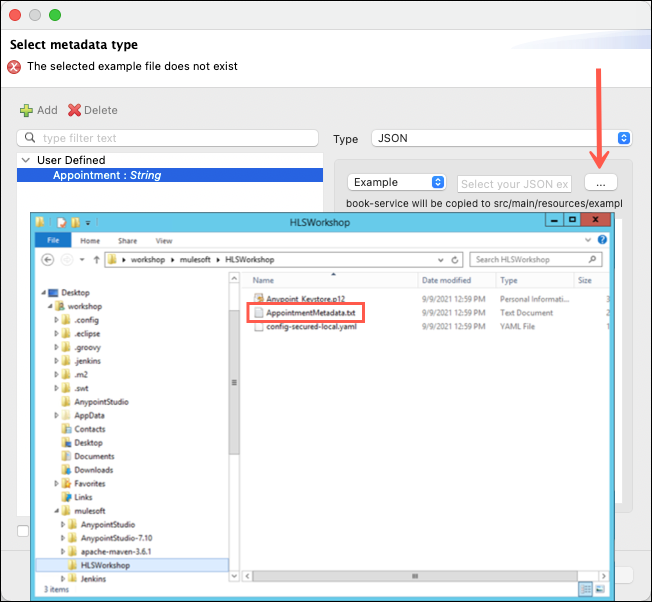
Note: You may need to change the file type selector to All Files (*.*) to view all files.
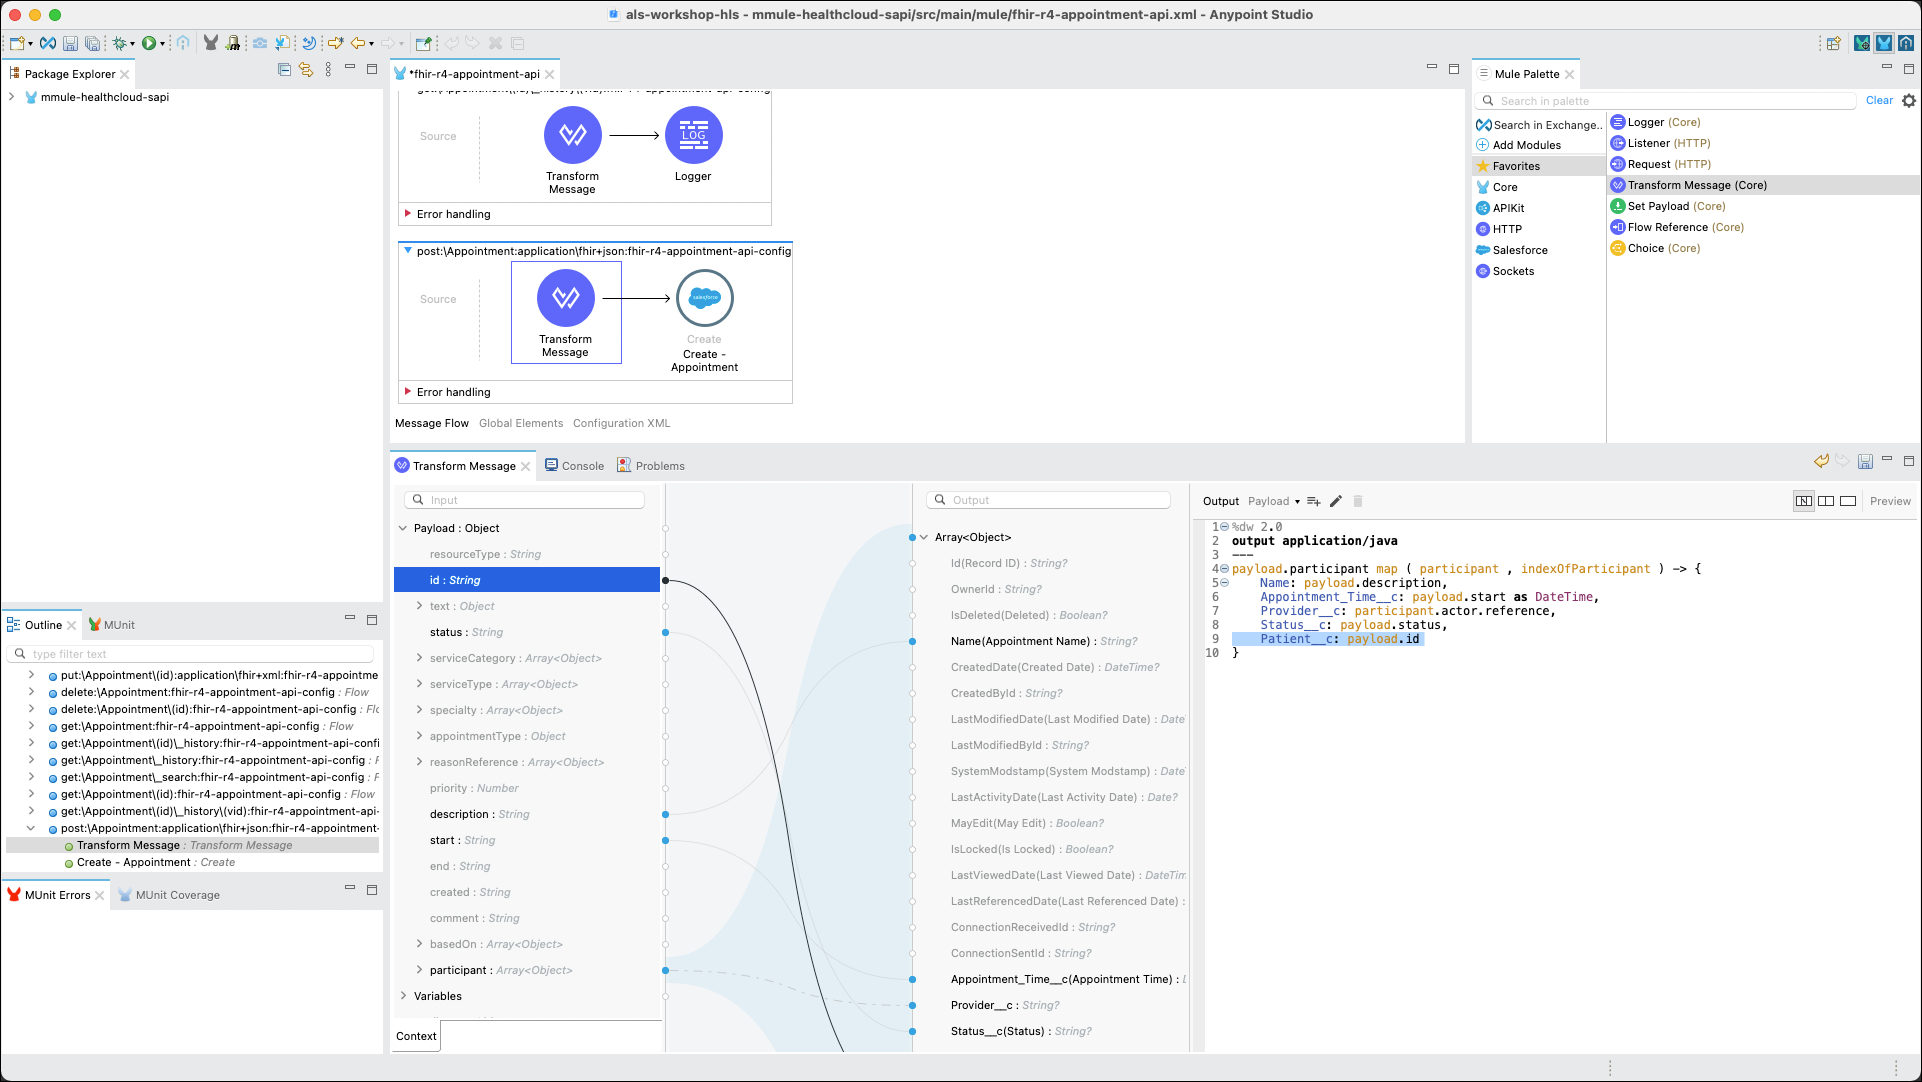
Step 7: Map the Inputs to the Outputs
Option 1: Use drag and drop operations to map the variables:
-
Now that the metadata that describes the incoming payload is defined, drag and drop the following variables from the Input pane to the Output pane. The DataWeave code will automatically be written as you go.
Input
Output
Participant→Actor→Reference
Provider__c
description
Name(Appointment Name)
start
Appointment_Time__c(Appointment Time)
status
Status__c(Status)
id
Patient__c
The DataWeave section of the properties editor should now look like this:
Save your work by clicking on the Save All icon in the Studio toolbar.
Option 2: Directly enter DataWeave mapping rules:
-
In the DataWeave code pane on the right side of the properties editor replace the contents with the following code:
If metadata is available in the Input side of the DataWeave editor you can use automatic statement completion to speed up the process of writing mapping rules. Feel free to experiment with that, however ensure that your project only contains the statements listed below before you save your work. |
%dw 2.0
output application/java
---
payload.participant map ( participant , indexOfParticipant ) -> {
	Name: payload.description,
	Appointment_Time__c: payload.start as DateTime,
	Provider__c: participant.actor.reference,
	Status__c: payload.status,
	Patient__c: payload.id
}-
Save your work by clicking on the Save All icon in the Studio toolbar.
Step 8: Add a Transform Message Component
The response from the Salesforce component needs to be transformed to JSON format. Complete the following steps to transform the payload.
-
Drag and drop another Transform Message component into the flow immediately after the Salesforce Create component.
-
Define the output as application/json.
-
Delete the curly braces {} in the message and type payload.
%dw 2.0
output application/json
---
payload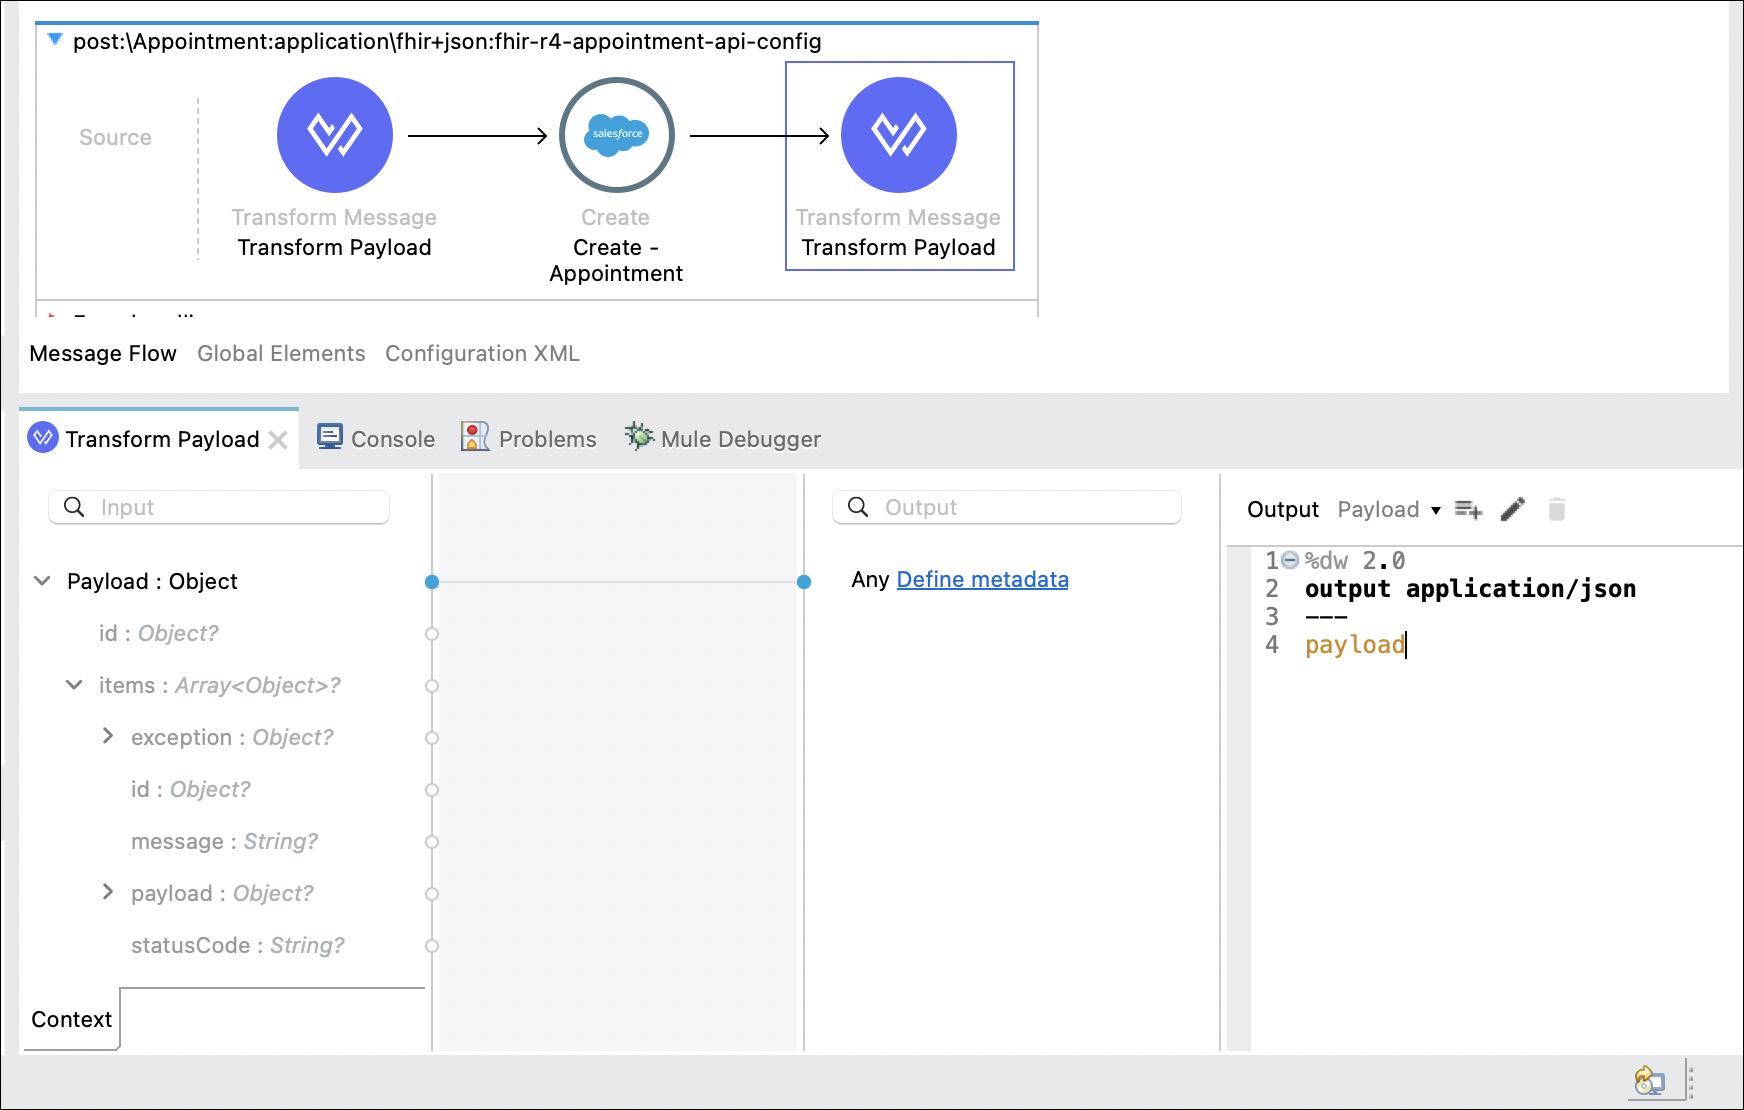
-
Save your work by clicking on the Save All icon in the Studio toolbar.
Optional Lab Exercise: Run and Test your API
-
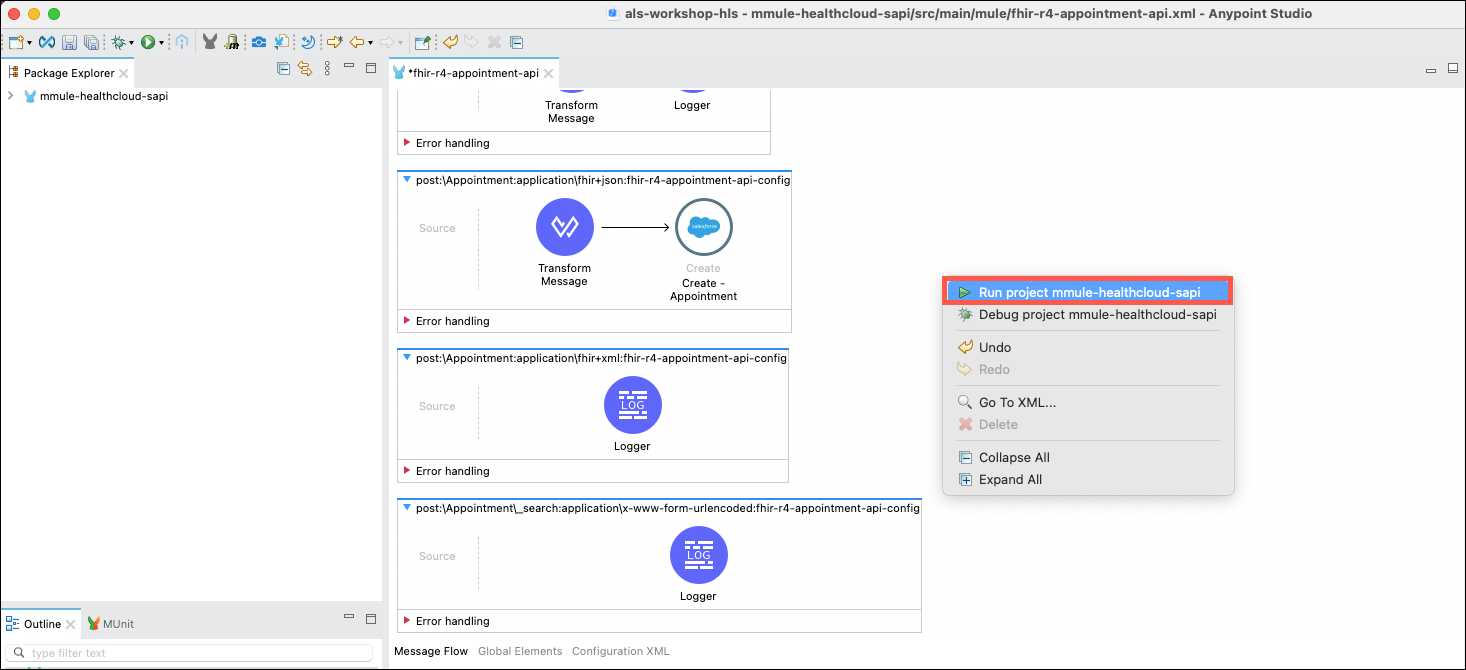
Right click in the canvas and select Run Project.
-
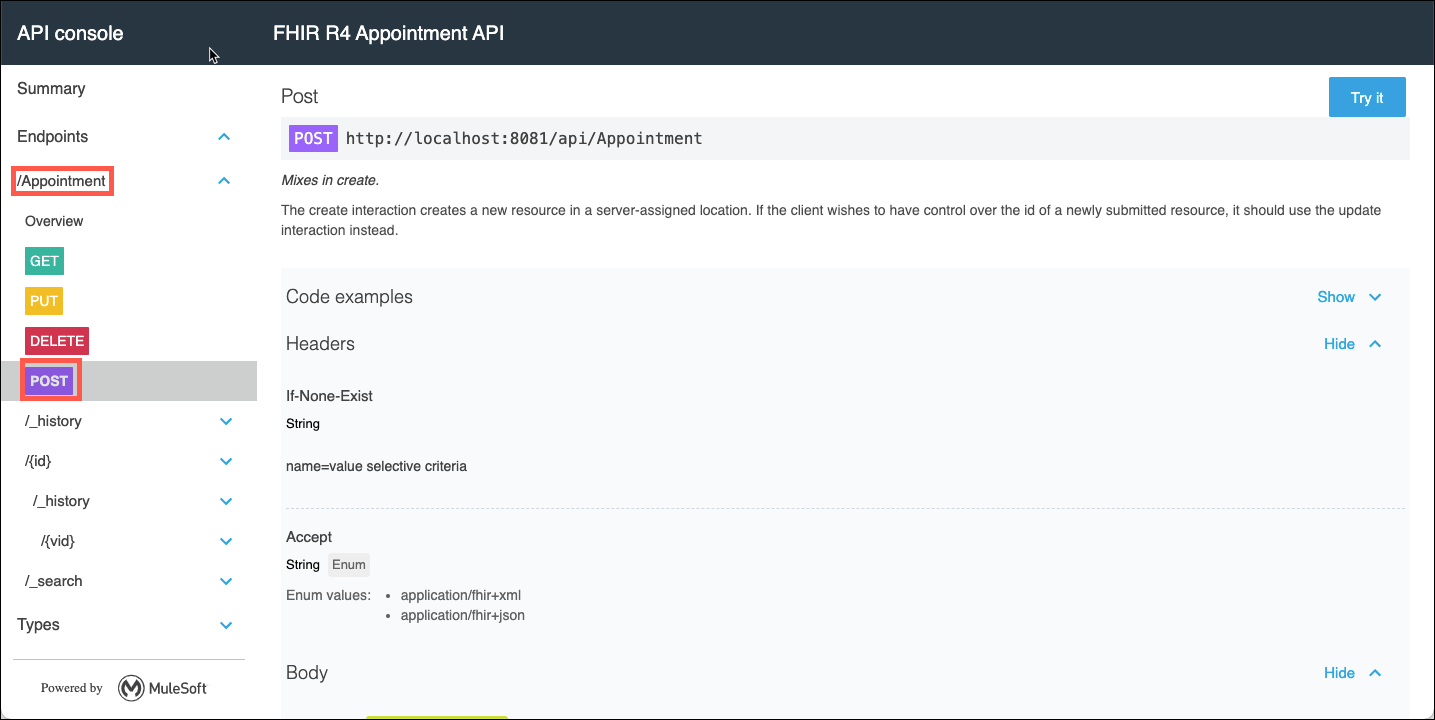
Wait for the project to run and the console to display that your application is deployed. Then, locate the APIkit Console and click on Open Console.
-
The APIKit Console is an automatically generated test tool to enable API developers to test out their flows using a mocking service. This is similar to the mocking service that may be found in Anypoint Design Center or Anypoint Exchange.

-
In the console view expand the /Appointment link that is on the left side of the page. Next click on the POST operation. A description of the POST operation is displayed. Take a moment to review it.
-
To test out your API select the Show optional headers checkbox under the Headers section. Use the Add button as necessary and modify the following headers:
Accept: application/fhir+json
Header name: Content-Type
Header value: application/fhir+json
-
Also, under the Body content type drop down list select application/fhir+json. Lastly, enter the following for the body:
{
"id": "0015e00000CtBhcAAF",
"status": "booked",
"description": "Dermatology Appointment",
"start": "2021-10-16T18:50:39.391336Z",
  "participant": [
    {
      "actor": {
        "reference": "0035e000009jpKjAAI",
        "display": "Peter James Chalmers"
      },
      "required": "required",
      "status": "accepted"
    }
  ]
}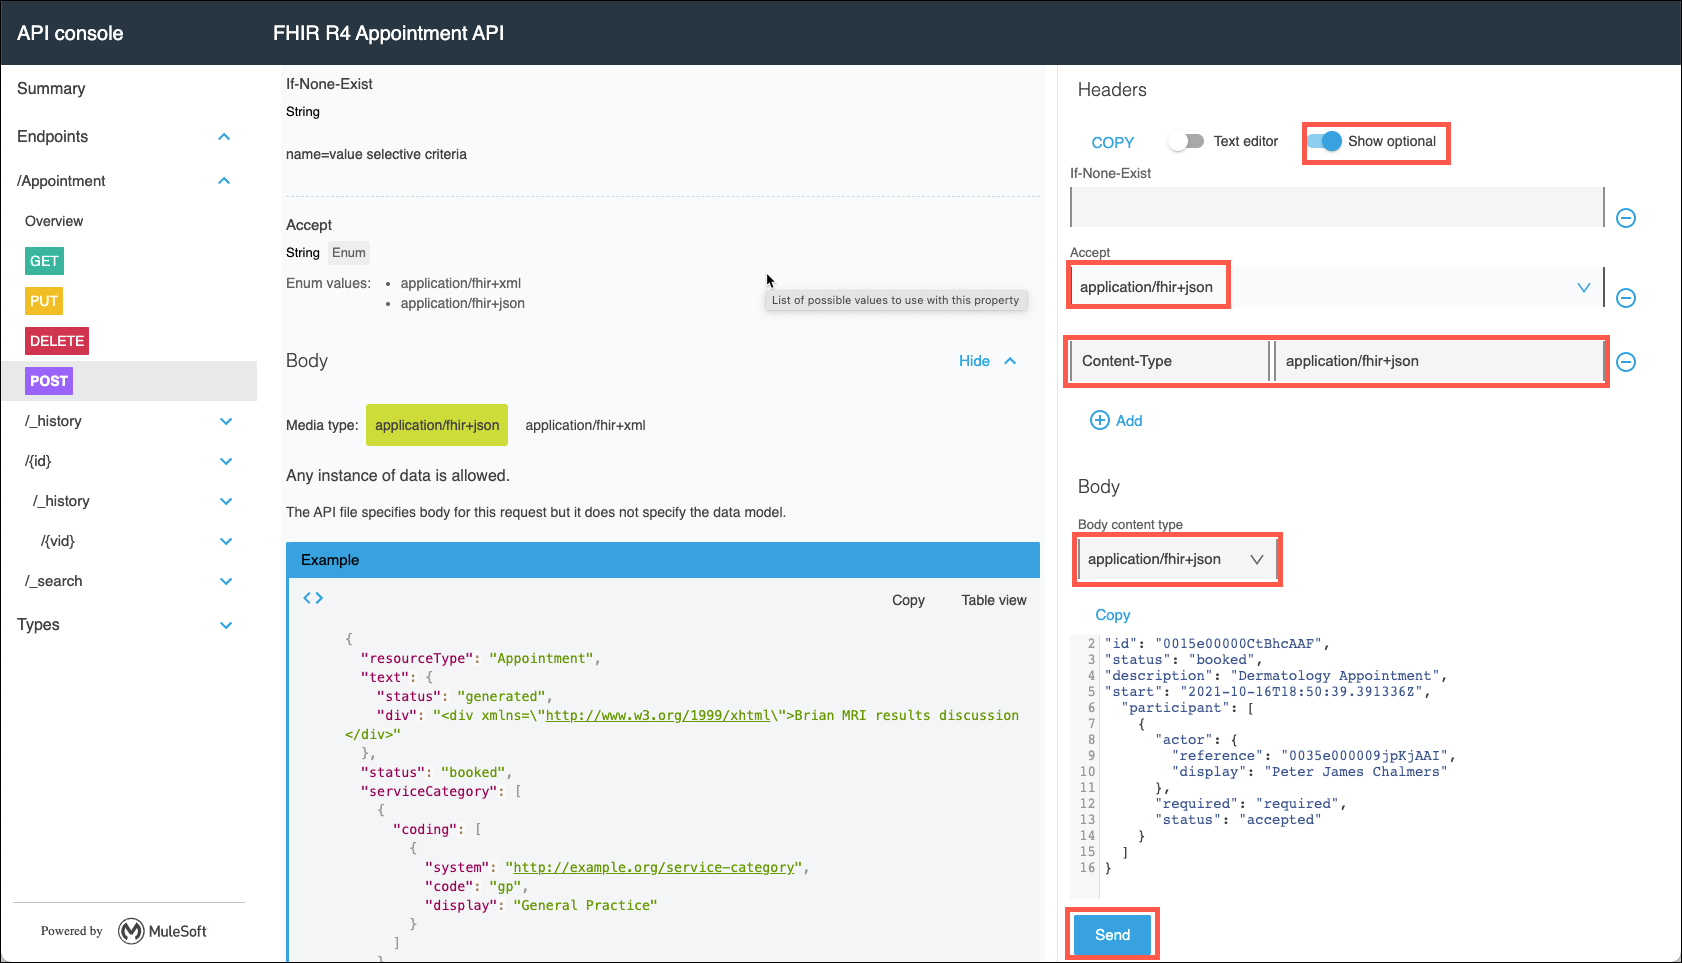
-
Now click Send, and you should receive a 200 OK success status code!
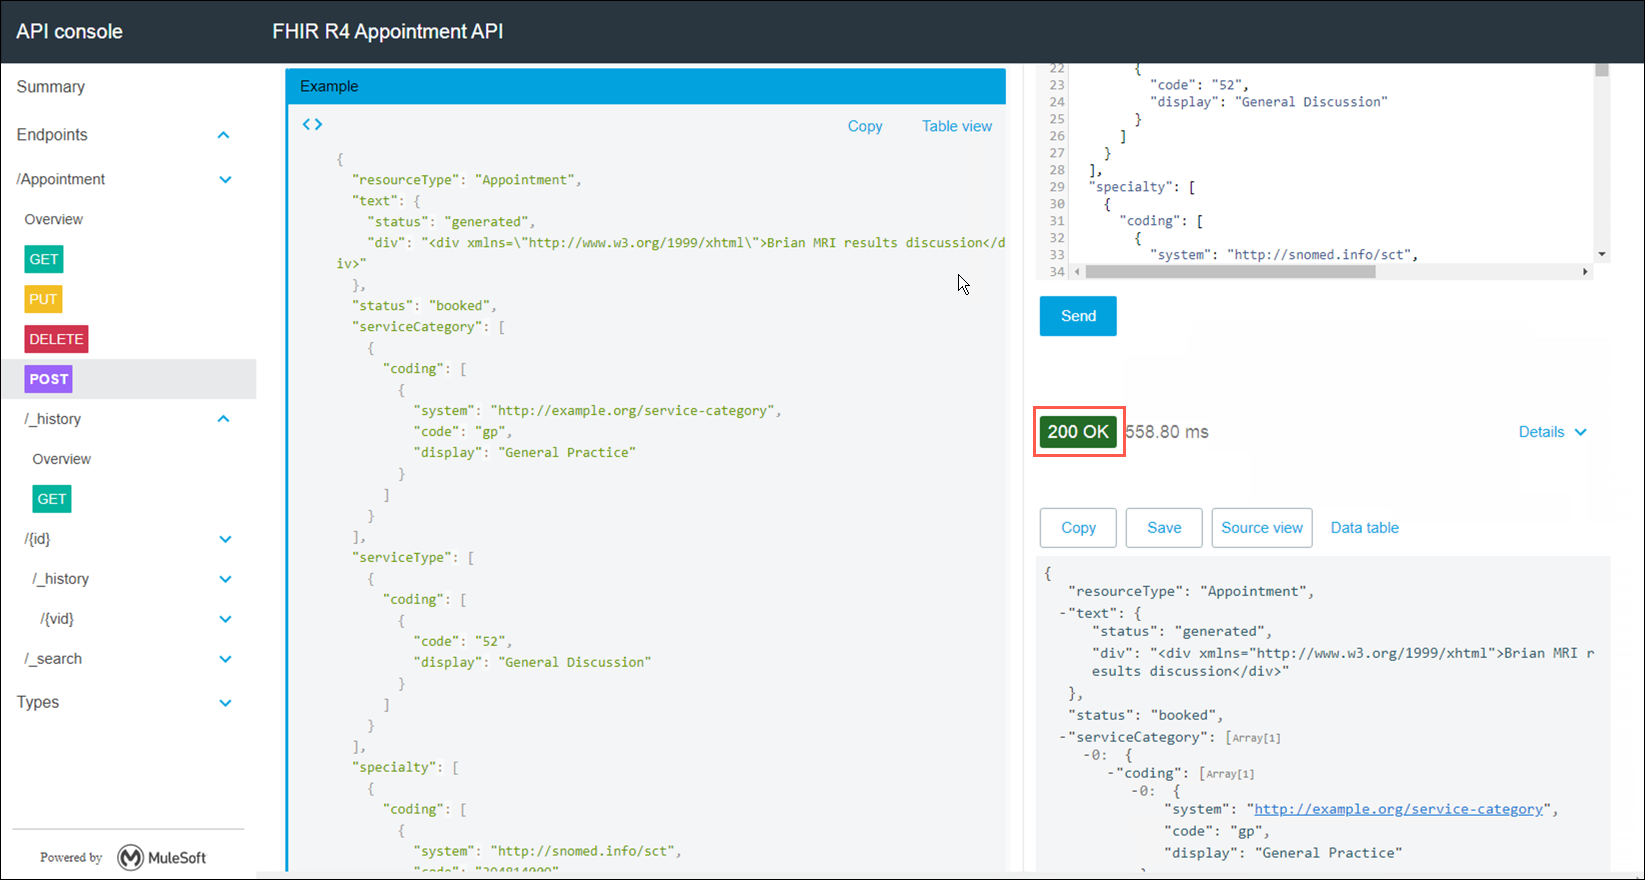
Congratulations! You have successfully tested your new System API that connects to Salesforce Health Cloud.
Summary
In this lab you have seen how to create a connection to an instance of Salesforce Health Cloud using an accelerator from Anypoint Exchange. Anypoint Exchange has 100’s of accelerators, templates and connectors that can significanlty reduce the amount of time that it takes to integrate applications.
Please proceed to Lab 7 in the HLS Industry Module.