Lab 7: Create a Process API to Create Appointments in Salesforce Health Cloud.

Overview
Scenario
Now that the appropriate System APIs have been created you will need to create a Process API that will enable a patient or MHS staff member to create an appointment in Salesforce Health Cloud. Note that if the patient does not have a current profile in the Salesforce System a new profile will be created as a part of this Process API.
Learning Objectives
Lab participants will be introduced to the following features:
-
The ability to use Anypoint Exchange to locate the System APIs that were created earlier in this workshop.
-
The use of Anypoint Studio to implement the process API as well as test its functions via the built-in MuleSoft runtime and debugger.
-
The use of the APIkit console to test out your API as you are working on it.
Step 1: Search Anypoint Exchange for an appointment scheduling API
-
Login to Anypoint Platform and click on the Exchange button.

-
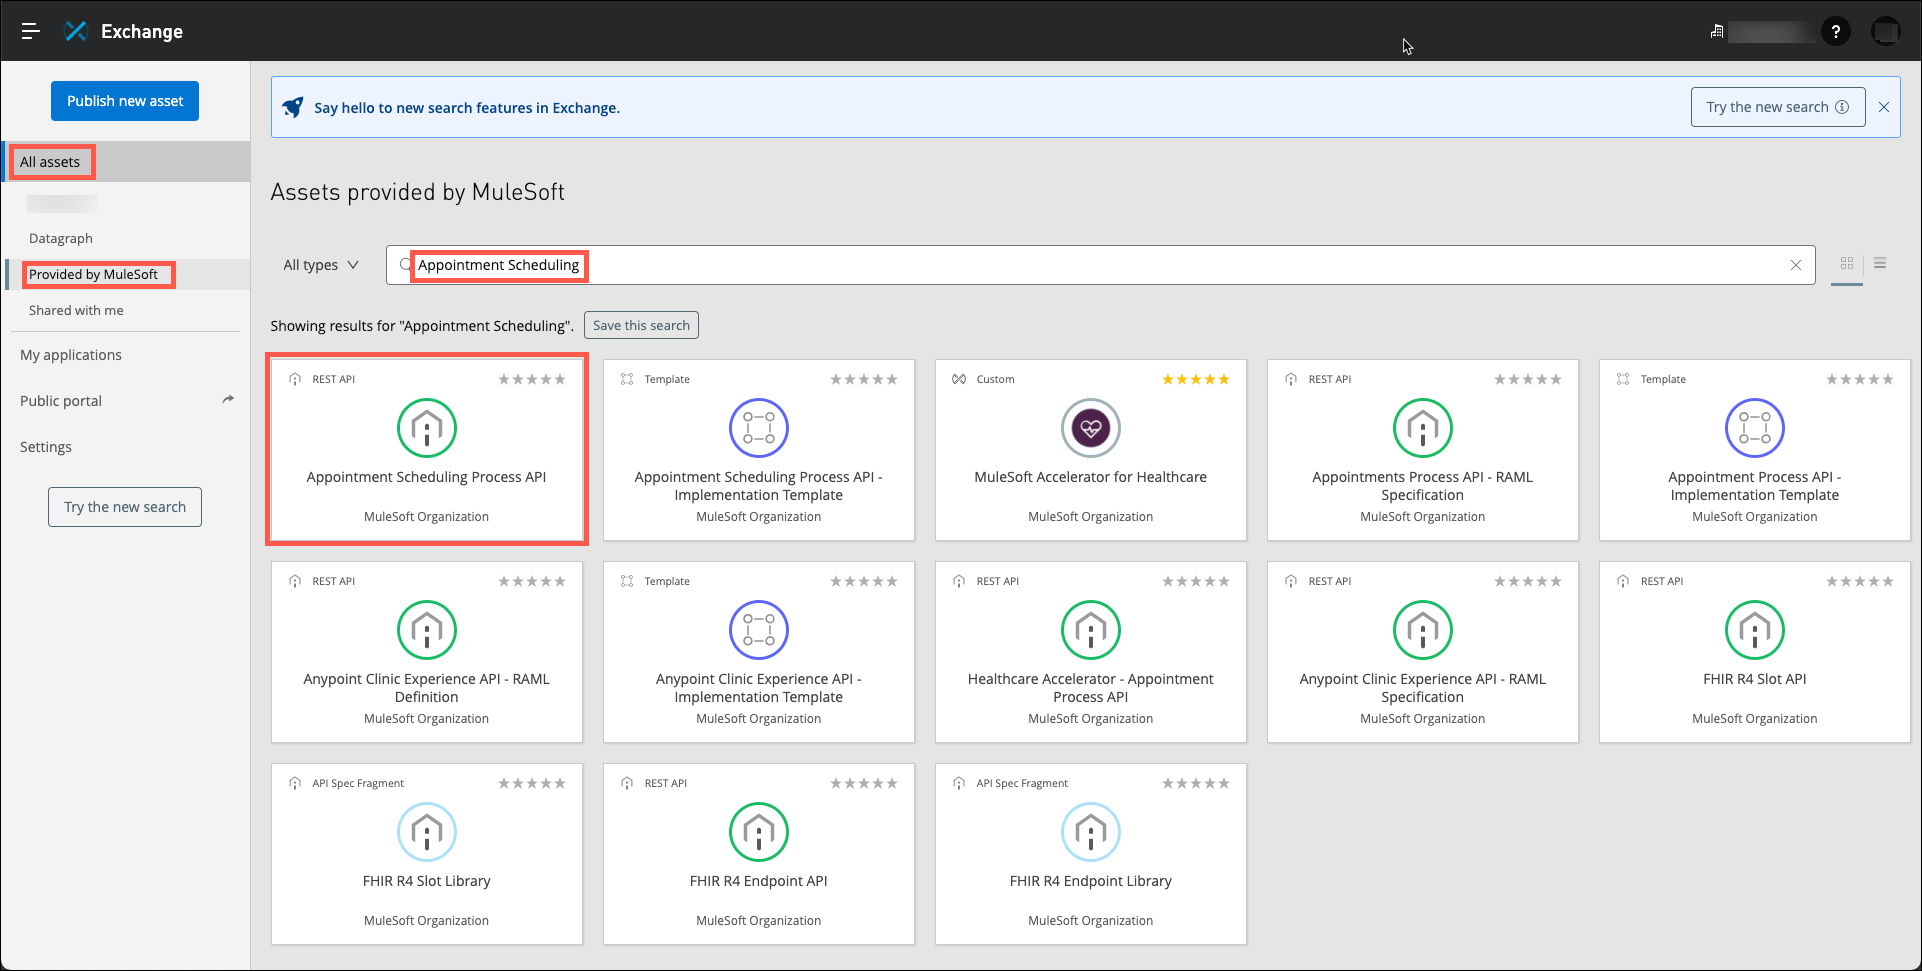
Click on All Assets→Provided by MuleSoft and search for the Appointment Scheduling API. This API is provided by MuleSoft as a part of the MuleSoft Acclerator for Healthcare. Click on the Appointment Scheduling Process API to view its details.
-
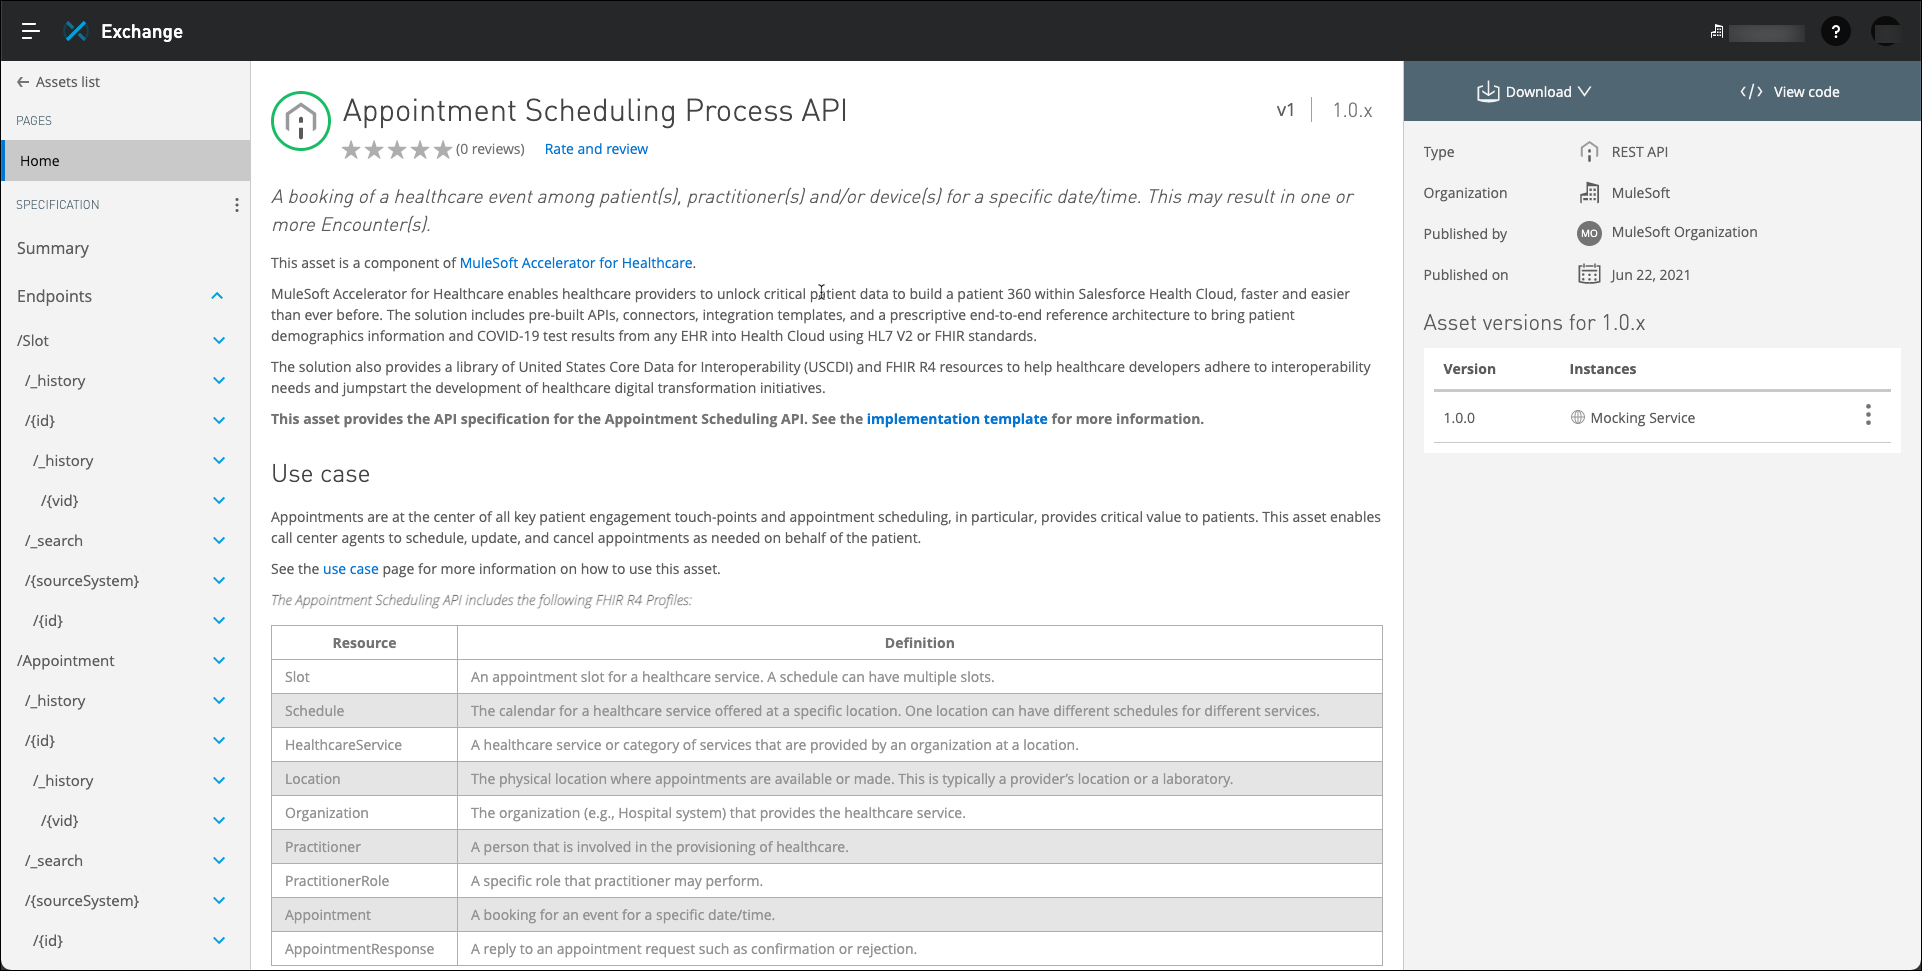
This takes you to the home page for Appointment Scheduling Process API where you can read the overview and use cases. Take a moment to review the documentation.
-
So, it looks like this API has all of the functions that you need. In order to implement it you will use Anypoint Studio to download the API and create a new project with all of the functions "scaffolded" (templated) out for you.
Step 2: Implement the API in Anypoint Studio
-
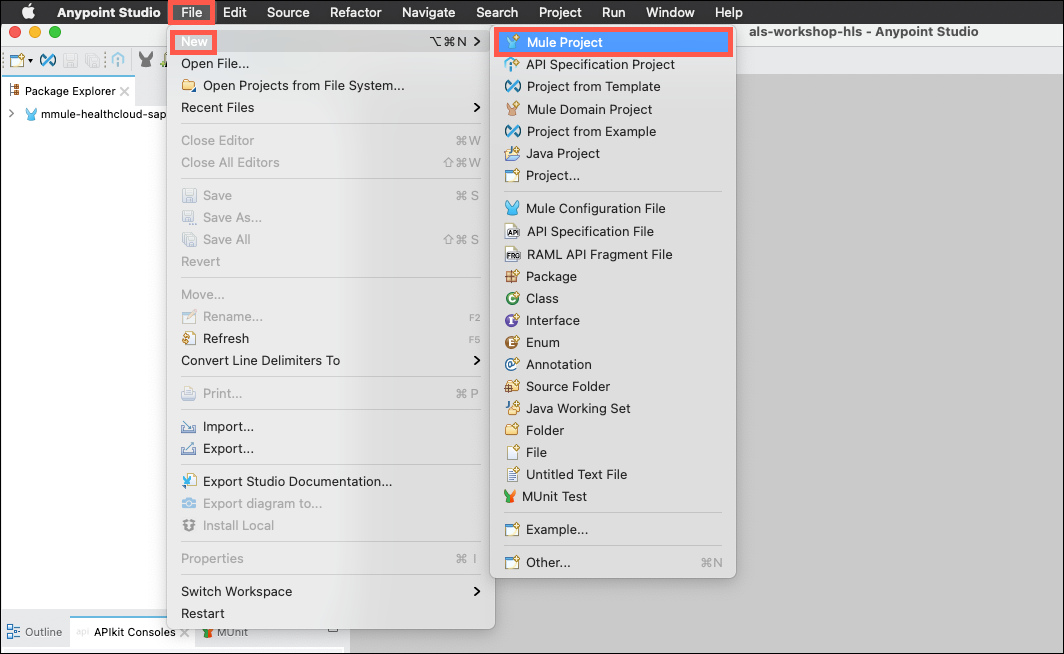
Open Anypoint Studio and then click on File→New→Mule Project to start your work.
-
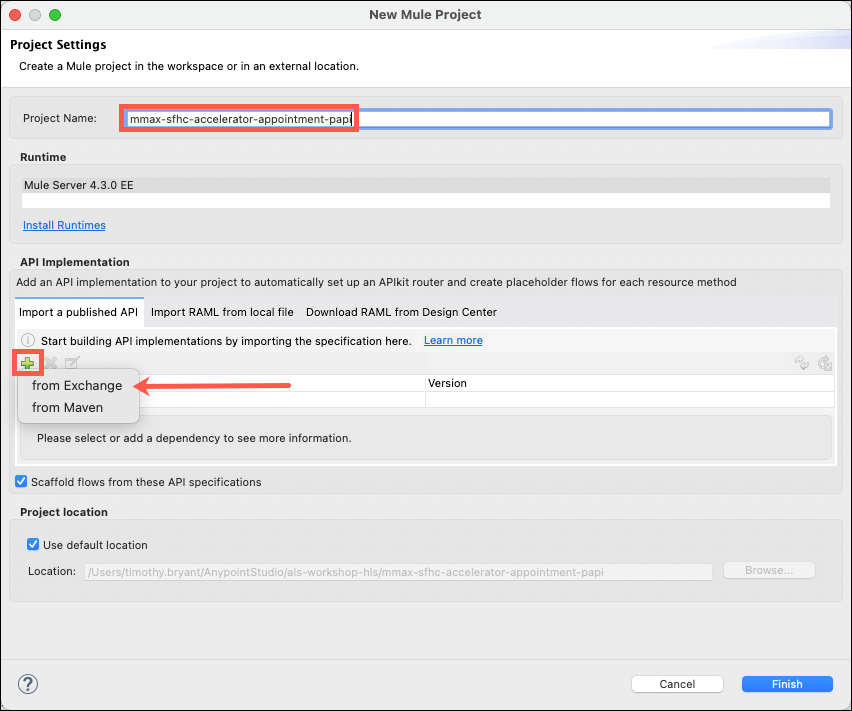
Name your project <FInitialLastName>-sfhc-accelerator-appointment-papi For example, Max Mule would name his project mmule-sfhc-accelerator-appointment-papi.
Under API Implementation, click on the green plus icon + and select from Exchange.
-
A window will appear titled Add Dependencies to Project.
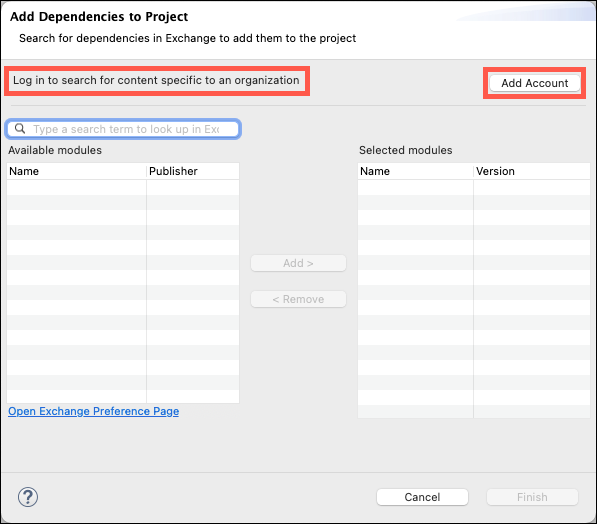
Note: If you see Log in to search for content specific to an organization immediately below the title line you will need to login to the Anypoint Platform. Click on the Add Account button and enter your Anypoint Platform credentials to continue.
-
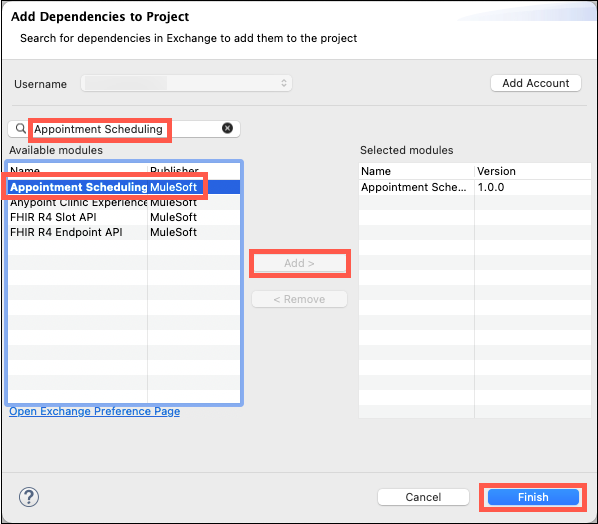
In the Search bar of the Add Dependencies to Project window, type in Appointment Scheduling and press enter. Select the Appointment Scheduling Process API published by MuleSoft, and then click Add and Finish. Once your dependency loads, click Finish on the Project Settings dialog.
Anypoint Studio will go through a number of steps to create your API and "scaffold" (create a template) of all of the resources and operations associated with the API specification that you had downloaded. Once this process has completed the outline of the scaffolded project will be displayed.
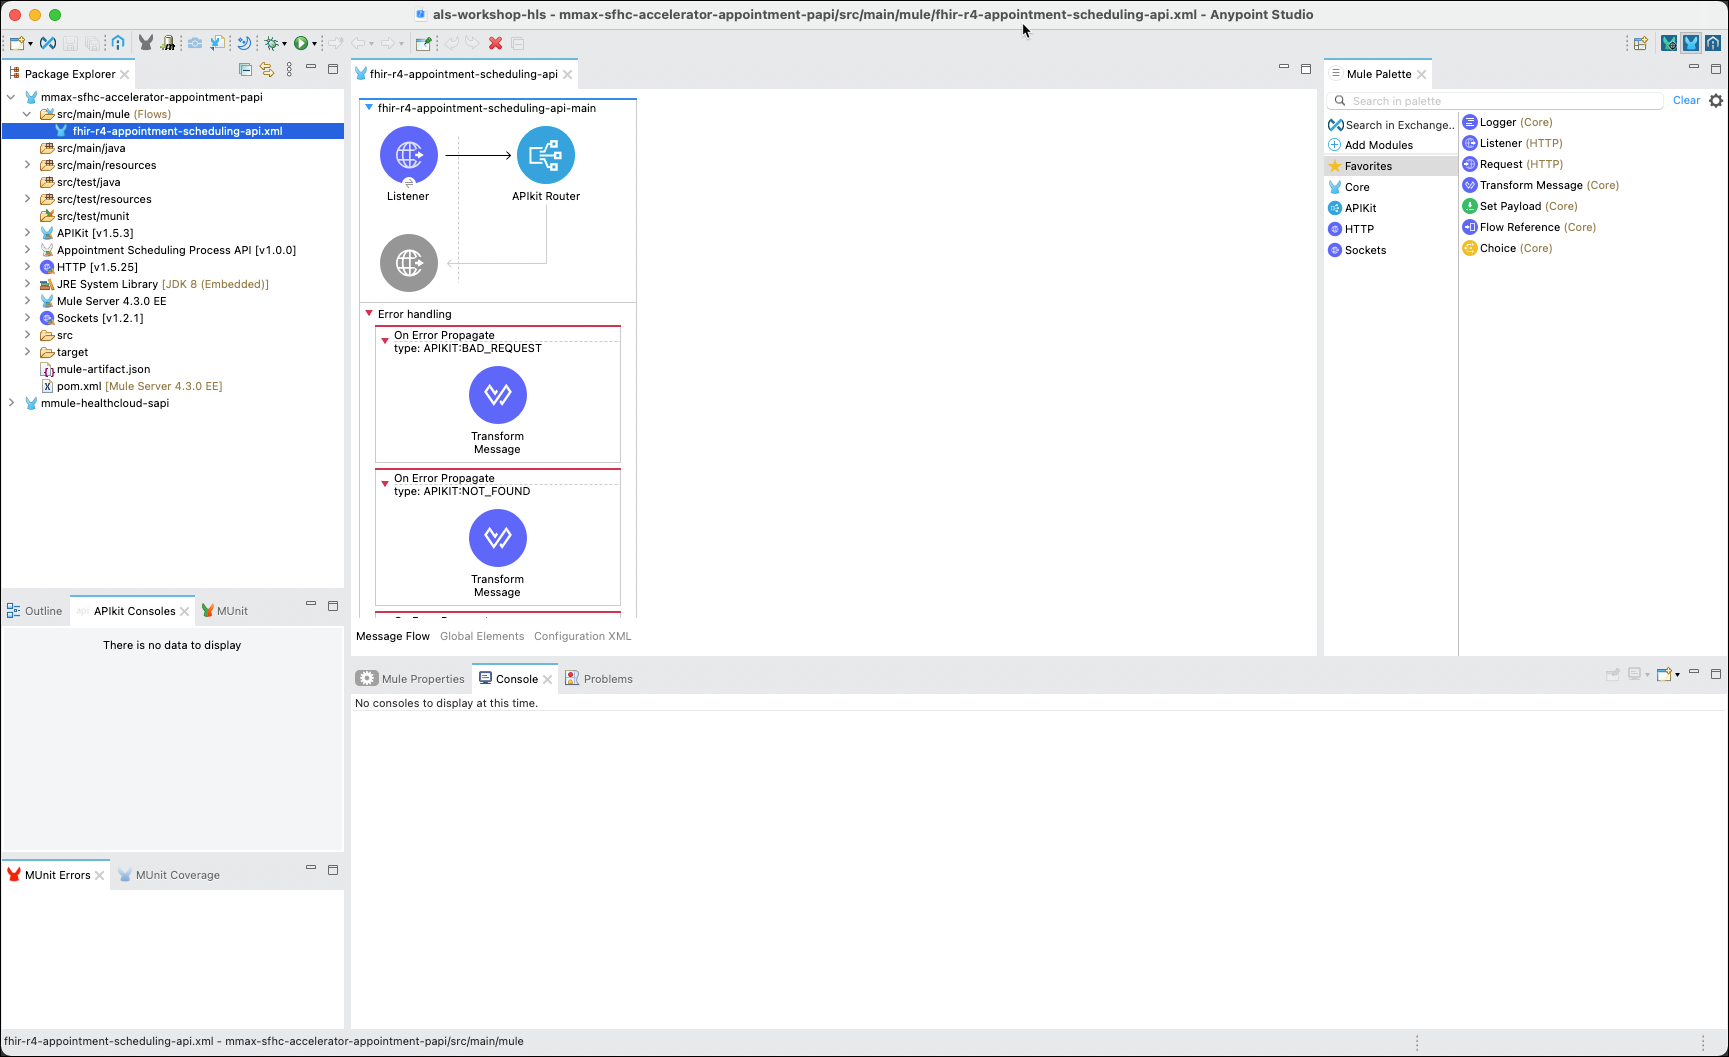
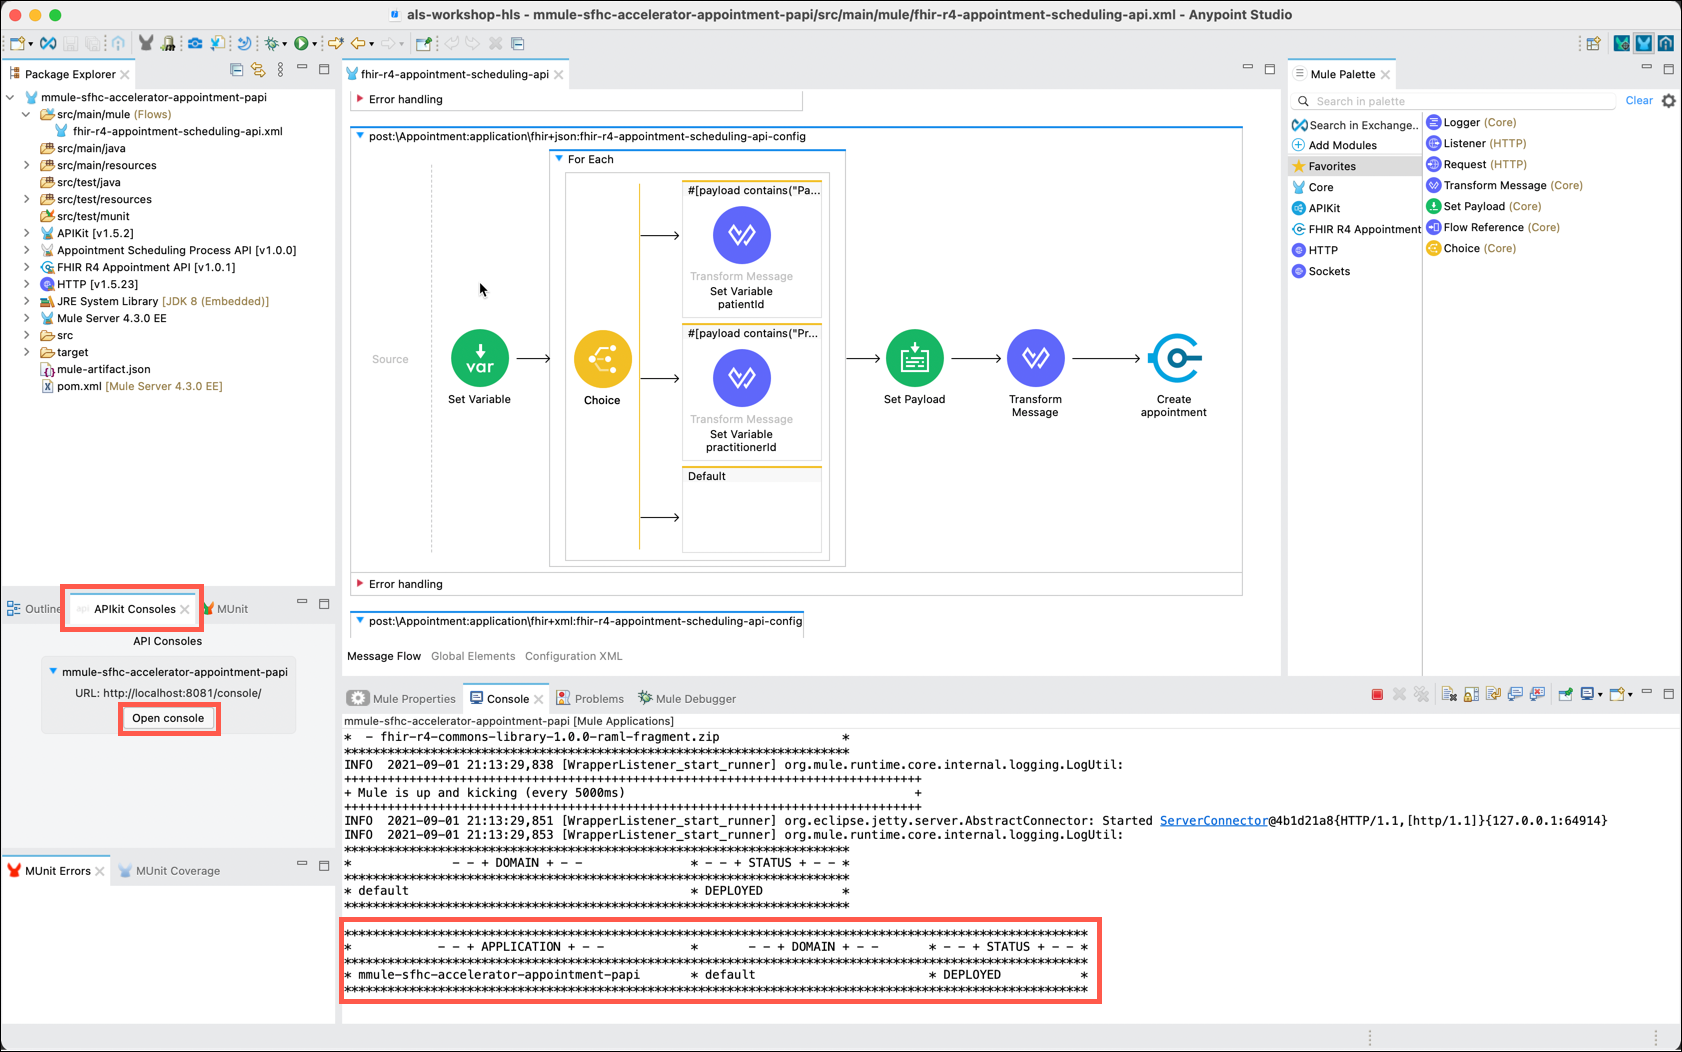
Note: Your API outline can be located in the Package Explorer by expanding your project, expanding src/main/mule, and selecting fhir-r4-appointment-scheduling-api.xml
Step 3: Add System APIs to the Project
-
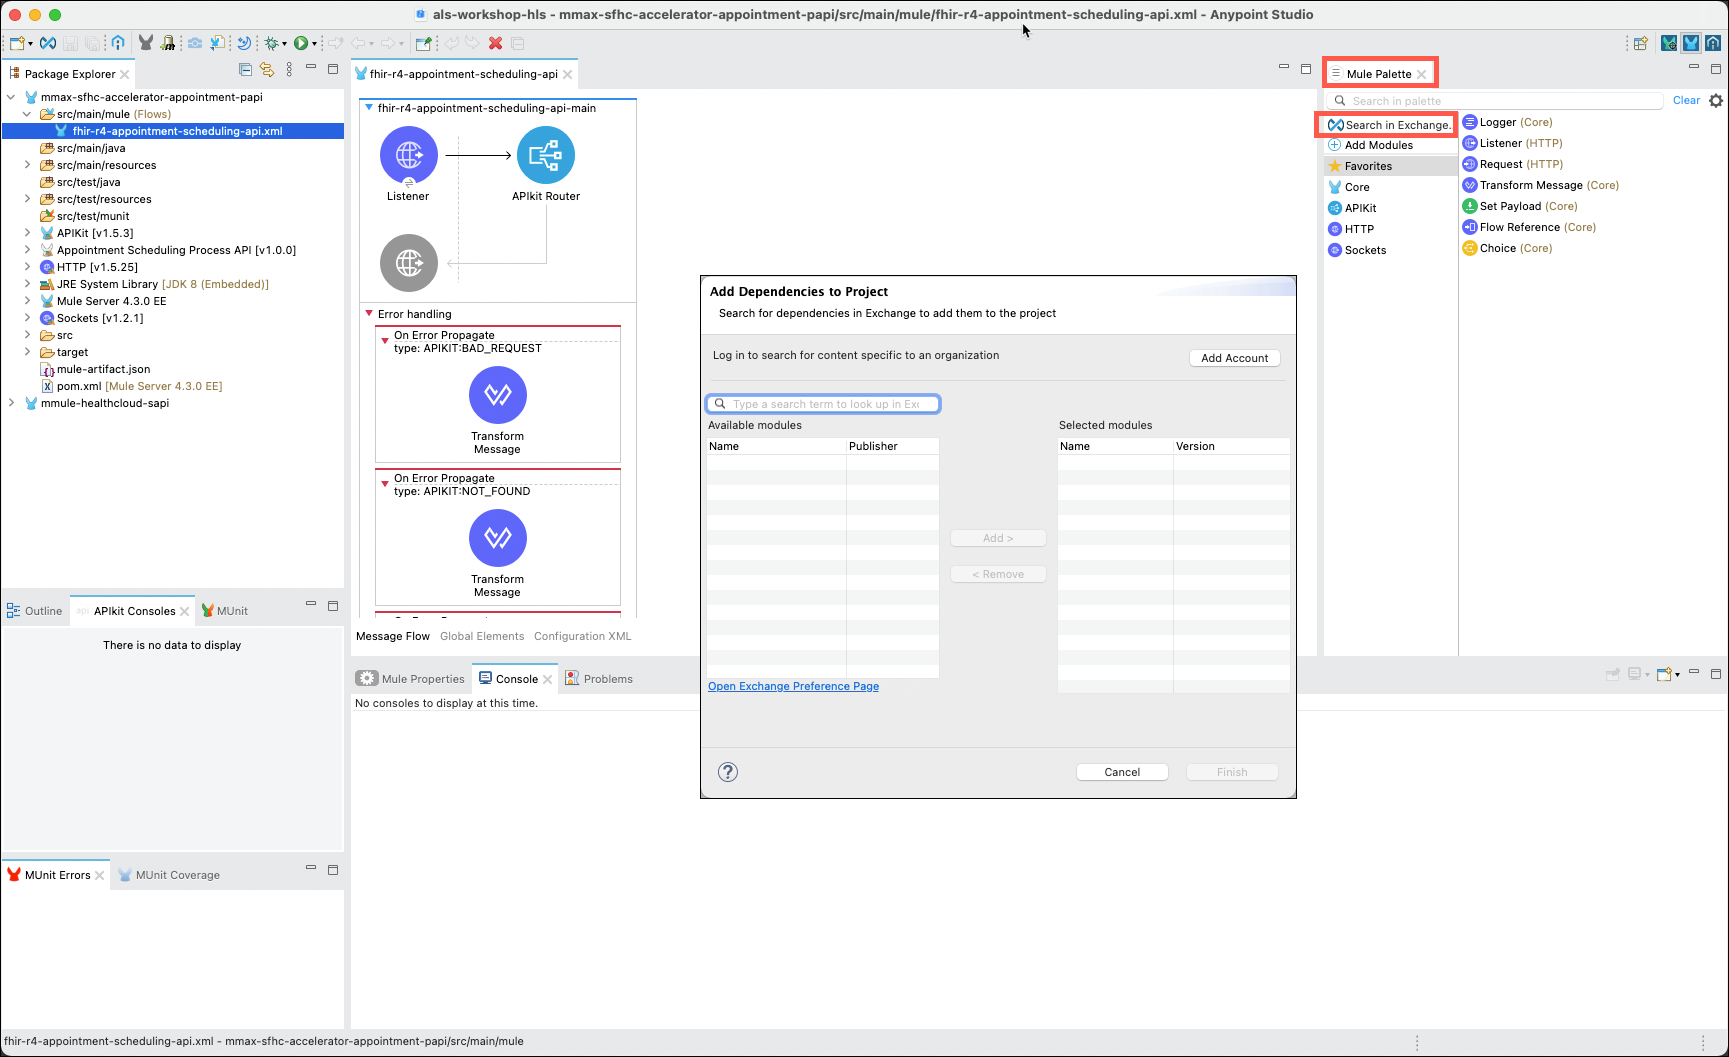
In the upper right of Studio locate the Mule Palette tab and click on Search in Exchange…. The Add Dependencies to Project window will reappear.
-
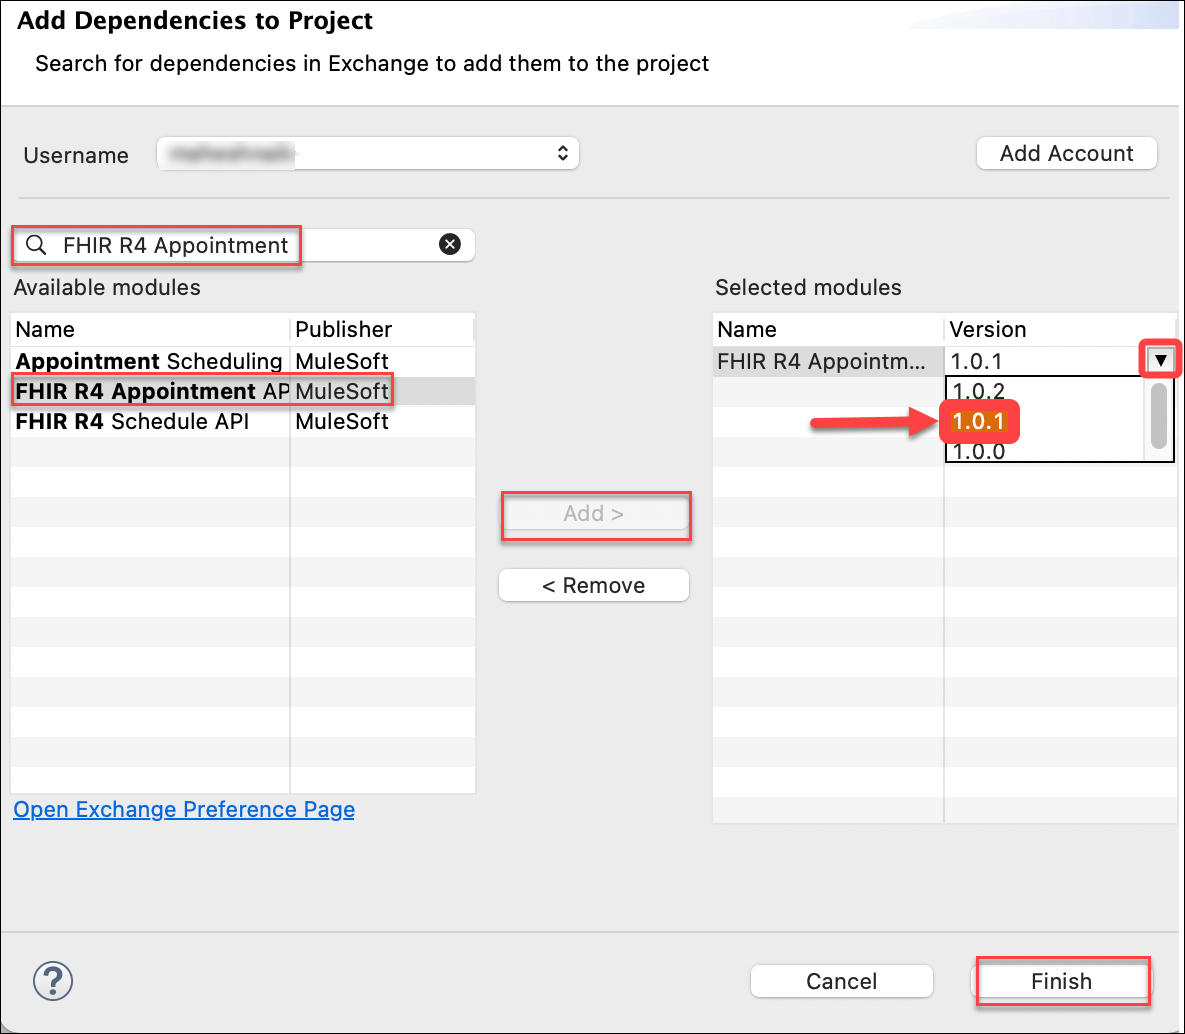
In the Search bar of the Add Dependencies to Project window, type in FHIR R4 Appointment and press enter. Select the FHIR R4 Appointment API that is published by MuleSoft and then click on the Add button. Under Selected modules → Version select the drop down and choose version 1.0.1. Click on the Finish button to close the Add Dependencies to Project window.
This will load all of the artifacts associated with the FHIR R4 Appointment API into your Mule Palette.
Step 4: Implement the post:\Appointment Flow
-
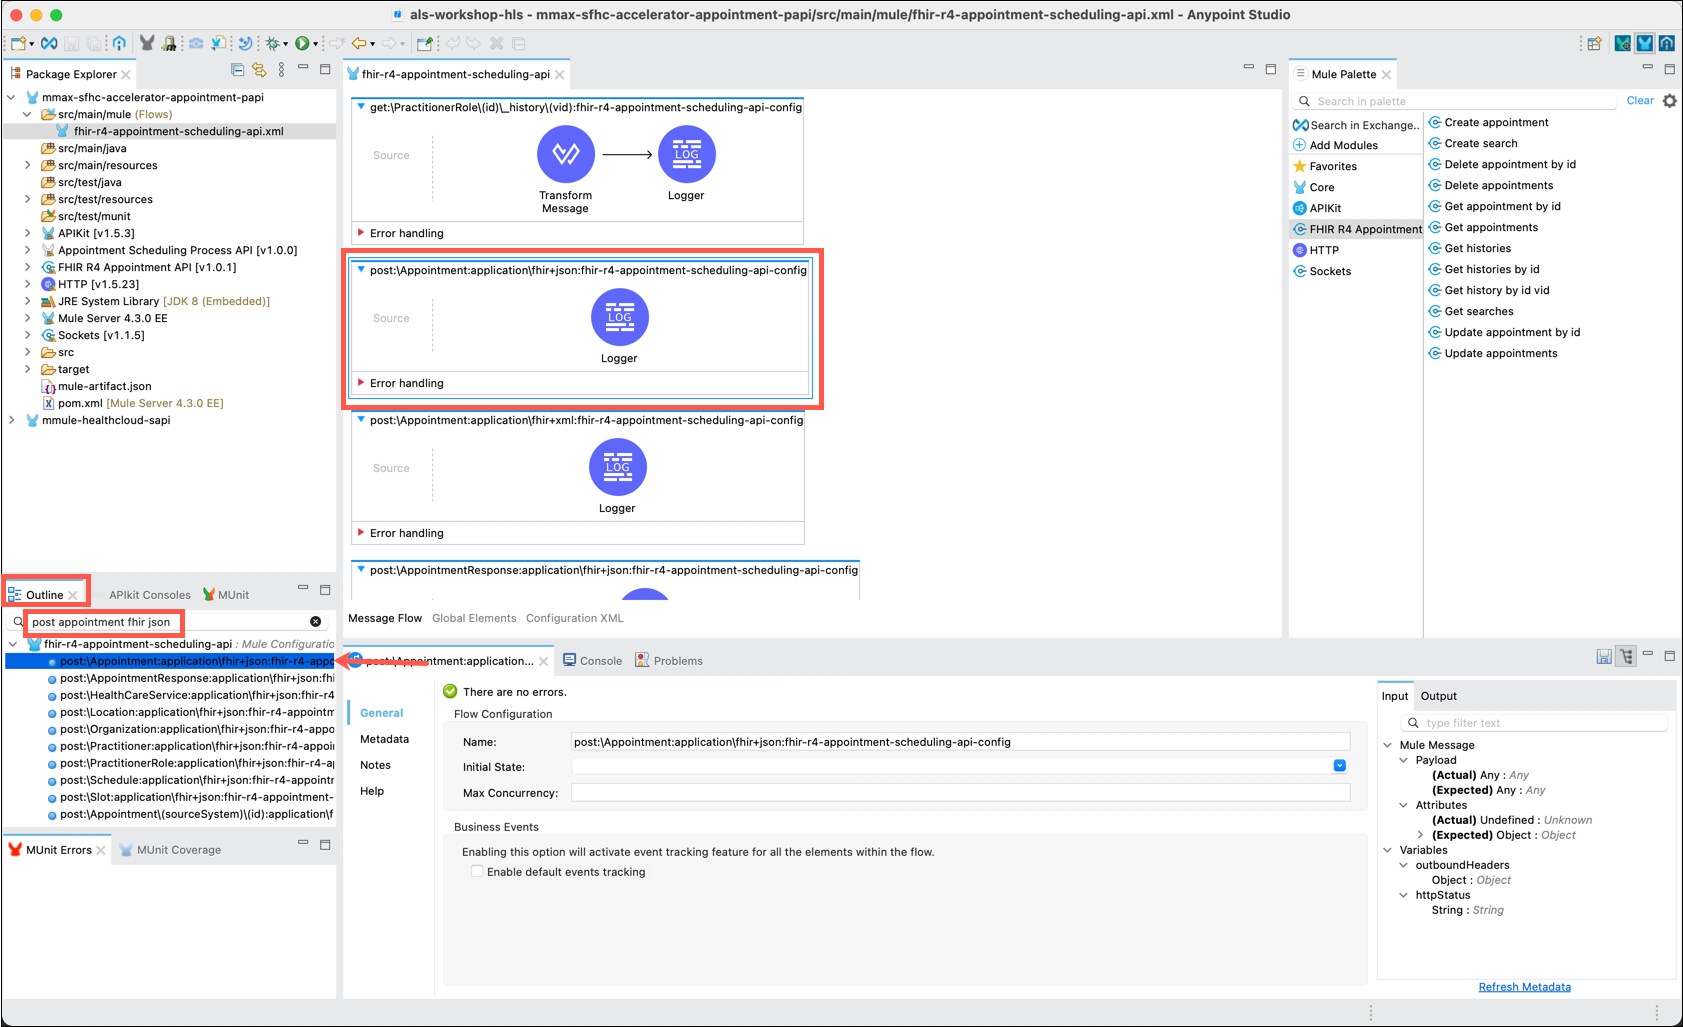
In the main canvas scroll down to locate the post:\Appointment:application\fhir+json:fhir-r4-appointment-scheduling-api-config flow. We will implement this flow to create a new appointment for the indicated patient in Salesforce Health cloud.
Note: For APIs with a large number of resources it can be difficult to locate a specific flow. Here’s a hint to easily find the desired flow in your API project.
The lower left side of Anypoint Studio includes a tab labeled Outline. You may scroll through this outline to locate the specific flow you want to edit. Or, you may enter words that make up the flow name (Do not include special characters such as colons or backslashes) to filter the list of flows.
Once you have located the desired flow in the Outline double click on the flow to have the main canvas navigate to and put focus on the flow.
-
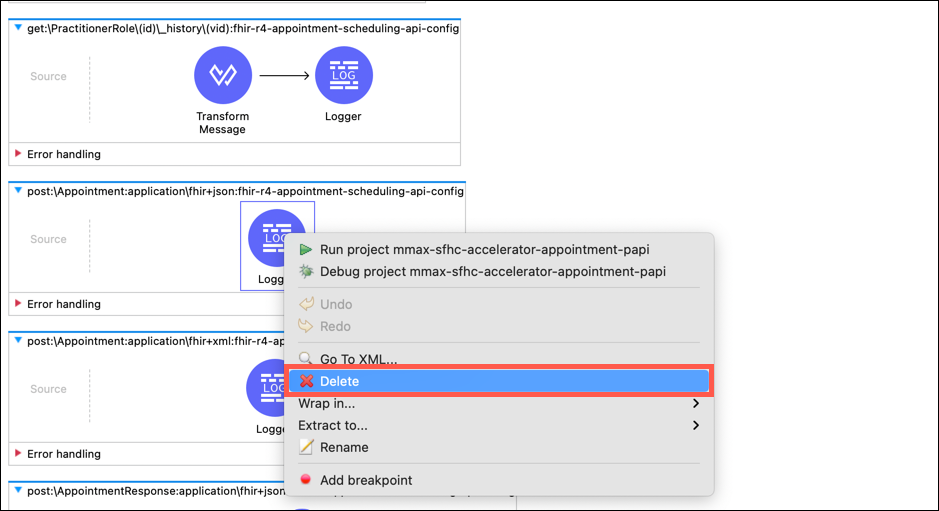
When APIs are scaffolded by Anypoint Studio the scaffolding process will add a Logger and, depending on the operation, a Transform Message component to the flows. For this lab you won’t need to use the Logger component for your API. Delete this by right clicking on the Logger component and clicking on the Delete option.
-
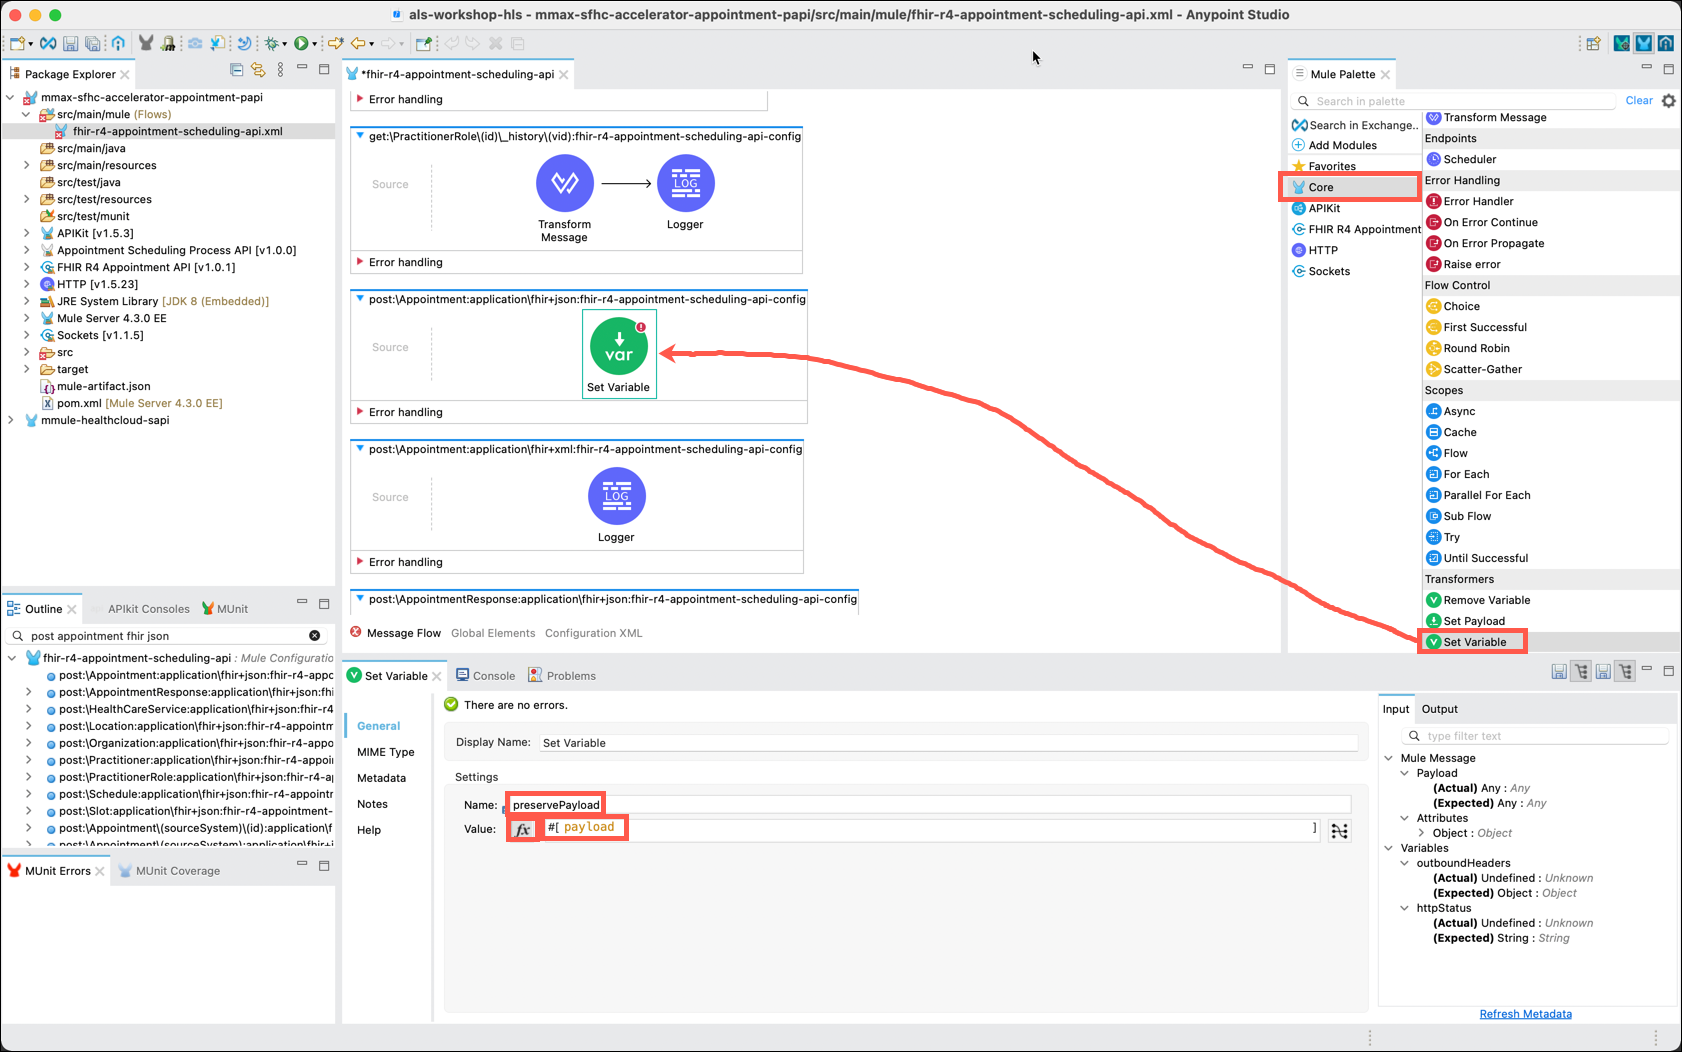
The first thing that you will want to do is save the message that was received into a variable for later reference.
In the Mule Palette, click on Core and scroll to select the Set Variable component. Drag and drop the component to the center of the flow. In the Set Variable editor, under Settings, name the variable preservePayload, click the fx button, and enter payload in the text box.
-
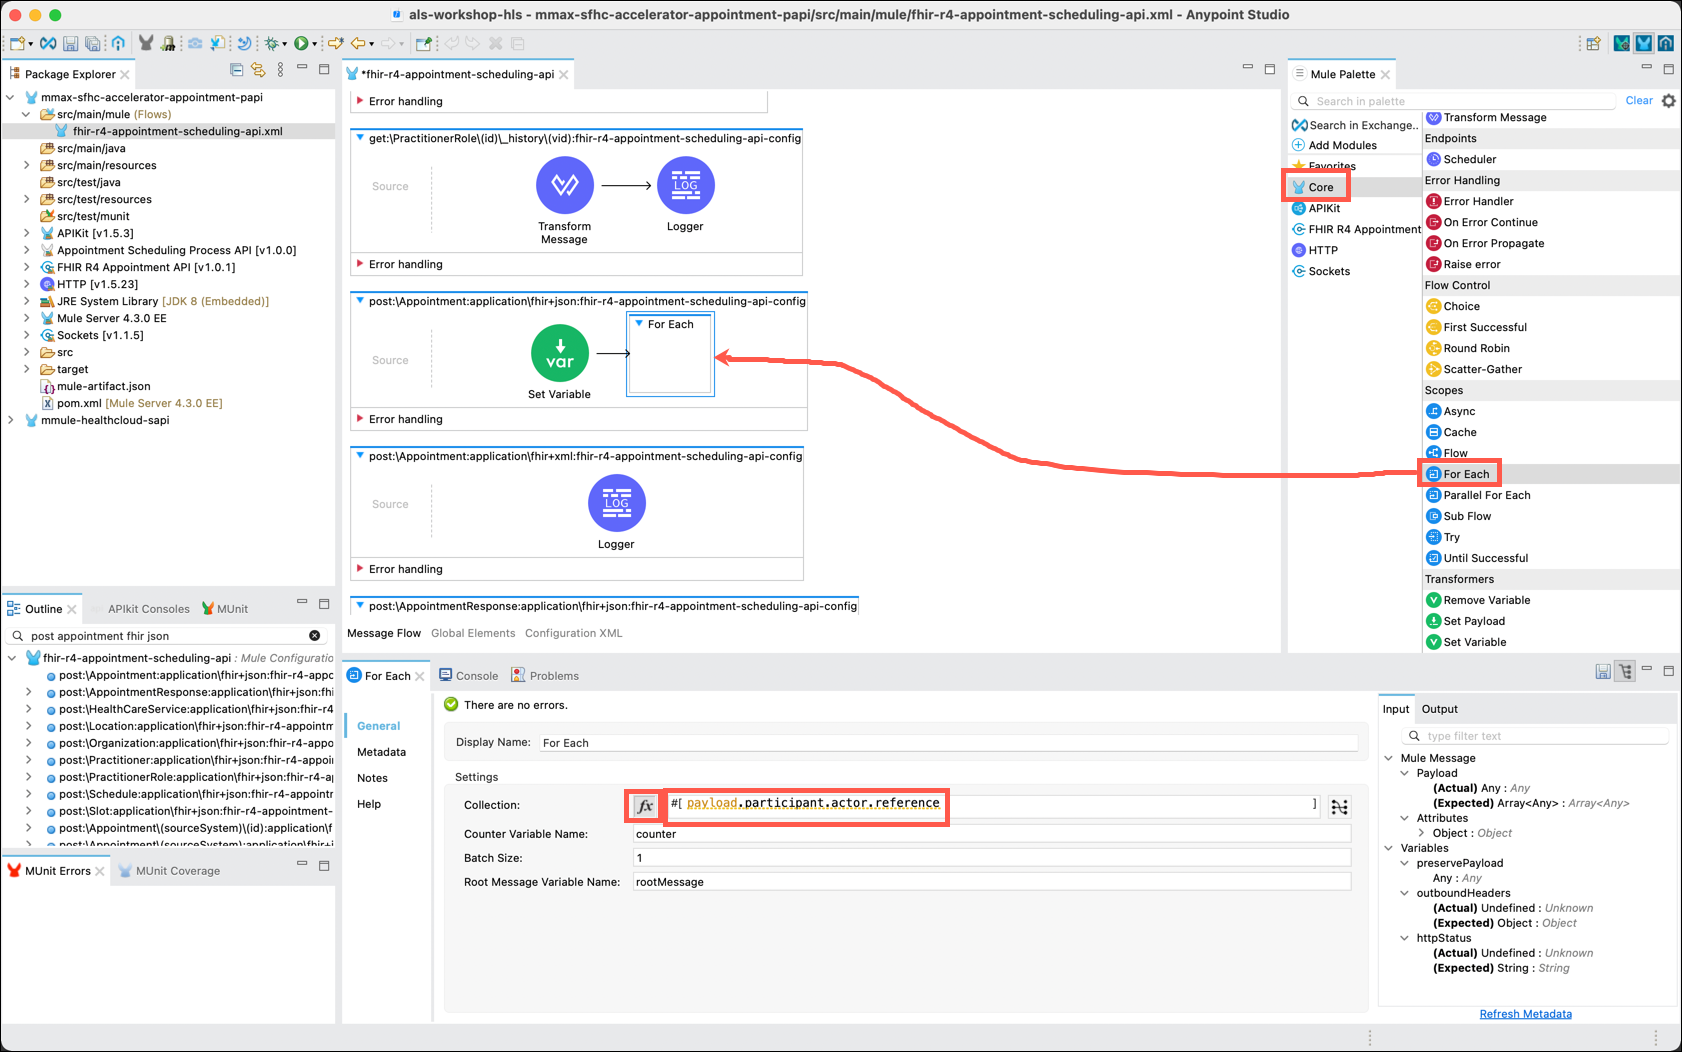
HLS FHIR messages are sent as an array of entries that are referred to as "bundles". A FHIR bundle may contain one or more entries in them. In order to process the entries, it will be necessary to iterate over the bundle. You will use the For Each component to accomplish this.
In the Mule Palette, click on Core and locate the For Each component. Drag and drop the For Each to the right of the Set Variable component. In the For Each editor, click on the fx button that is next to Collection and enter payload.participant.actor.reference in the text box.
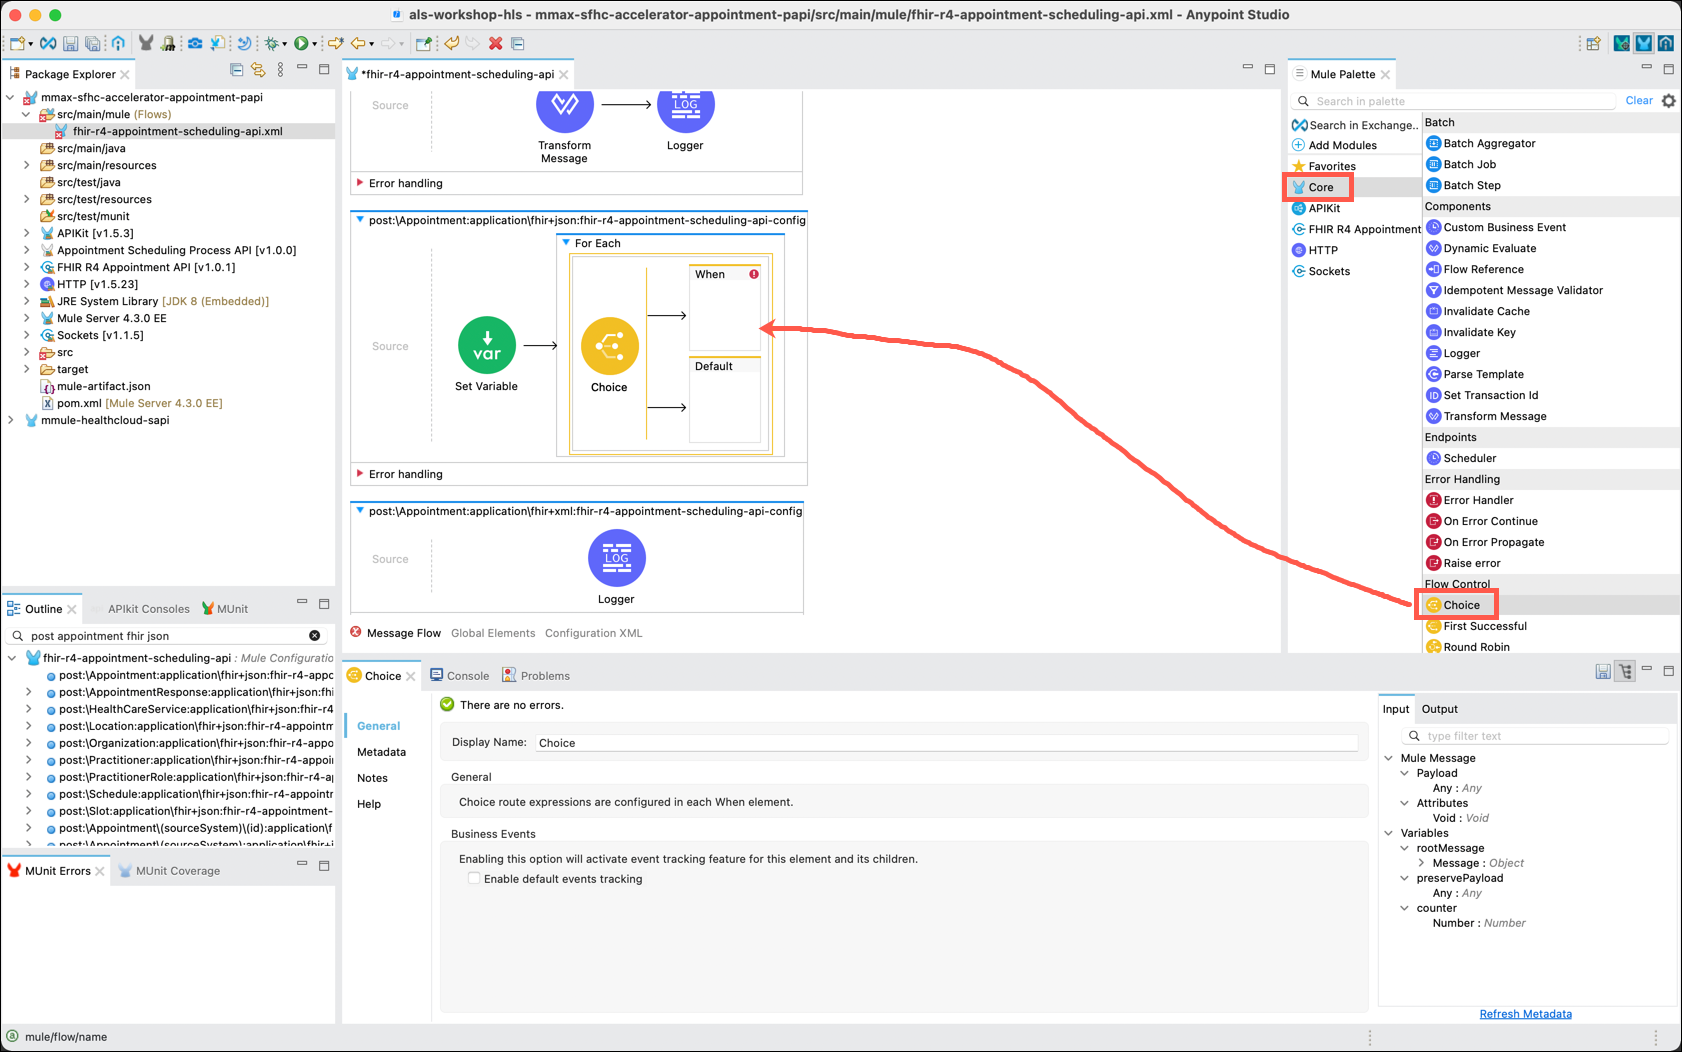
For this lab you will only want to process "Patient" or "Practitioner" entries. The When component allows you to conditionally process the entries. You need to add the When component within the For Each iterator in order to process only Patient entries. (We will process "Practitioner" entries later in this lab.)
-
In the Mule Palette, click on Core and locate the Choice component. Drag and drop the Choice component inside of the For Each component.
-
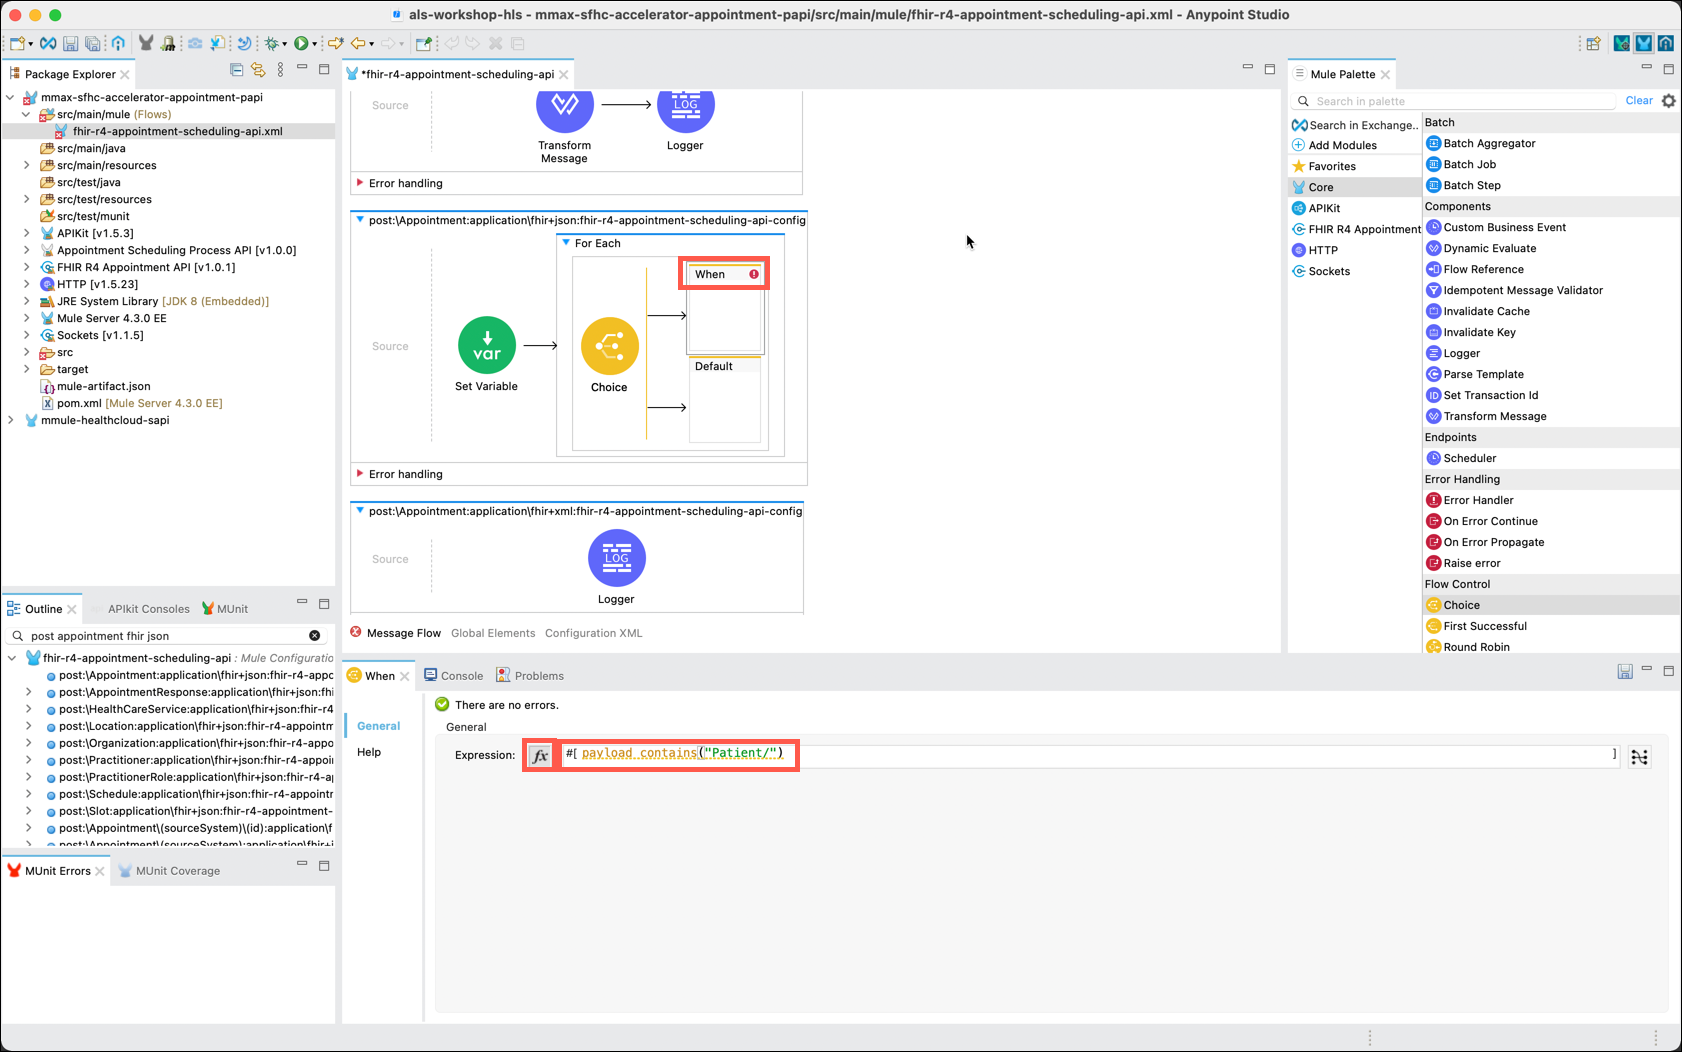
Now you need to configure the When component. In the flow, click on When to display its property editor. In the When editor, next to Expression, click on the fx button and then enter payload contains("Patient/") as the Expression.
Step 5: Transform the Message
-
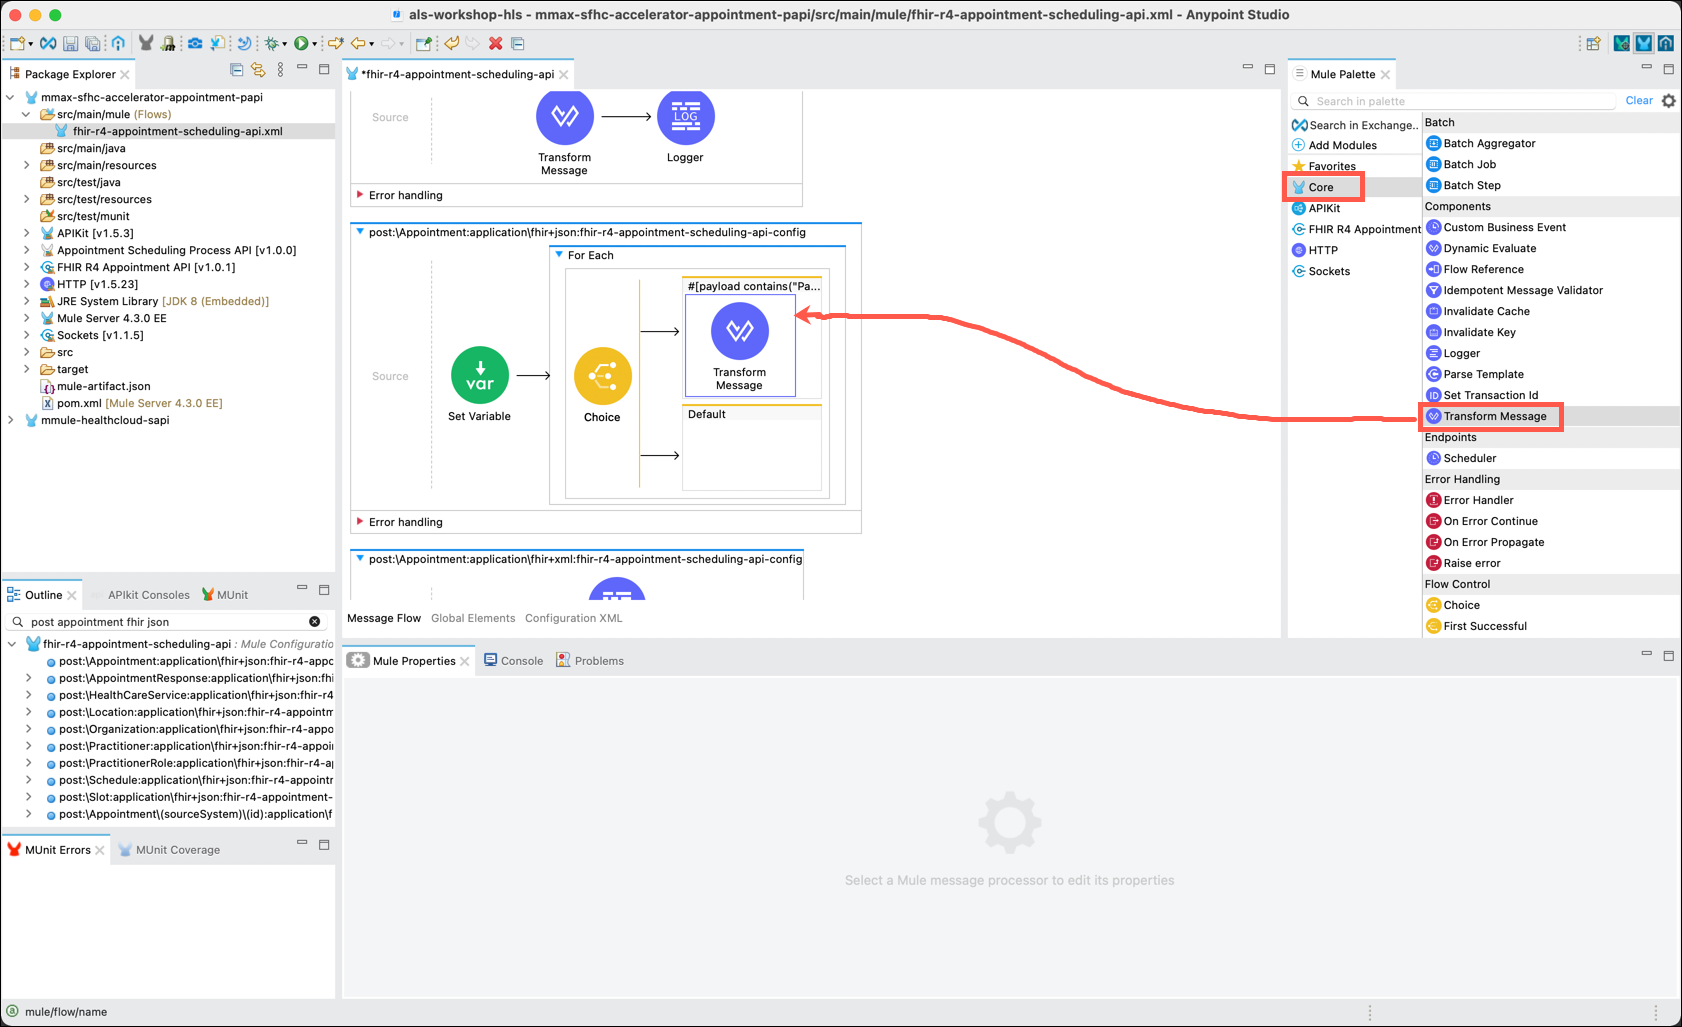
For every entry that contains "Patient" you will want to transform the payload. In the Mule Palette, click on Core and locate the Transform Message component. Drag and drop this component inside the When component of the diagram.
Note: The Transform Message component is one that you will use frequently as you develop APIs. You may have noticed the Favorites category immediately above the Core category. The Transform Message component is also located in the Favorites category.
As you may expect, the Favorites category can help you develop APIs more quickly by reducing the time it takes to locate components you use frequently. You can add any of the components found in the Core category by right clicking on the component and selecting the Add to favorites option.
-
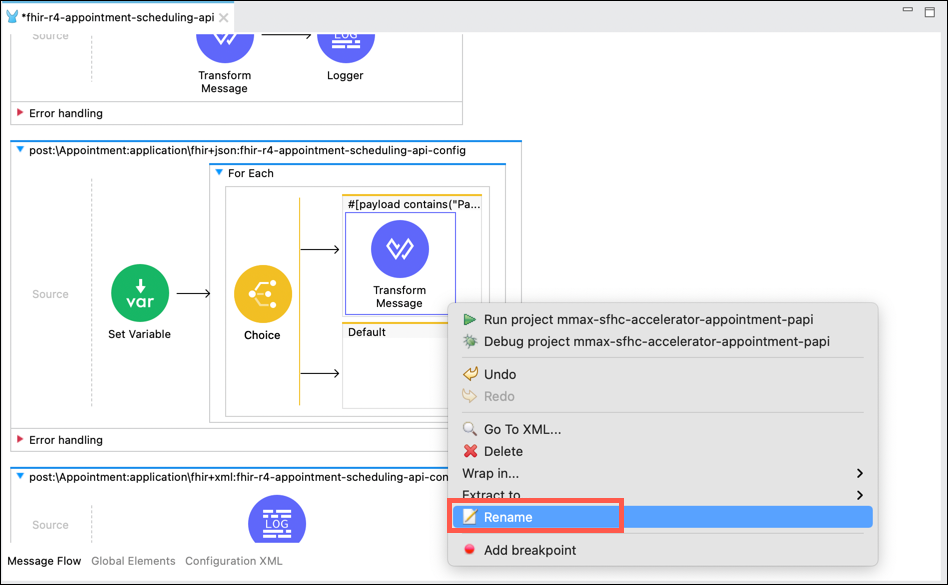
Rename the Transform Message component to Set Variable patientid by right clicking on the Transform Message component and selecting the Rename option.
-
Now you need to access the current FHIR entry that is being processed to save the "PatientId" to a variable for later processing. The Transform Message component supports accessing variables as well as a number of other message processing functions.
Mapping message inputs to outputs, or accessing flow variables, is a common use of the Transform Message component. You may use either the drag and drop editor, or you may use Dataweave to process message payloads. DataWeave is a powerful language that may be used to reformat data.
The use of DataWeave is out of scope for this lab exercise. So, to complete this lab exercise you will simply copy and paste the expression below to save the "PatientId" to a variable as instructed.
-
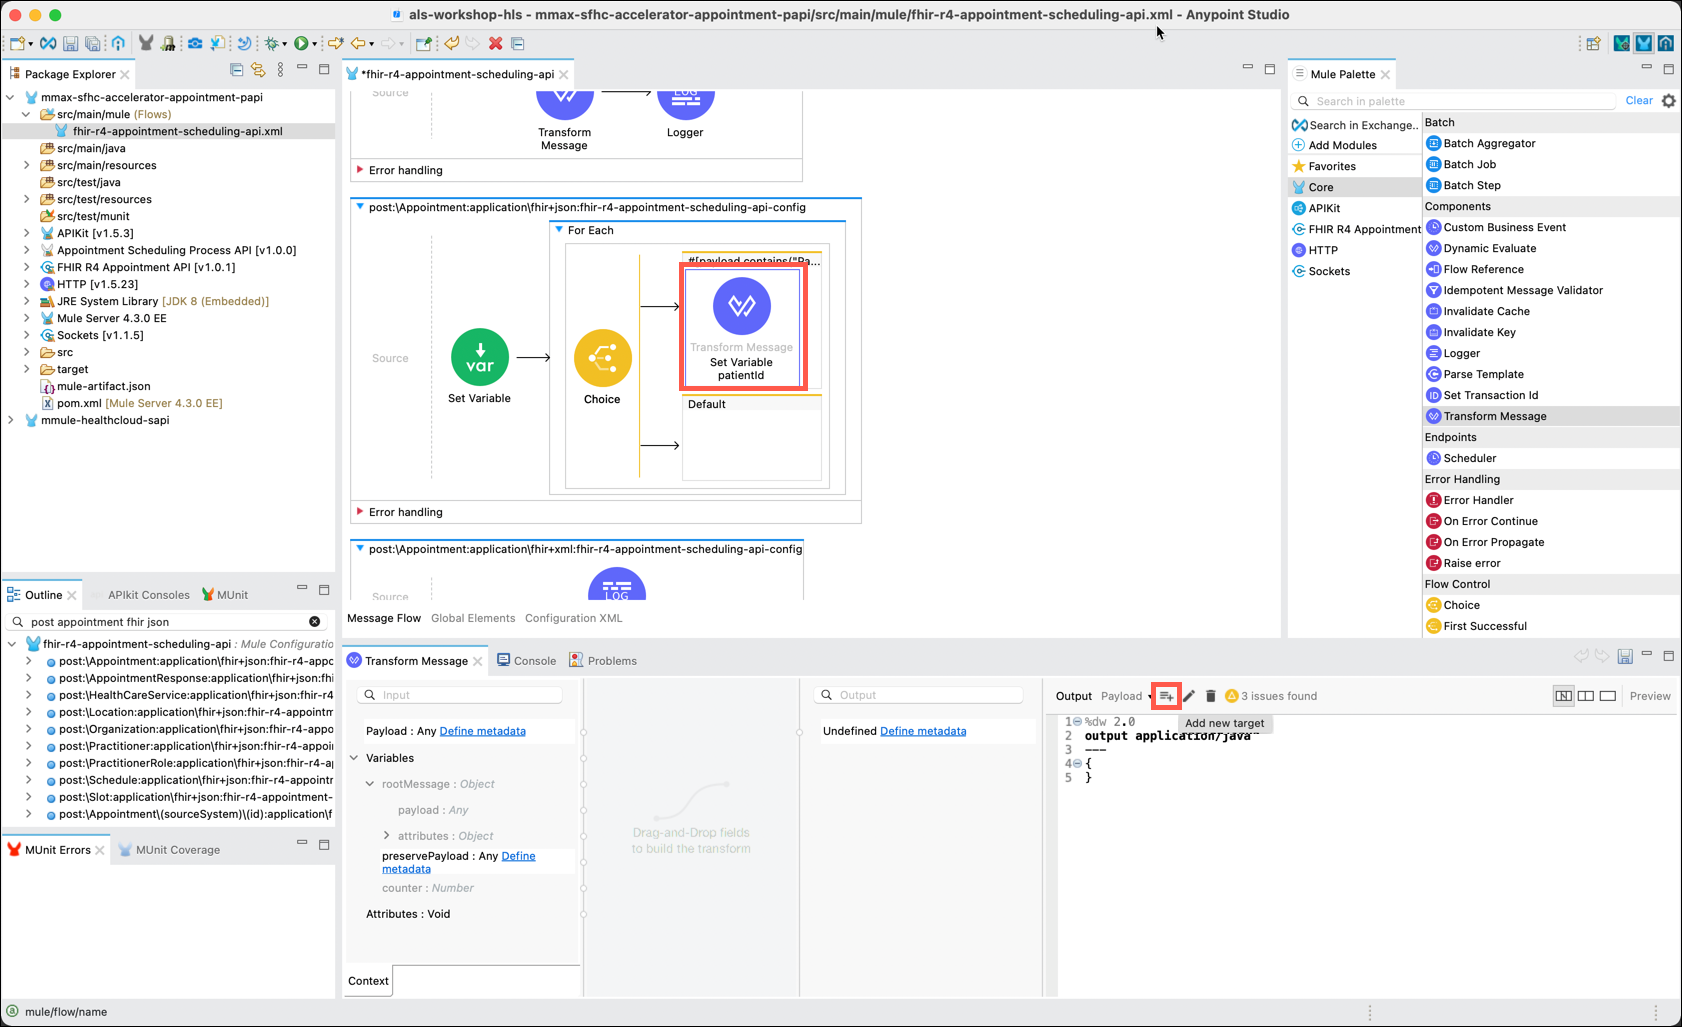
To save the "PatientId" into a variable for later use click on the Add new target icon.
-
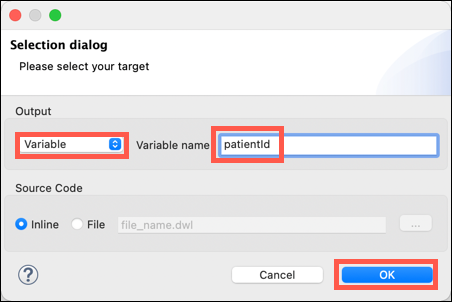
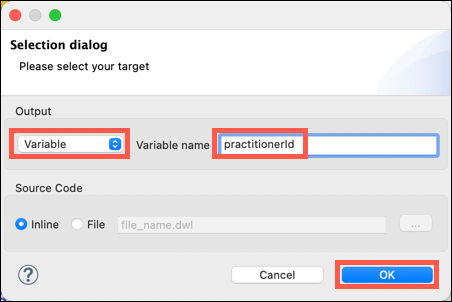
The Selection dialog window will be displayed. Change the Output to Variable via the drop down. Name the variable patientId. Click on the OK button.
-
The DataWeave editor will be displayed in the lower right pane. Note that the Output is set to Variable - patientId. This tells you that the Dataweave code you are about to enter will be setting the value of the patientId variable, and not the output of this component. Now, copy and paste the following Dataweave code and replace the code that is currently in the editor:
DataWeave for Transform component%dw 2.0 import * from dw::core::Strings output application/java --- substringAfter(payload,"/")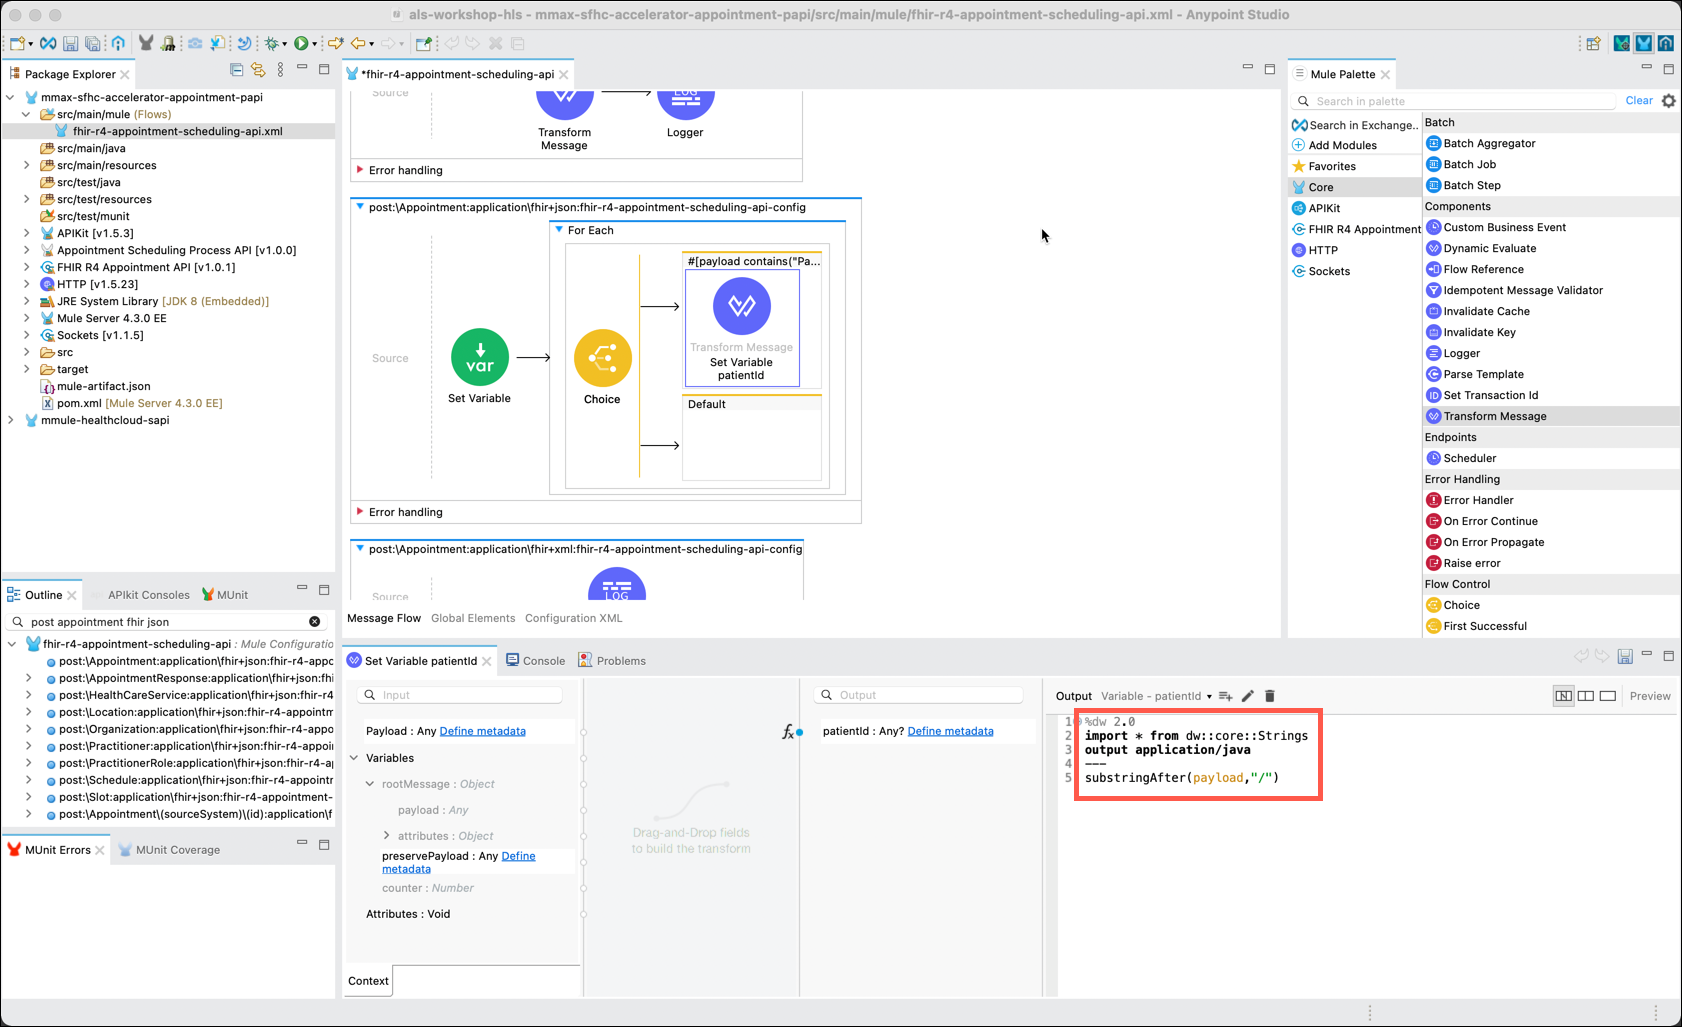
-
You will also want to capture the "Practitioner" value to a variable. You will use a similar set of steps that you completed to capture the "PatientId".
-
Add another When clause by dragging another Transform Message component from the Mule Palette into the space between the Choice component and the existing When and Default clauses. Drop the component on top of the vertical line that will appear when you are in the proper position. You should see a new When clause with the Transform Message component in it.
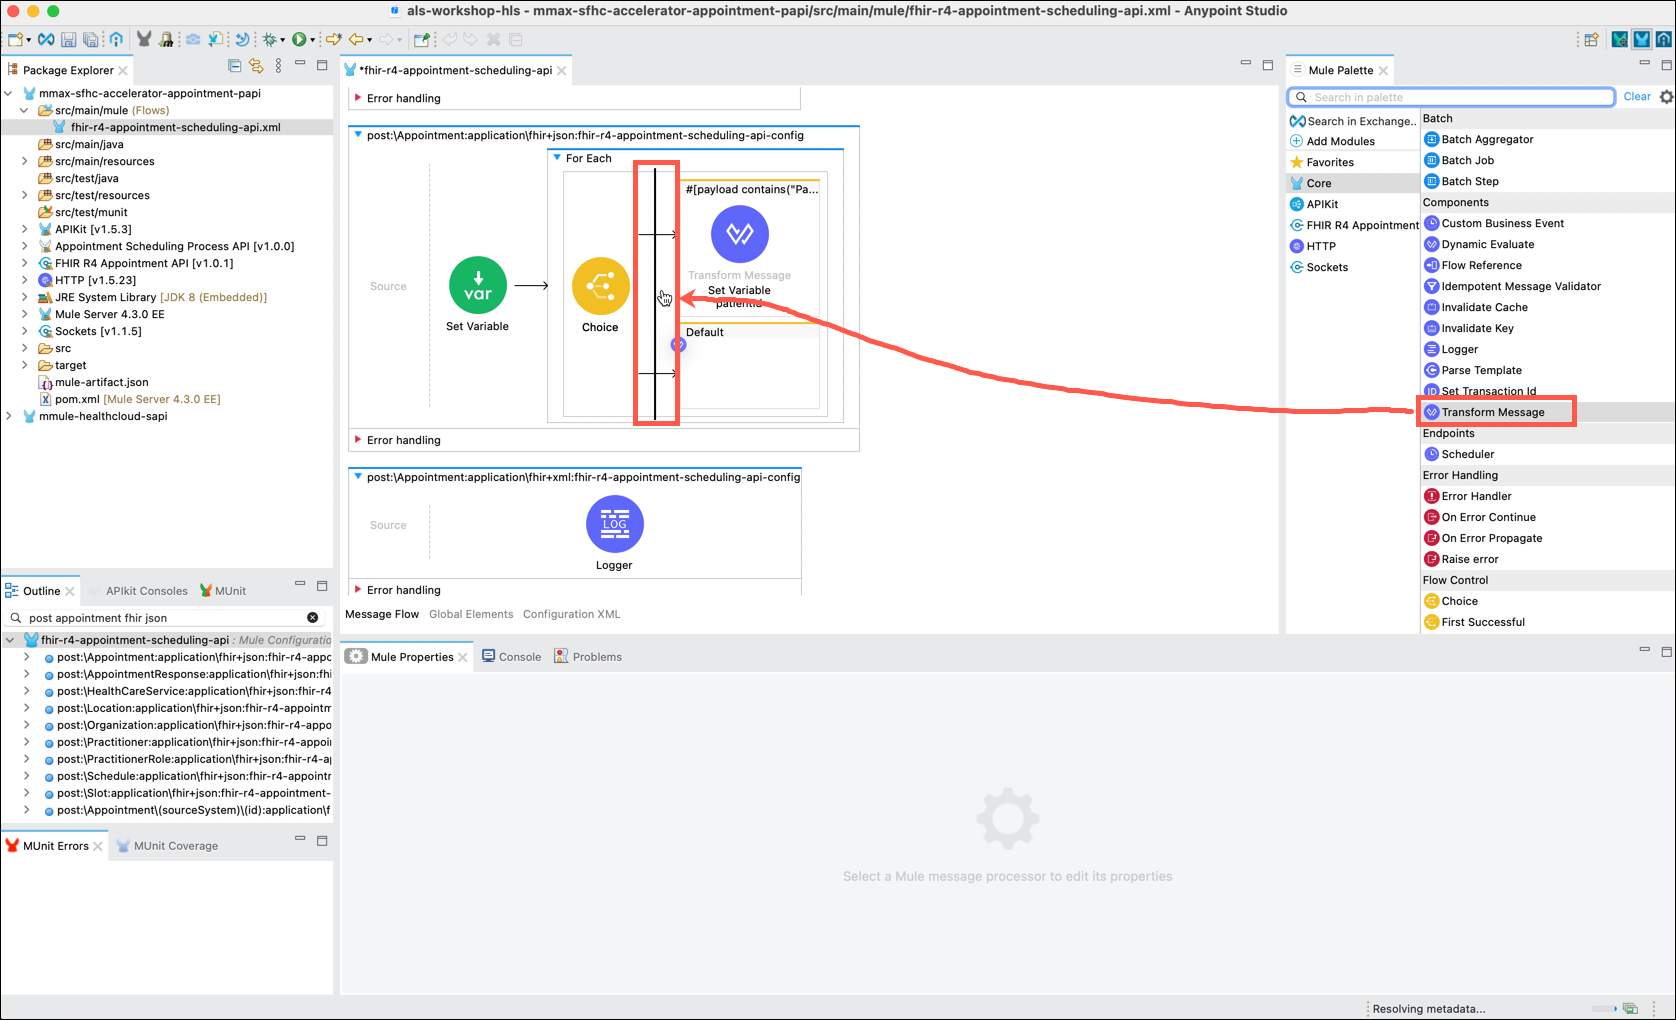
-
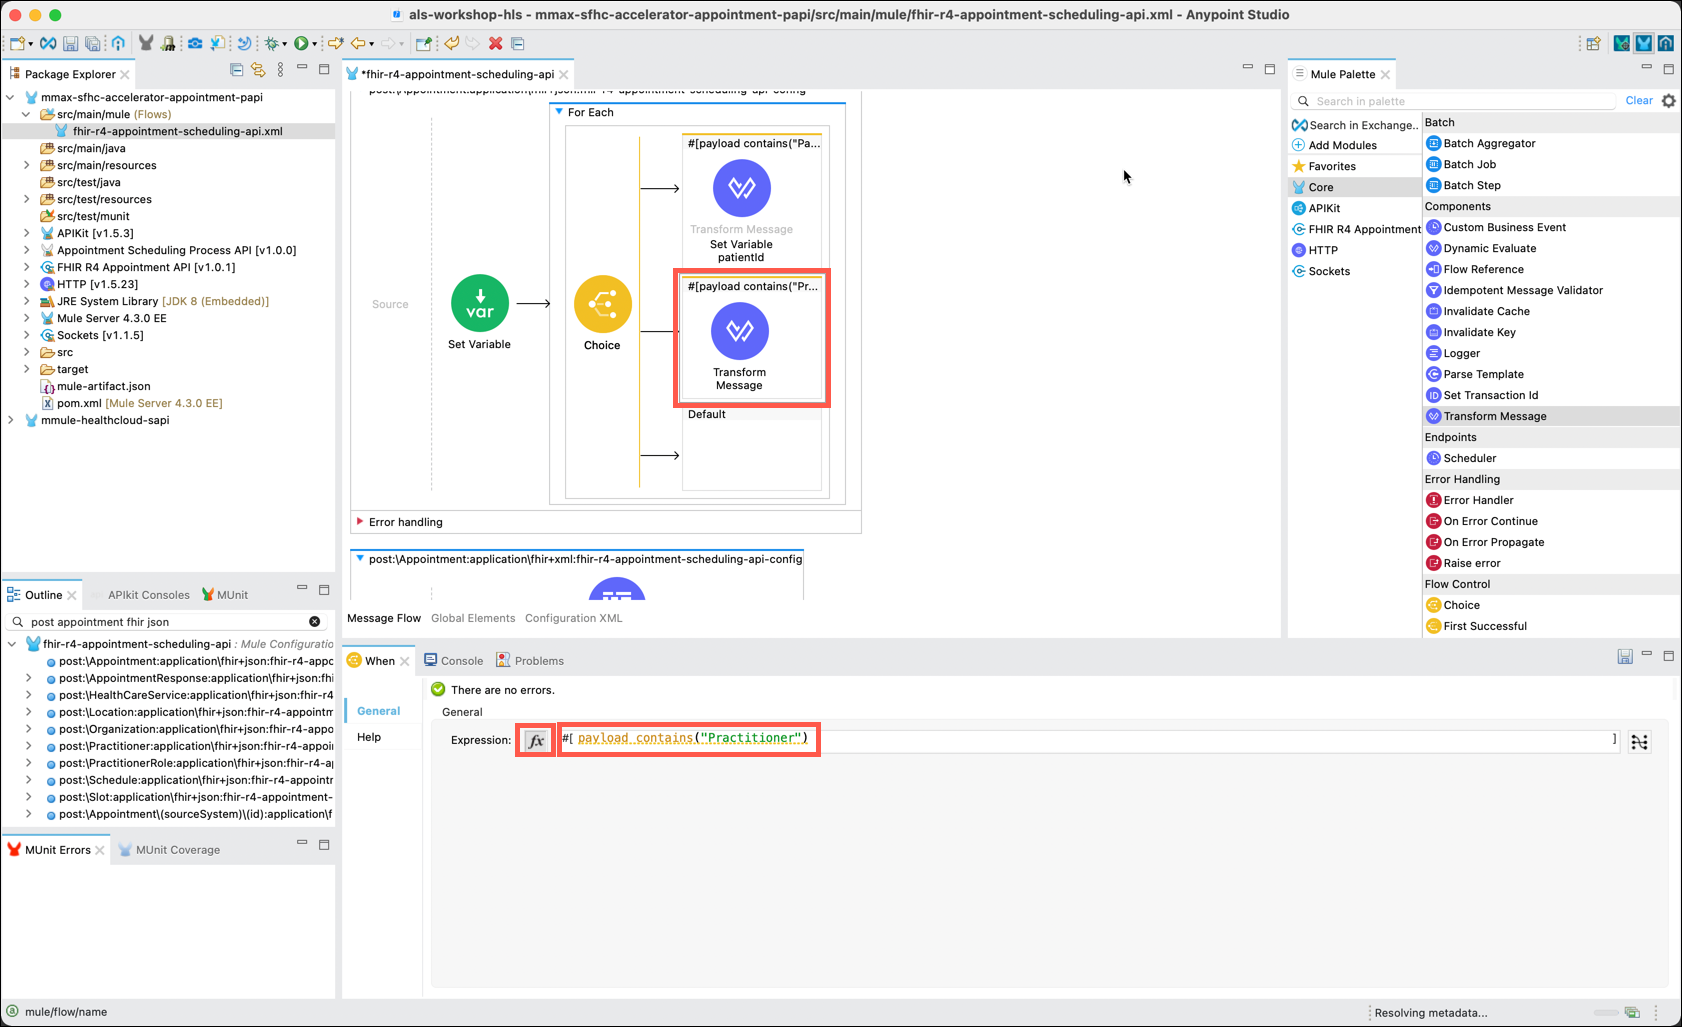
Click on the newly created When component. In the When editor, next to Expression, click on the fx button and enter payload contains("Practitioner/")
-
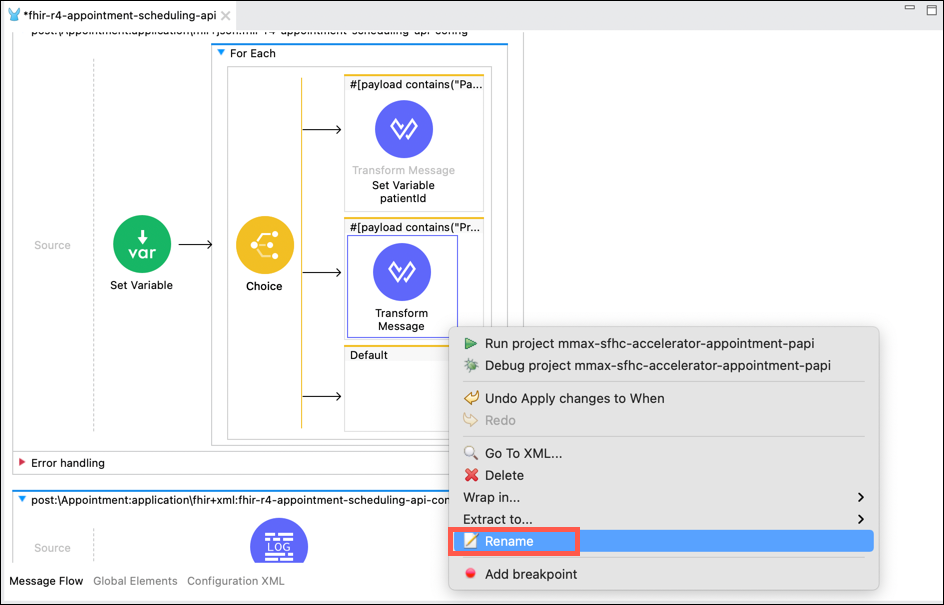
Rename the Transform Message component to Set Variable practitionerId by right clicking on the Transform Message component and selecting the Rename option.
-
In the Transform Message editor, click on the Add new target icon, which opens the Selection dialog window.
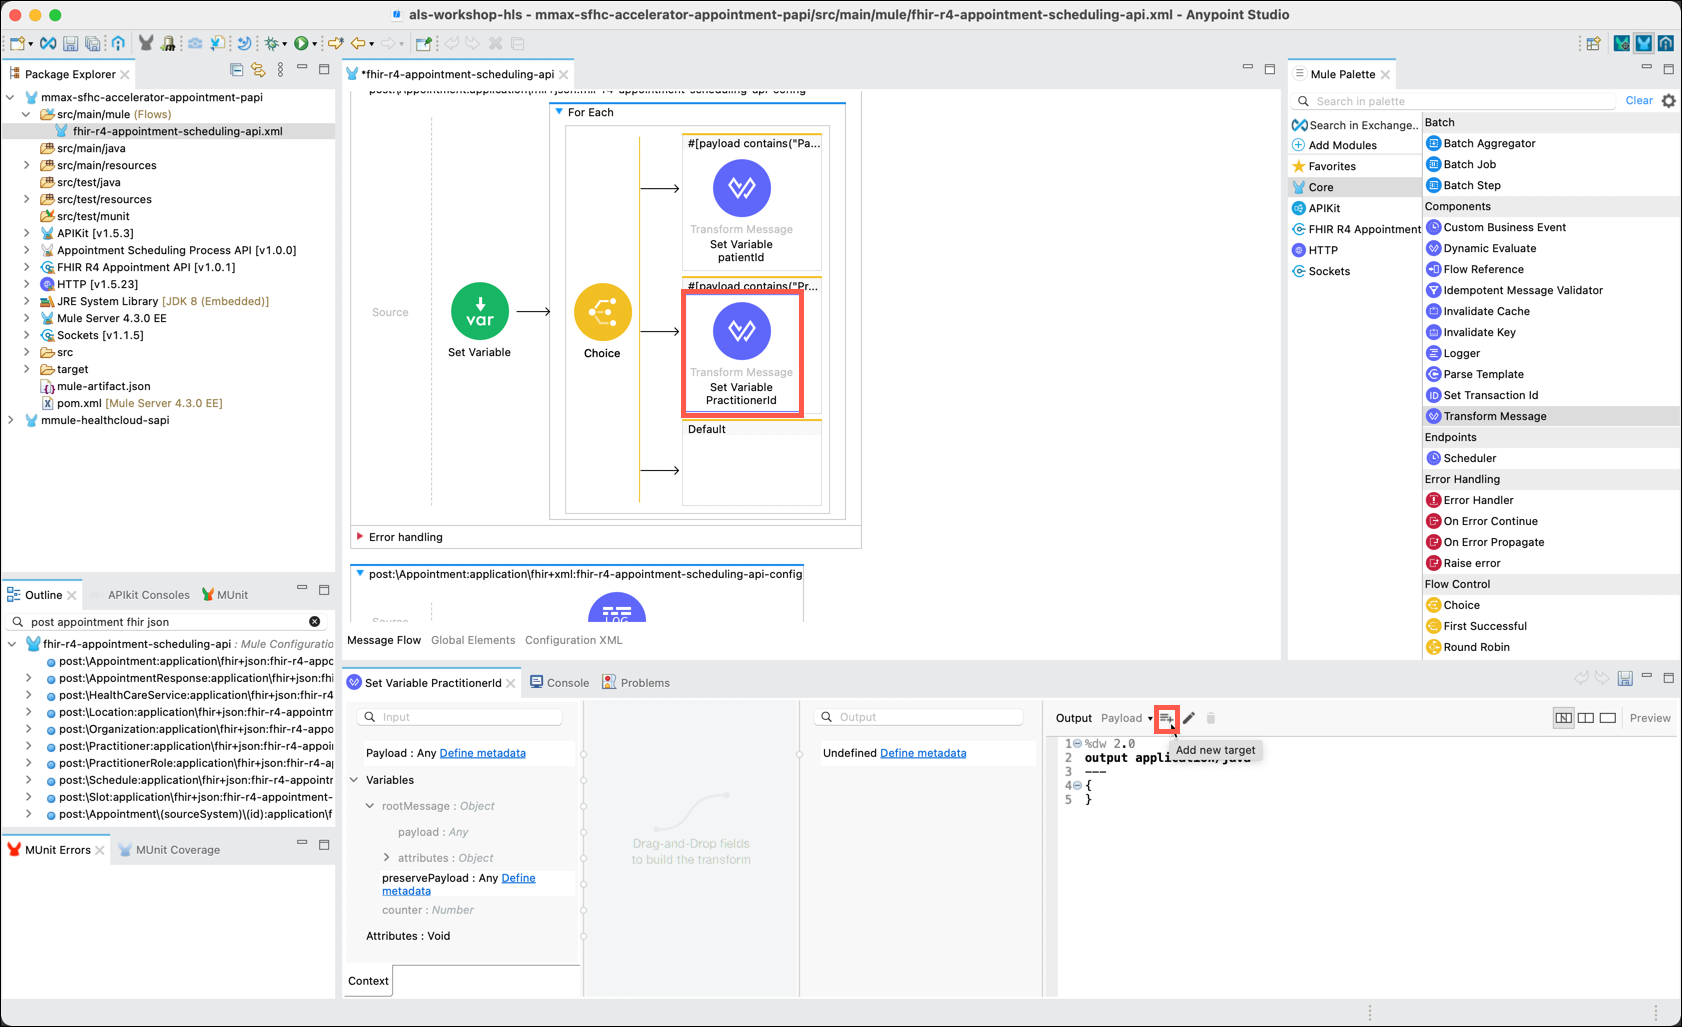
-
Change the Output to Variable via the drop down. Name the variable practitionerId and then click on the OK button.
-
In the DataWeave editor, replace the default DataWeave code with the followiing:
DataWeave for Transform component%dw 2.0 import * from dw::core::Strings output application/java --- substringAfter(payload,"/")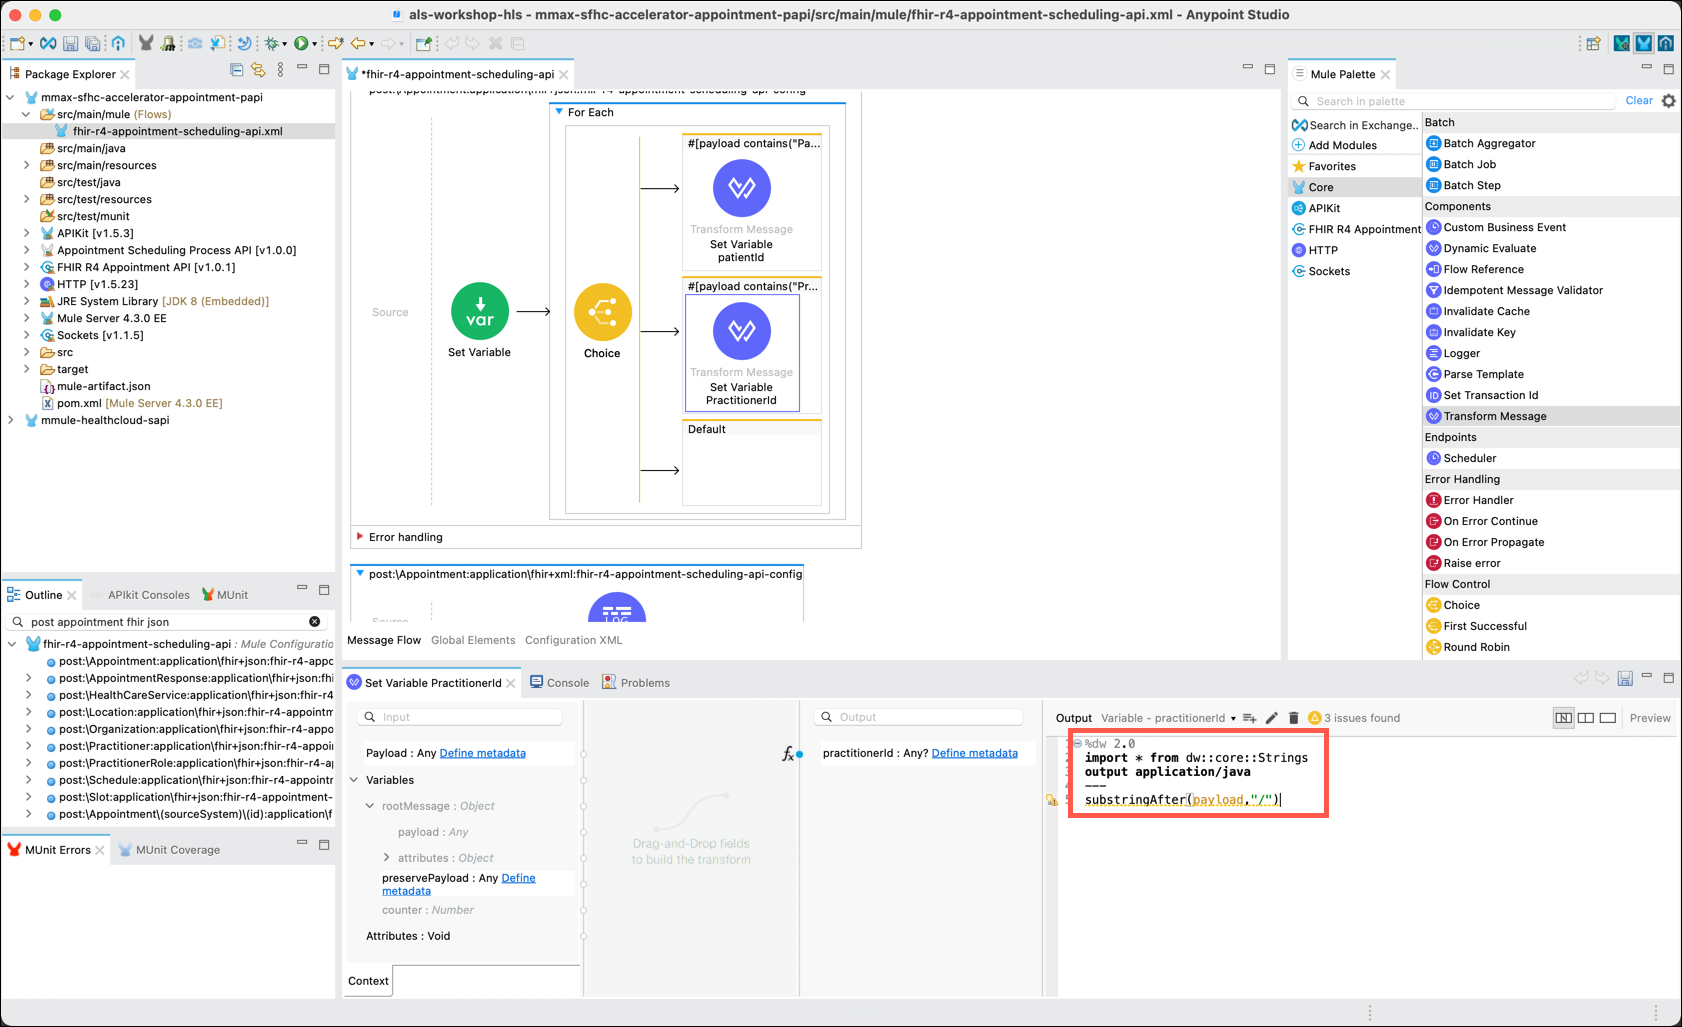
-
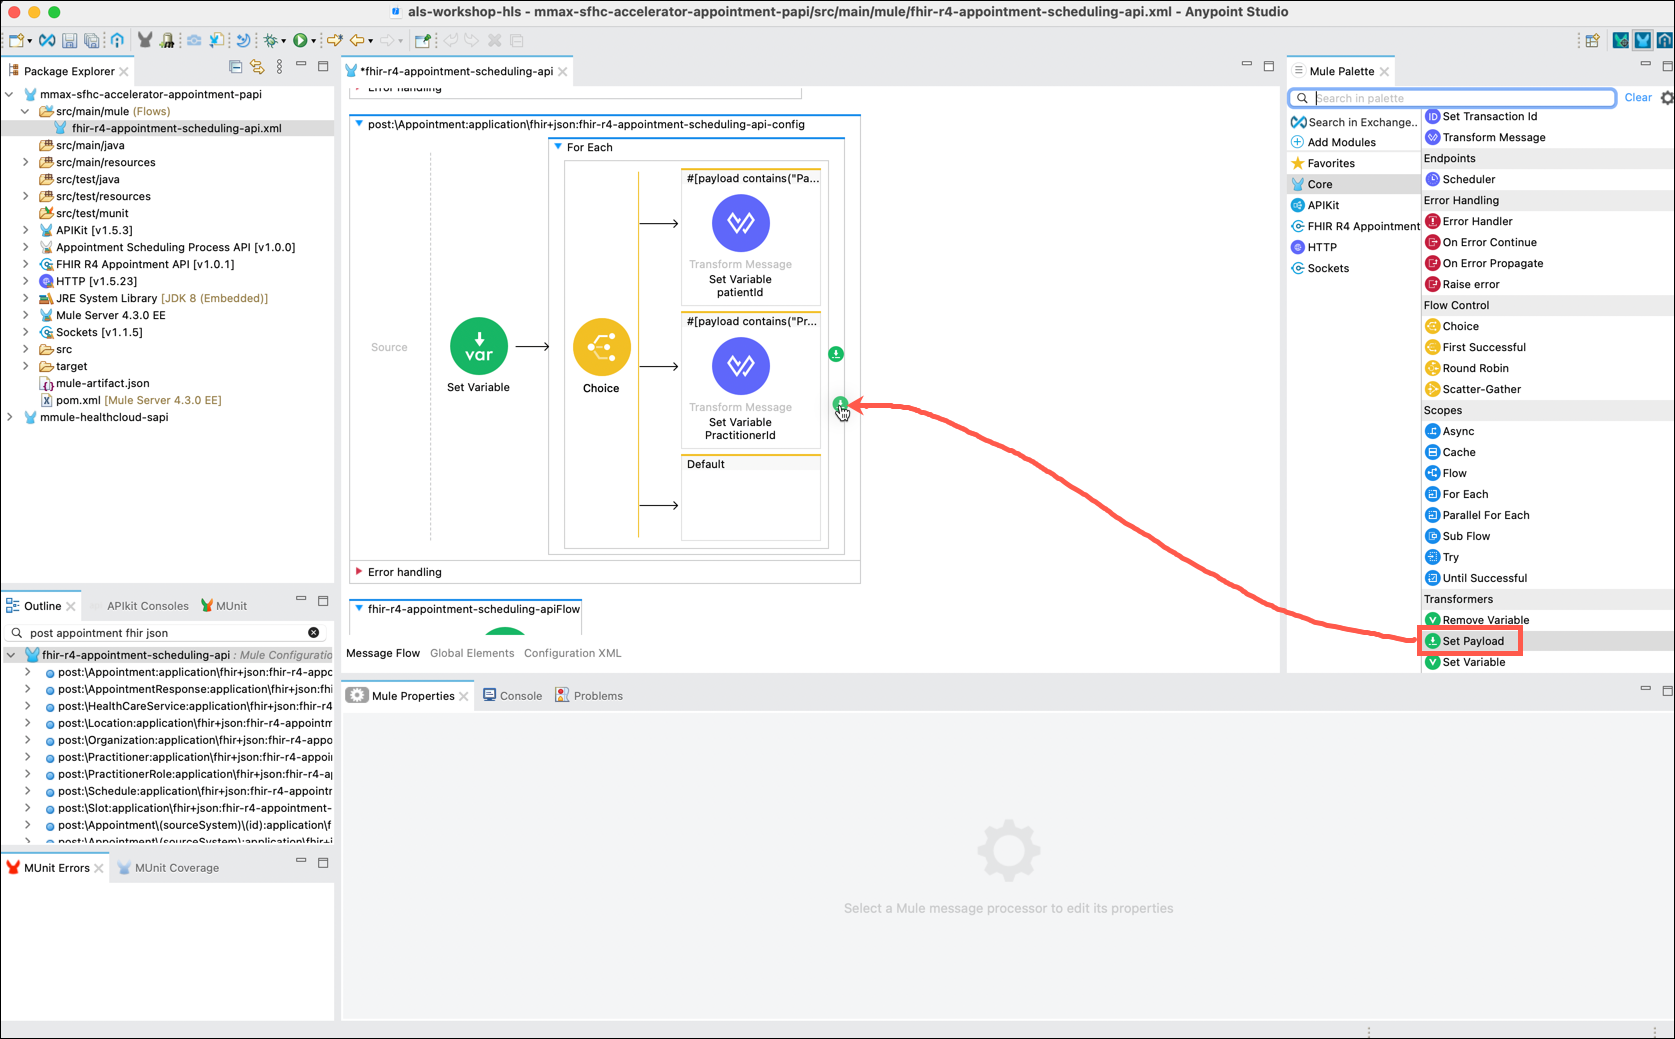
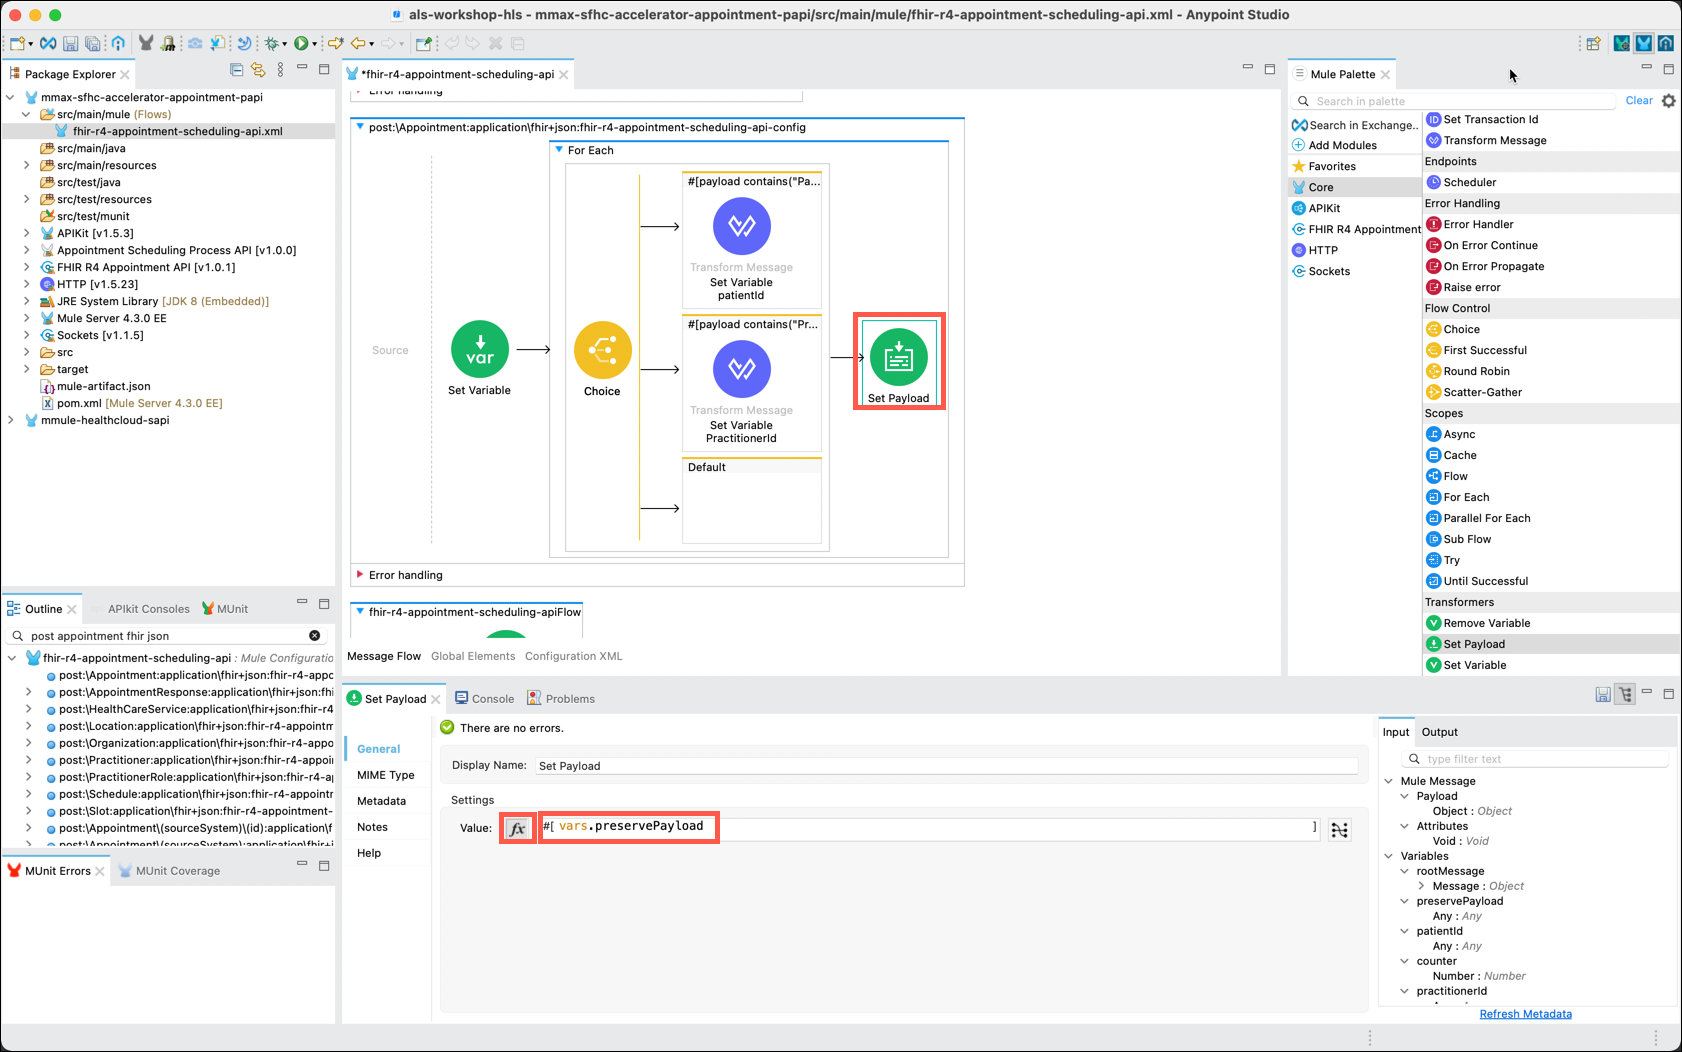
The next step is to reset the message payload to the value that was captured in the first Set Variable component. In the Mule Palette, click on the Core category and scroll to select the Set Payload component. Drag and drop the component to the right side of the For Each component, but not into the main flow. This may be a bit tricky. Look carefully at the surrounding outline to ensure you place it correctly.
-
In the Set Payload editor, ensure that the fx button is selected and then enter vars.preservePayload in the Value text box.
-
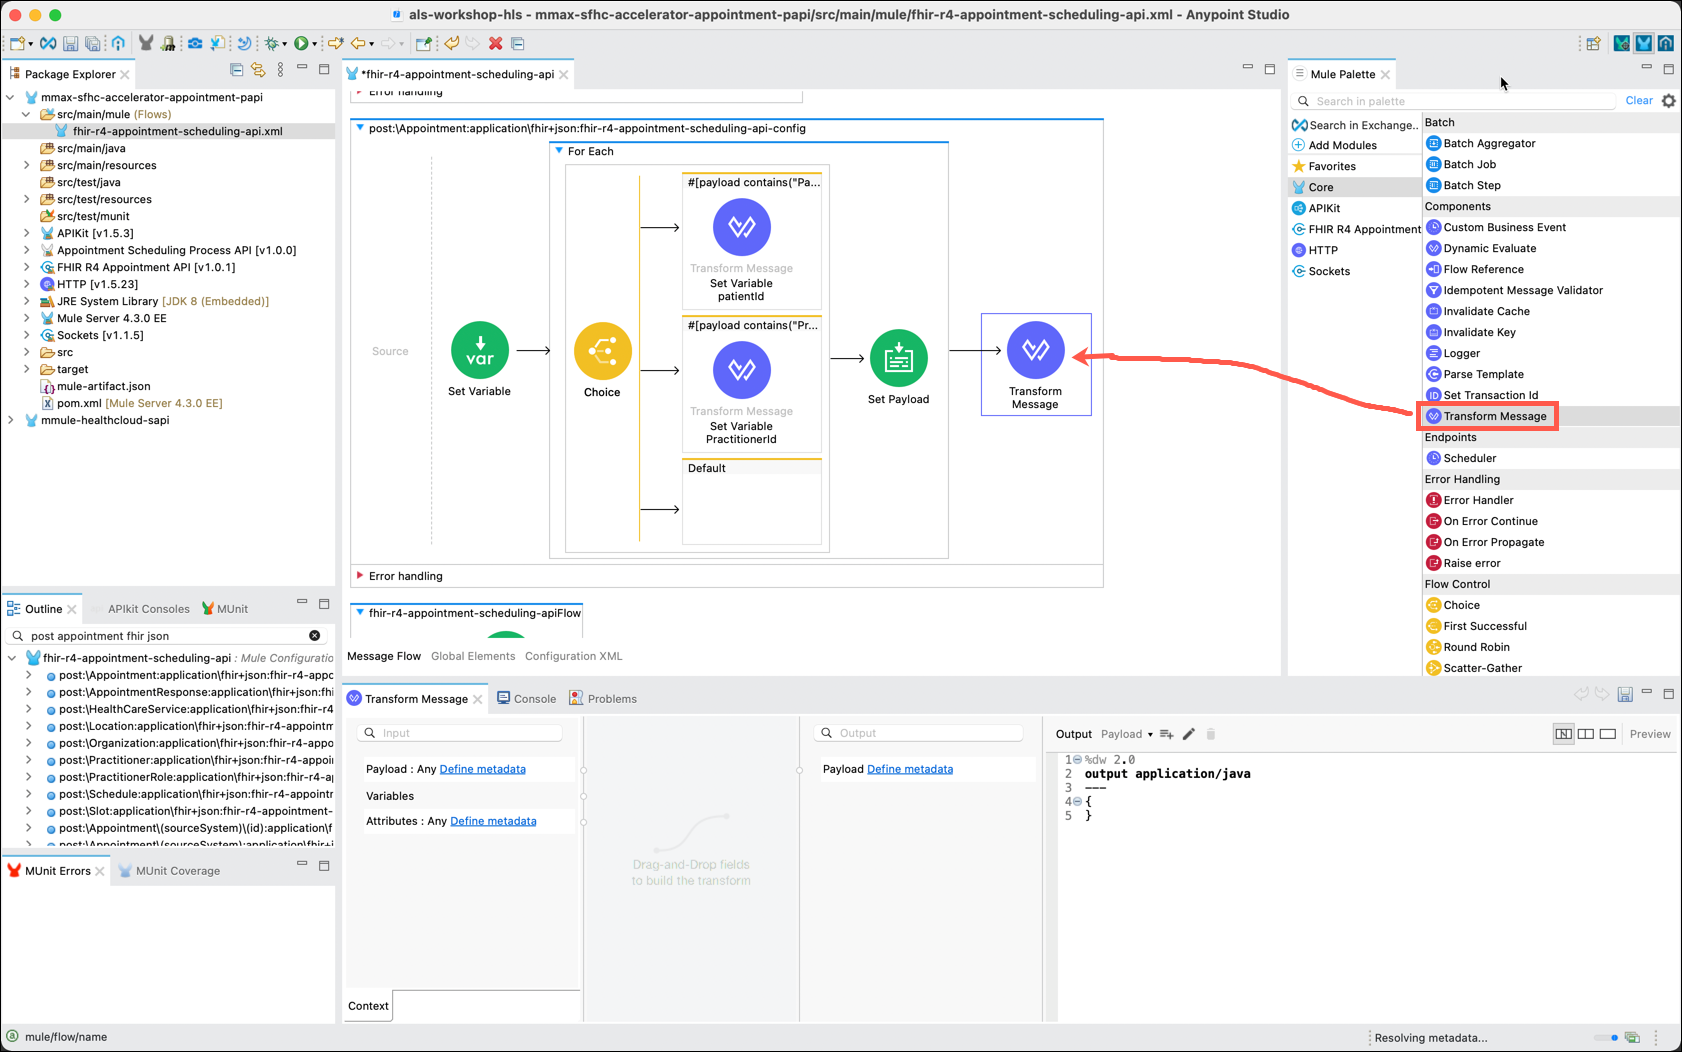
You are now ready to begin the process to transform the payload received to the appropriate return value. Another Transform Message component will be used to accomplish this.
The DataWeave editor in the Transform Message component supports the use of metadata that describes the input and output message formats. The use of metadata enables graphical drag and drop mapping of fields. Metadata also enables statement completion prompts when using the DataWeave editor.
Complete the following steps to add a new Transform Message component and set metadata for the input and output message formats.
-
In the Mule Palette, drag and drop another Transform Message component into the main flow, to the right of the For Each component.
-
Sample metadata is typically added to the Message Transform component via files. A sample metadata file for mapping the input message structure has been provided in the C:\Users\workshop\mulesoft\HLSWorkshop\PostAppointment_Input.json file in your virtual desktop.
-
A sample metadata file for mapping the output message structure has also been provided in the C:\Users\workshop\mulesoft\HLSWorkshop\PostAppointmentSFHC_Output.json file in your virtual desktop.
-
You are now ready to use your metadata files to define the Input and Output payloads. Start with the input metadata by clicking on the Define metadata hyperlink next to the Payload entry in the Input column.
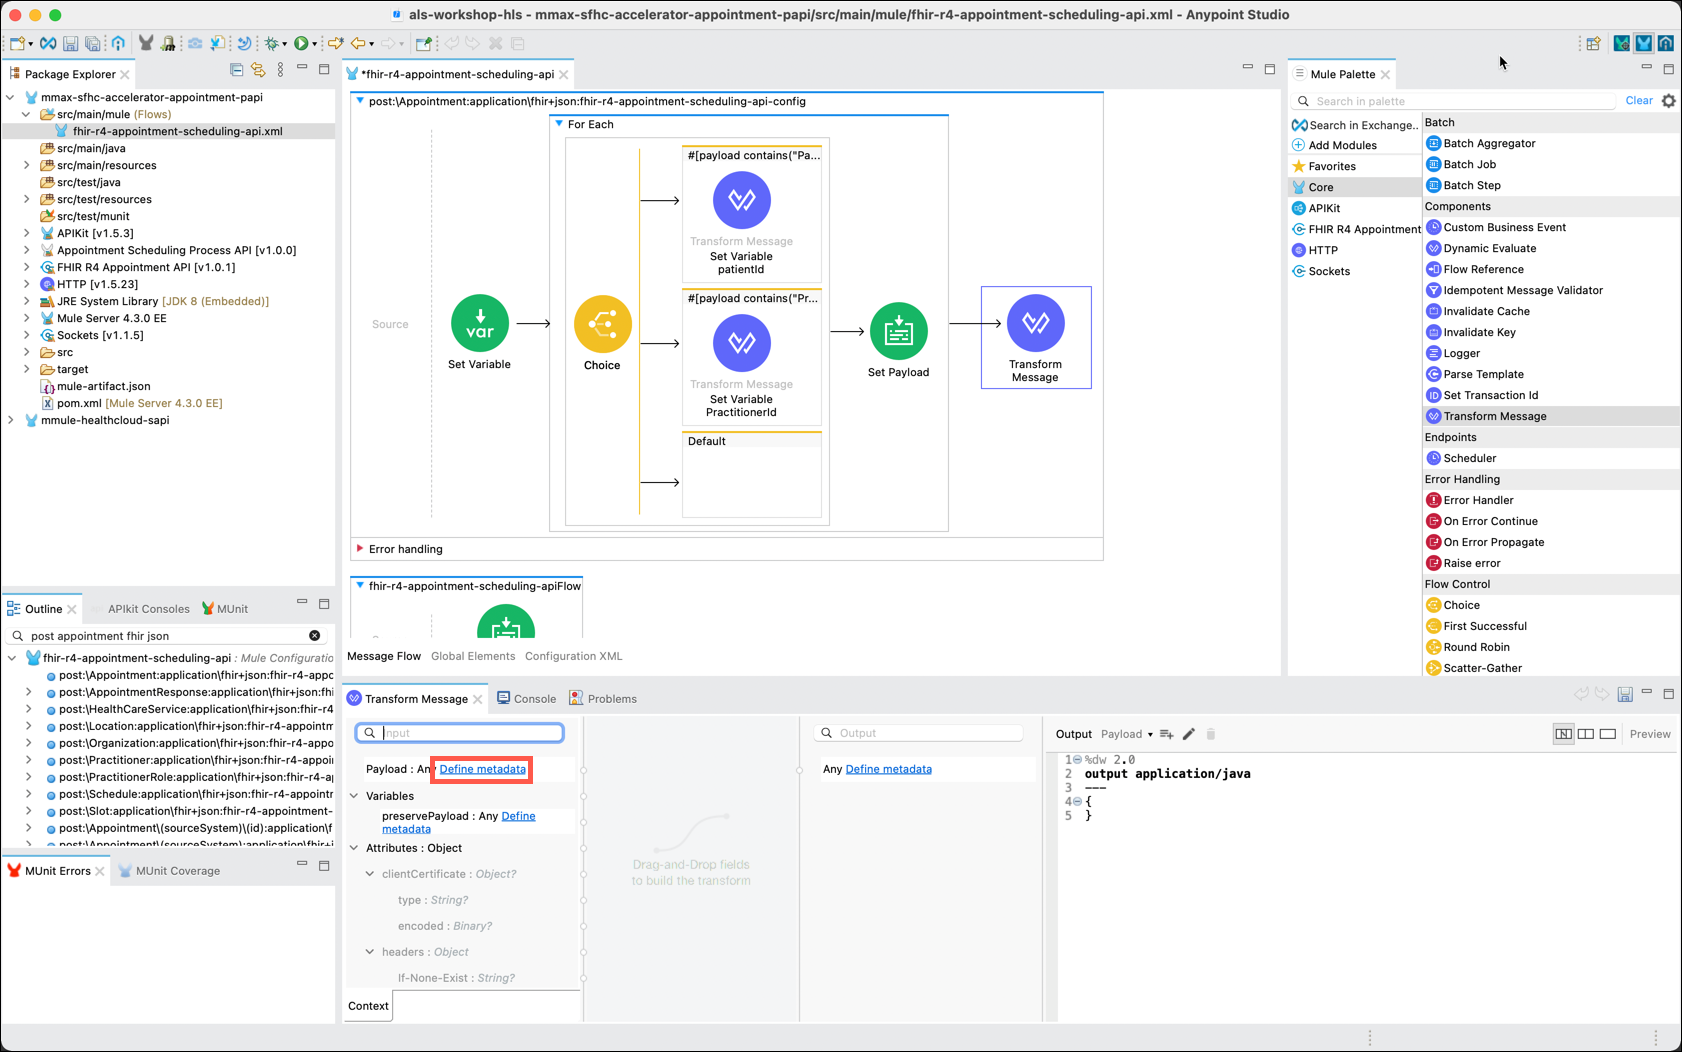
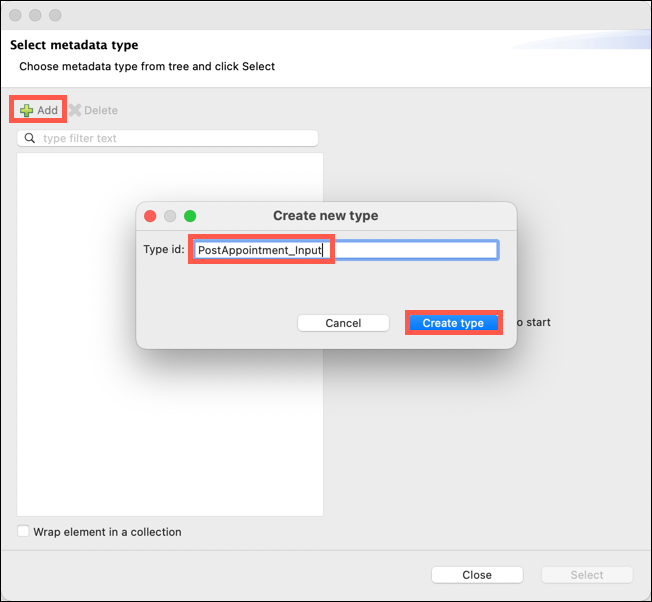
-
The Select metadata type window will appear. Click on the Add icon. The Create new type window will appear. Enter PostAppointment_Input as the Type id: and then click on the Create type button.
-
The Select metadata type window will change to include several new input fields. In the first Type drop down select JSON. In the second drop down select Example and then browse to select the PostAppointment_Input.json file. Next click Select.

-
Repeat the previous steps for the output, creating a new metadata type called PostAppointmentSFHC_Output using the PostAppointmentSFHC_Output.json file as the example.
-
Now that the metadata has been added to your project you can enter the appropriate DataWeave statements to create the response message. As mentioned earlier, the use of DataWeave is out of scope for this lab exercise. So, to complete this lab step you can simply replace the existing DataWeave code by copying and pasting the expression below into the DataWeave editor.
DataWeave for Transform Component%dw 2.0 output application/json --- { resourceType: payload.resourceType, id: vars.patientId, text: { status: payload.text.status, div: payload.text.div }, status: payload.status, serviceCategory: payload.serviceCategory map ( serviceCategory , indexOfServiceCategory ) -> { coding: serviceCategory.coding map ( coding , indexOfCoding ) -> { system: coding.system, code: coding.code, display: coding.display } }, serviceType: payload.serviceType map ( serviceType , indexOfServiceType ) -> { coding: serviceType.coding map ( coding , indexOfCoding ) -> { code: coding.code, display: coding.display } }, specialty: payload.specialty map ( specialty , indexOfSpecialty ) -> { coding: specialty.coding map ( coding , indexOfCoding ) -> { system: coding.system, code: coding.code, display: coding.display } }, appointmentType: { coding: payload.appointmentType.coding map ( coding , indexOfCoding ) -> { system: coding.system, code: coding.code, display: coding.display } }, reasonReference: payload.reasonReference map ( reasonReference , indexOfReasonReference ) -> { reference: reasonReference.reference, display: reasonReference.display }, priority: payload.priority, description: payload.description, start: payload.start, end: payload.end, comment: payload.comment, participant: [ { actor: { reference: vars.practitionerId, } } ] }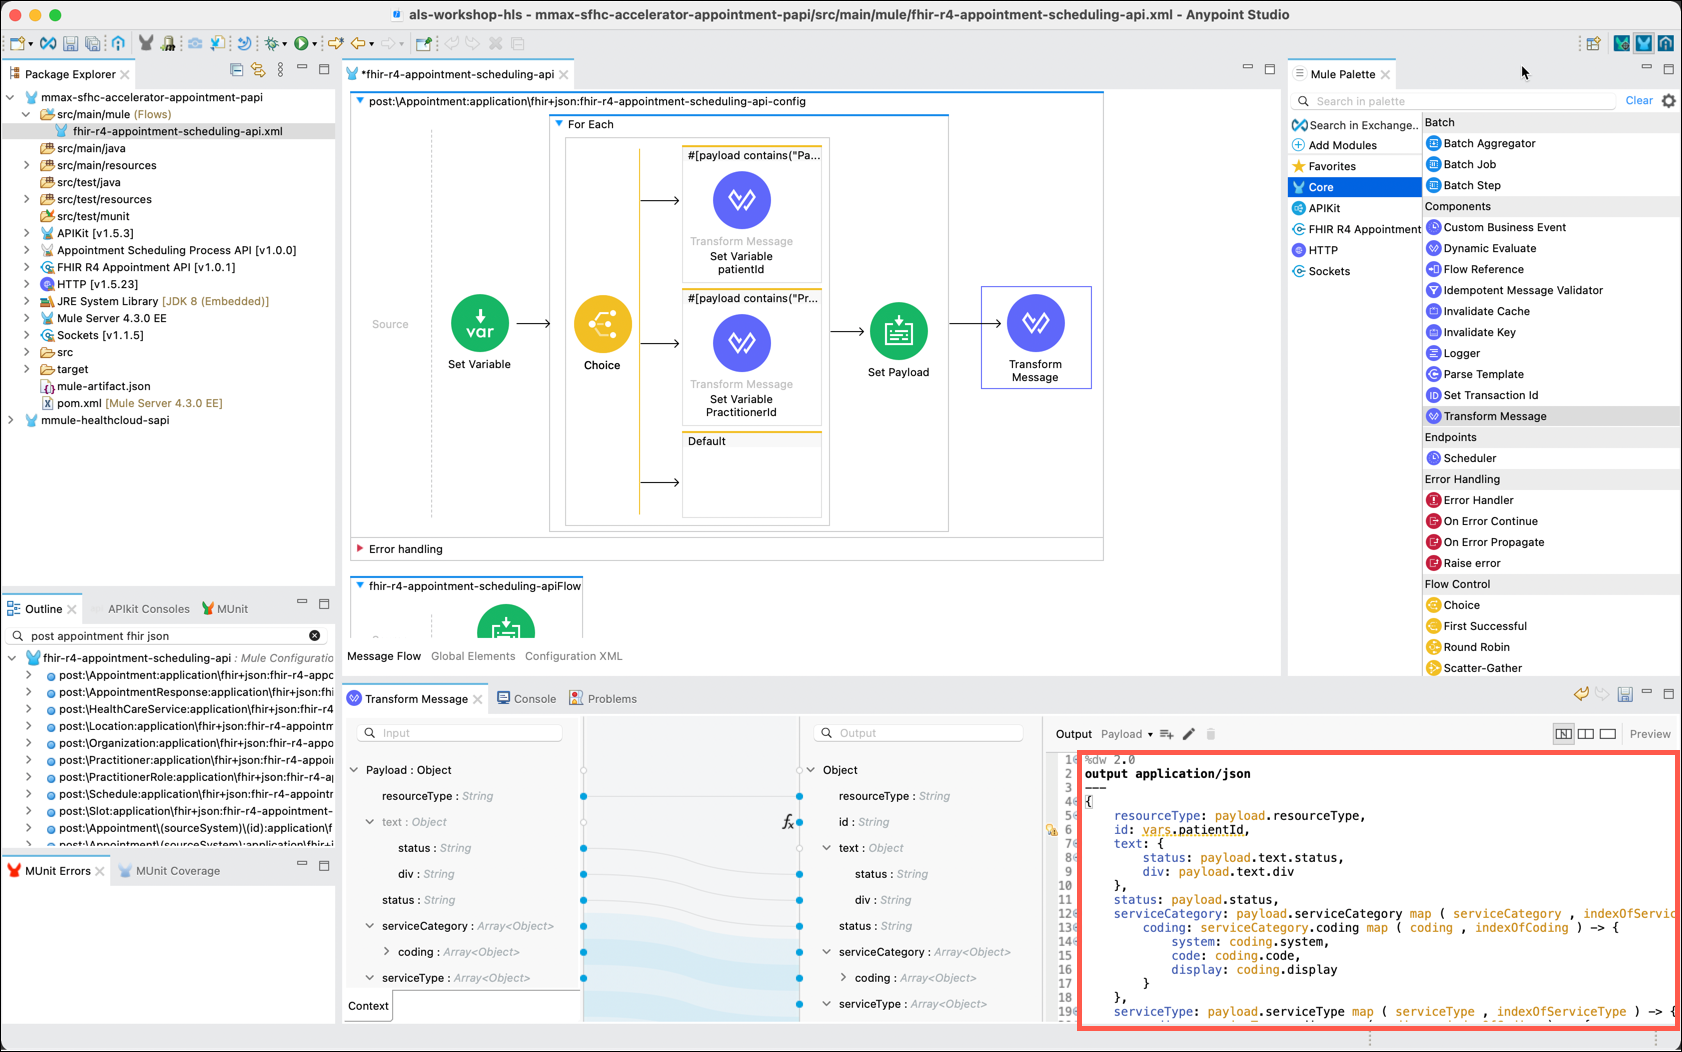
-
You are now ready to send the transformed payload to Salesforce Health Cloud. Earlier in this lab you had added the FHIR R4 Appointment connector to this project. Click on that component in the Mule Palette. Now drag and drop the Create appointment component to the right of the Transform Message component.
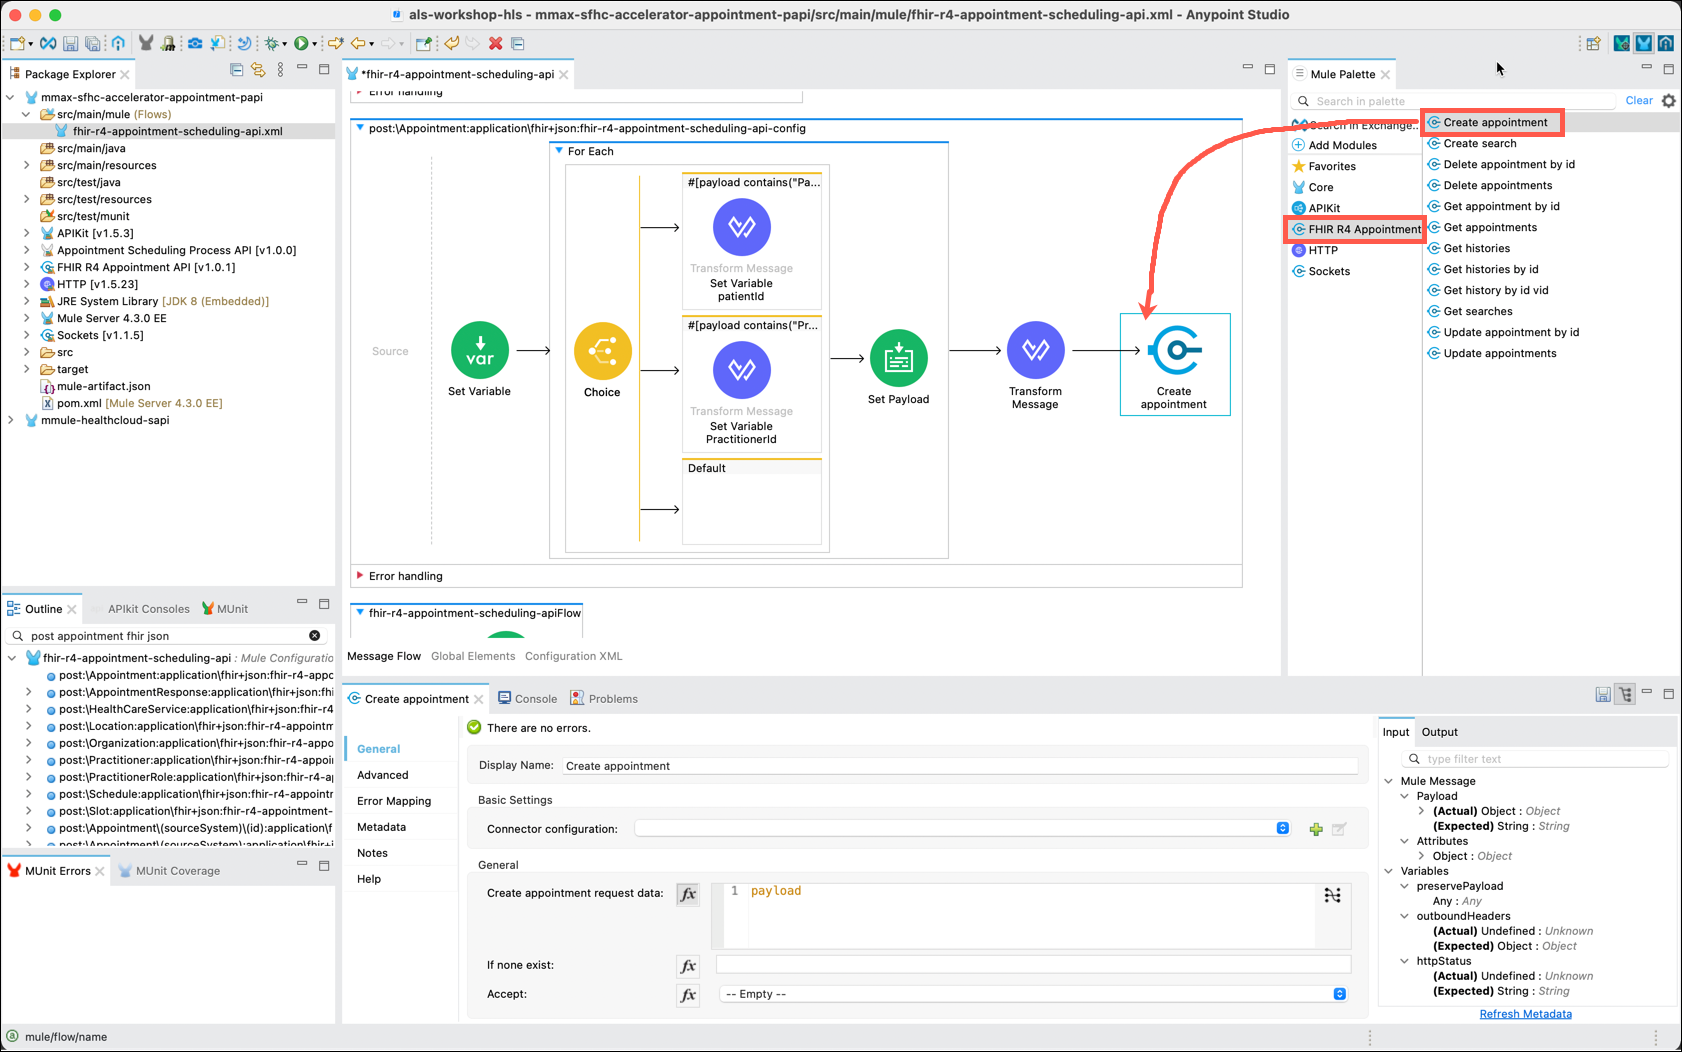
-
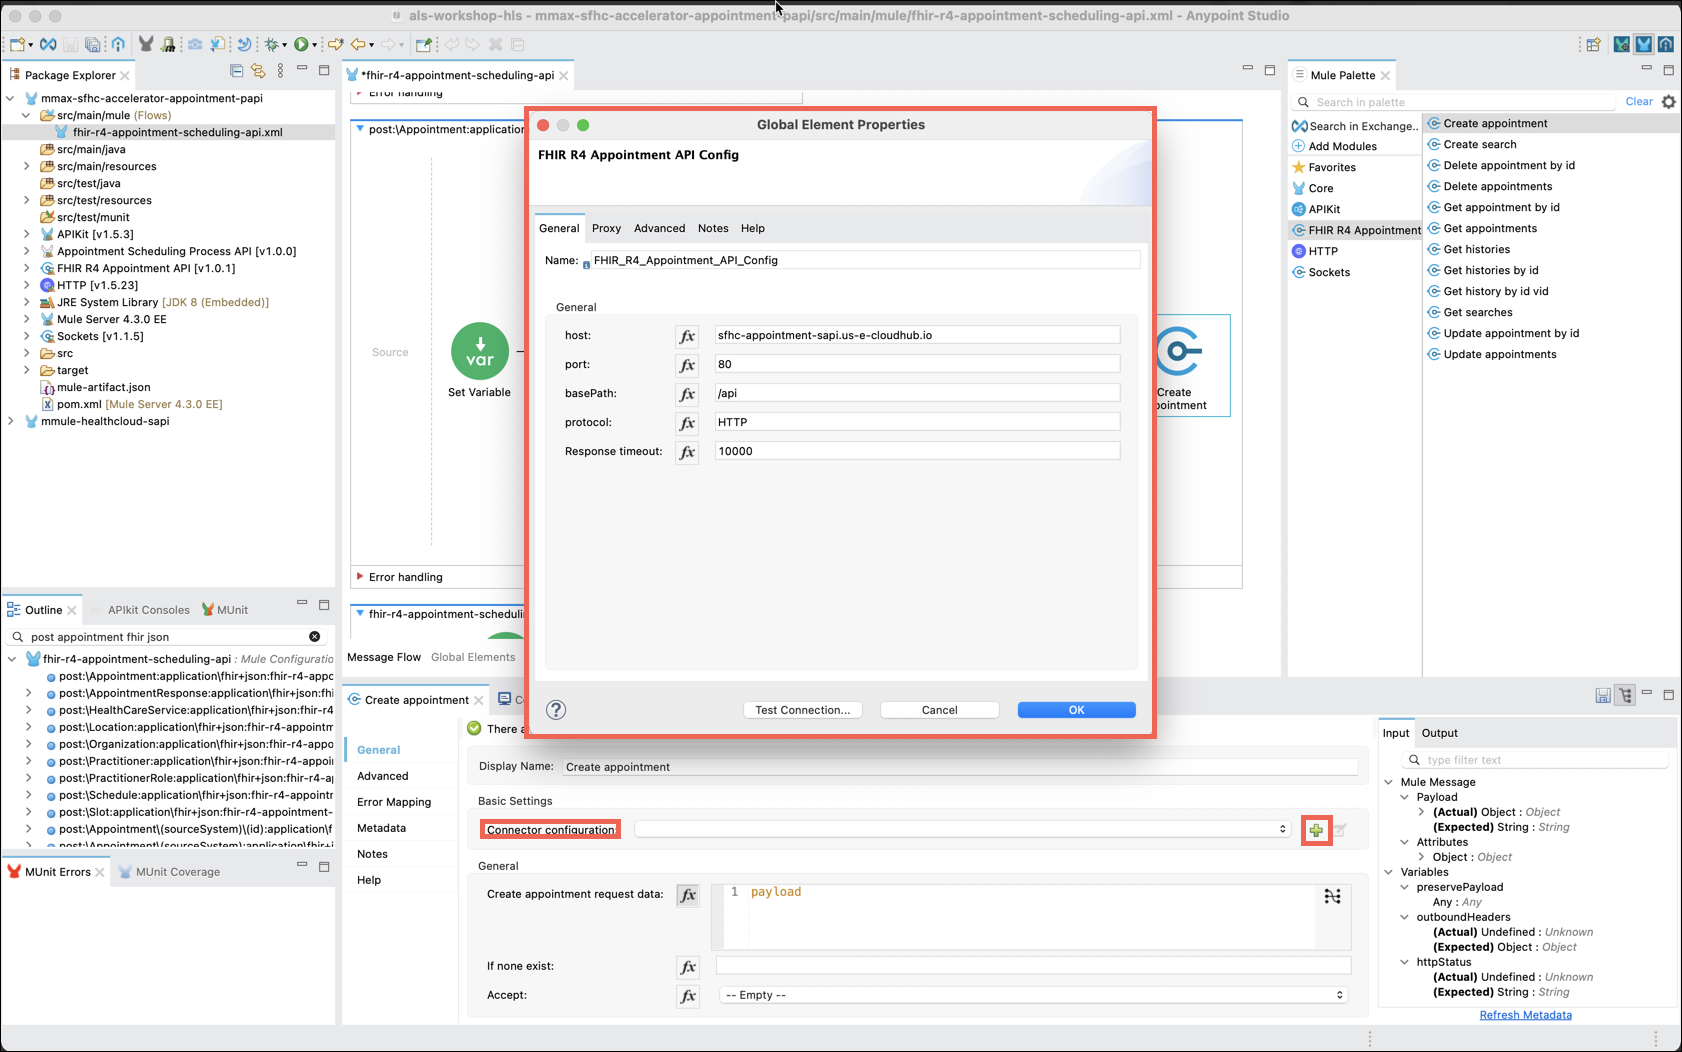
In the Create appointment editor locate the Connector configuration property and click on the Add (green plus sign) icon. The FHIR R4 Appointment API Config window will appear.
Replace the existing data with the following values:
Connector SettingsHost: sfhc-appointment-sapi.us-e1.cloudhub.io Port: 80 basePath: /api Protocol: HTTP
-
Click on Test Connection. a Test connection successful message should appear.

-
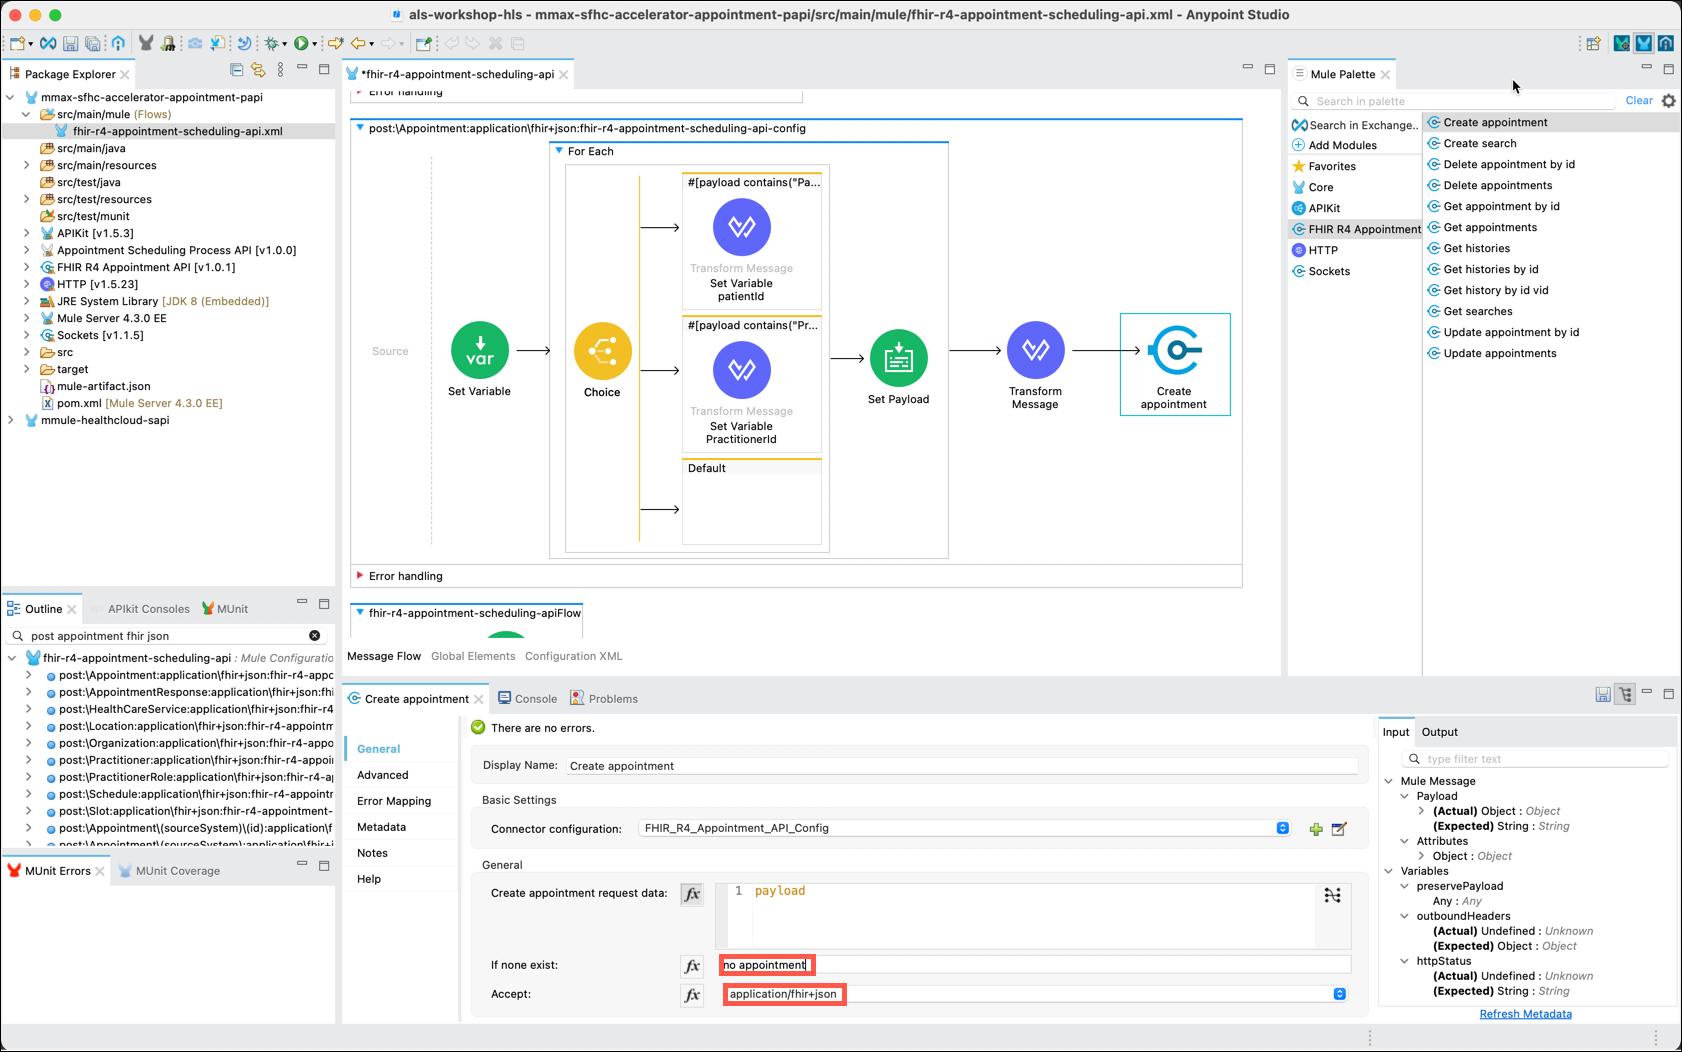
Click on the OK button to clear the message, then click on the OK button on the FHIR R4 Appointment API Config window to close it.
Continue configuring the Create appointment component by setting a value of no appointment in the If none exist: property. Also, set the Accept: property to application/fhir+json using the drop down.
-
Save your work by going to File→Save.
Step 6: Testing your API
Anypoint Studio includes a copy of the MuleSoft runtime that enables unit testing of your projects without requiring deployment to a separate runtime. Anypoint Studio also includes the APIkit Console, which provides a web GUI to test out all of the resources and operations of your API.
Complete the following steps to test your API:
-
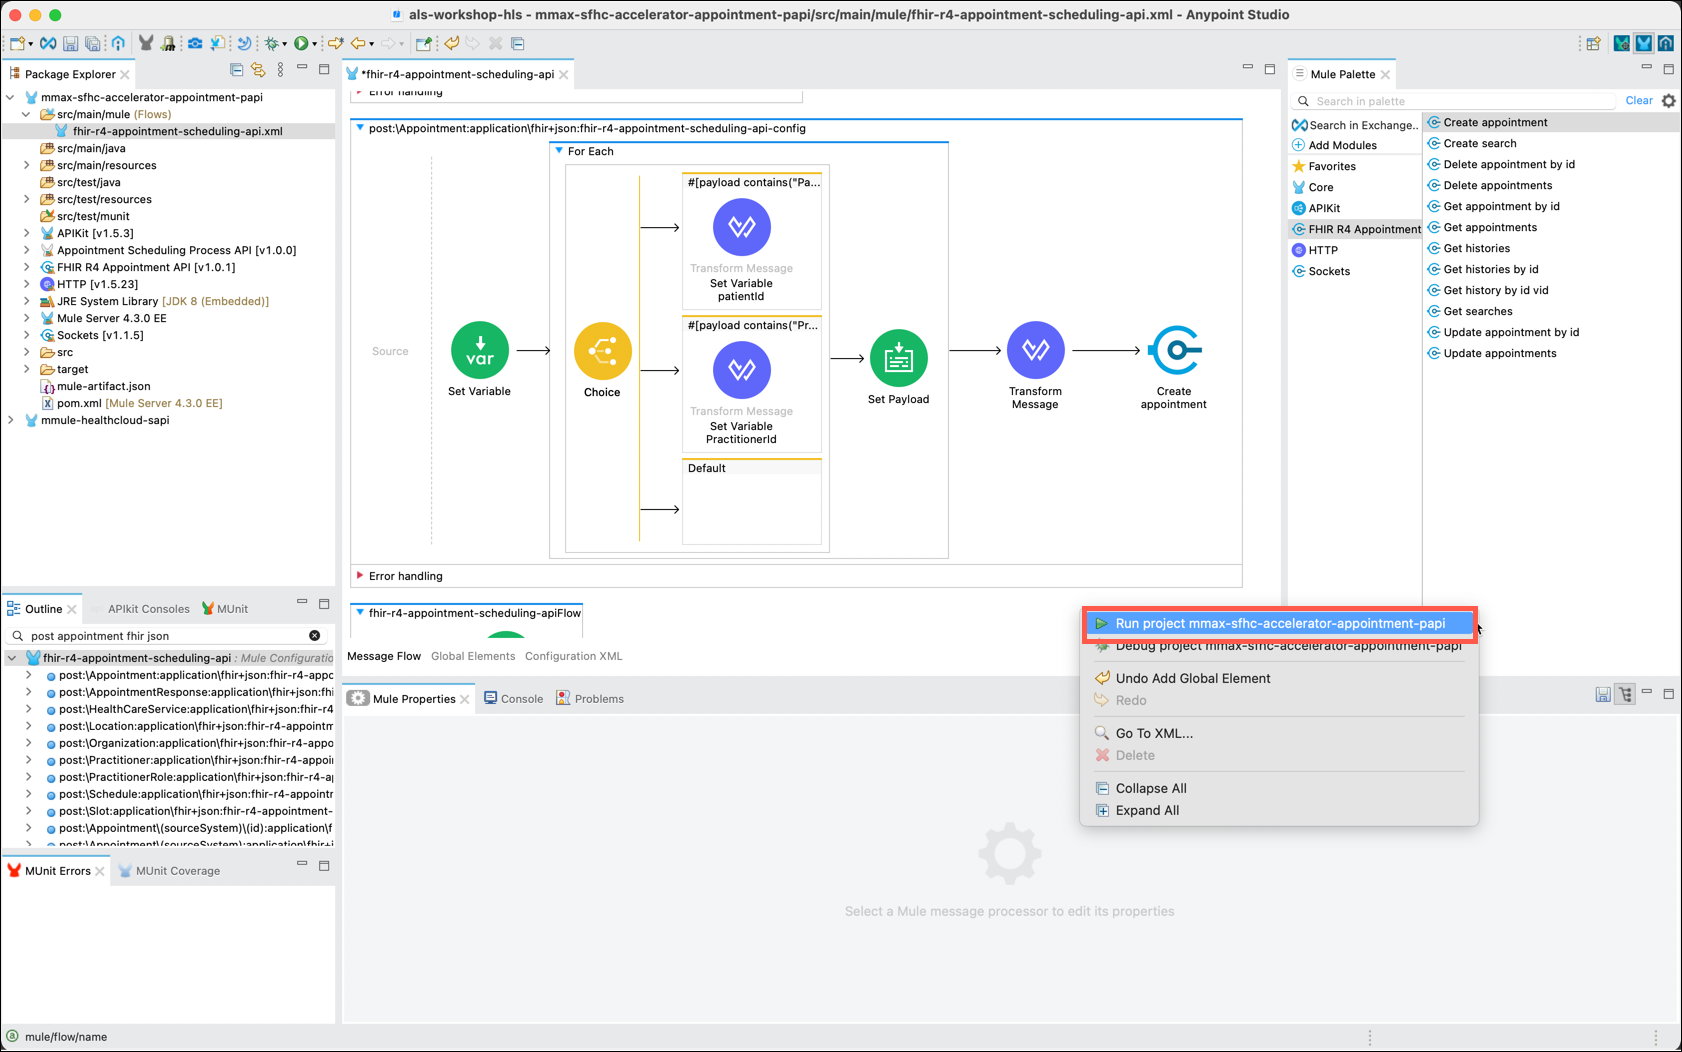
Right click anywhere on the canvas and select Run project <your project name>.
-
Anypoint Studio will initialize the test instance of the MuleSoft runtime and deploy your API to it. As soon as the Console shows a DEPLOYED status for your API, click on the Open Console button that is in the APIkit Consoles tab in the lower left of Studio.
Note: There may be a slight delay in displaying the APIkit Console.
-
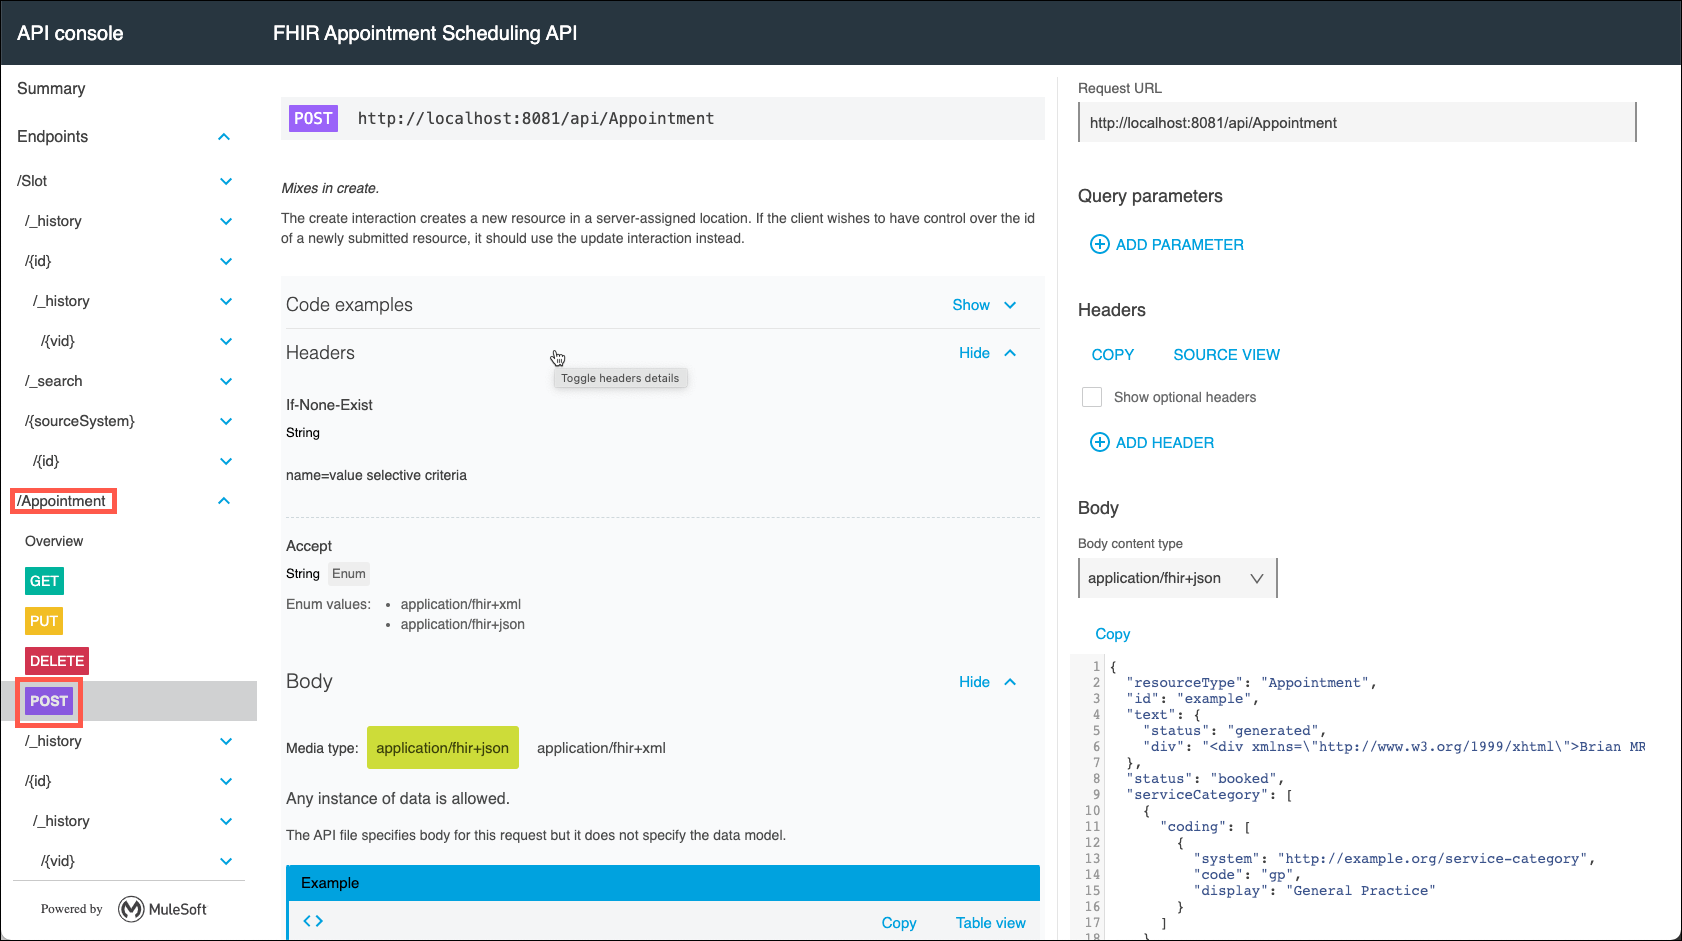
The APIkit will open in your browser where you can now locally test your application. On the left side of the APIkit page, expand the /Appointment resource and click on POST.
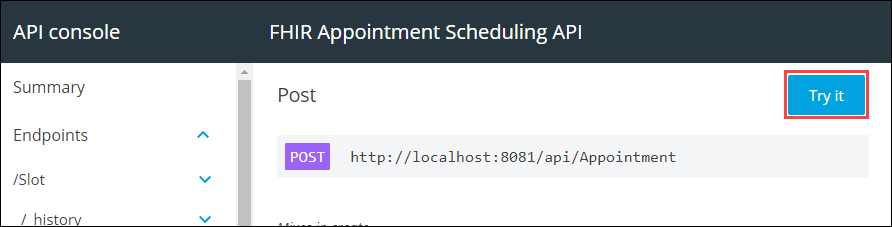
Note: Depending on your browser you may see a Try it button in the upper right corner of the page. If you see it, click it and proceed to the next step.
-
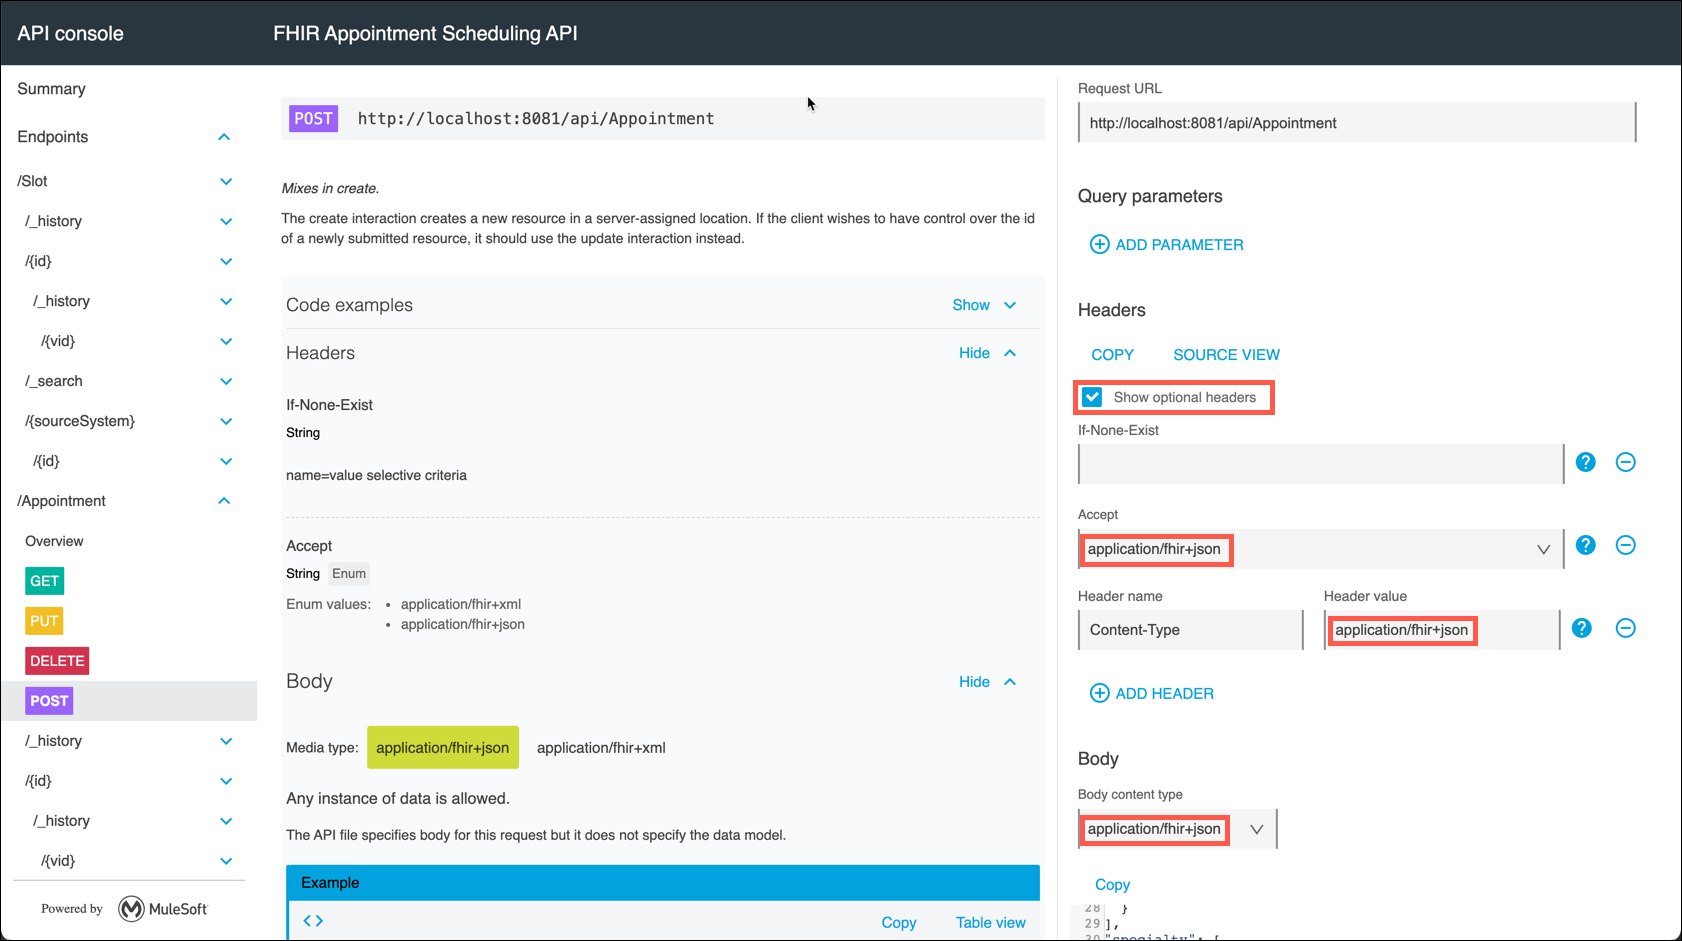
Check the box to Show optional headers. Select application/fhir+json for the Accept, Content-Type, and Body content type variables.
-
Clear the content of the Body section, then copy and paste the Test Message below into the Body. Click on the Send button to initiate the test.
Test Message{ "resourceType": "Appointment", "id": "example", "text": { "status": "generated", "div": "<div xmlns=\"http://www.w3.org/1999/xhtml\">Brian MRI results discussion</div>" }, "status": "booked", "serviceCategory": [ { "coding": [ { "system": "http://example.org/service-category", "code": "gp", "display": "General Practice" } ] } ], "serviceType": [ { "coding": [ { "code": "52", "display": "General Discussion" } ] } ], "specialty": [ { "coding": [ { "system": "http://snomed.info/sct", "code": "394814009", "display": "General practice" } ] } ], "appointmentType": { "coding": [ { "system": "http://terminology.hl7.org/CodeSystem/v2-0276", "code": "FOLLOWUP", "display": "A follow up visit from a previous appointment" } ] }, "reasonReference": [ { "reference": "Condition/example", "display": "Severe burn of left ear" } ], "priority": 5, "description": "Discussion on the results of your recent MRI", "start": "2013-12-10T09:00:00Z", "end": "2013-12-10T11:00:00Z", "created": "2013-10-10", "comment": "Further expand on the results of the MRI and determine the next actions that may be appropriate.", "basedOn": [ { "reference": "ServiceRequest/myringotomy" } ], "participant": [ { "actor": { "reference": "Patient/0015e00000CtBhcAAF", "display": "Peter James Chalmers" }, "required": "required", "status": "accepted" }, { "type": [ { "coding": [ { "system": "http://terminology.hl7.org/CodeSystem/v3-ParticipationType", "code": "ATND" } ] } ], "actor": { "reference": "Practitioner/0035e000009jpKjAAI", "display": "Dr Adam Careful" }, "required": "required", "status": "accepted" }, { "actor": { "reference": "Location/1", "display": "South Wing, second floor" }, "required": "required", "status": "accepted" } ] } -
Scroll the browser window down to view the HTTP response. You should see 200 OK as the HTTP response code and a payload returned to the browser.
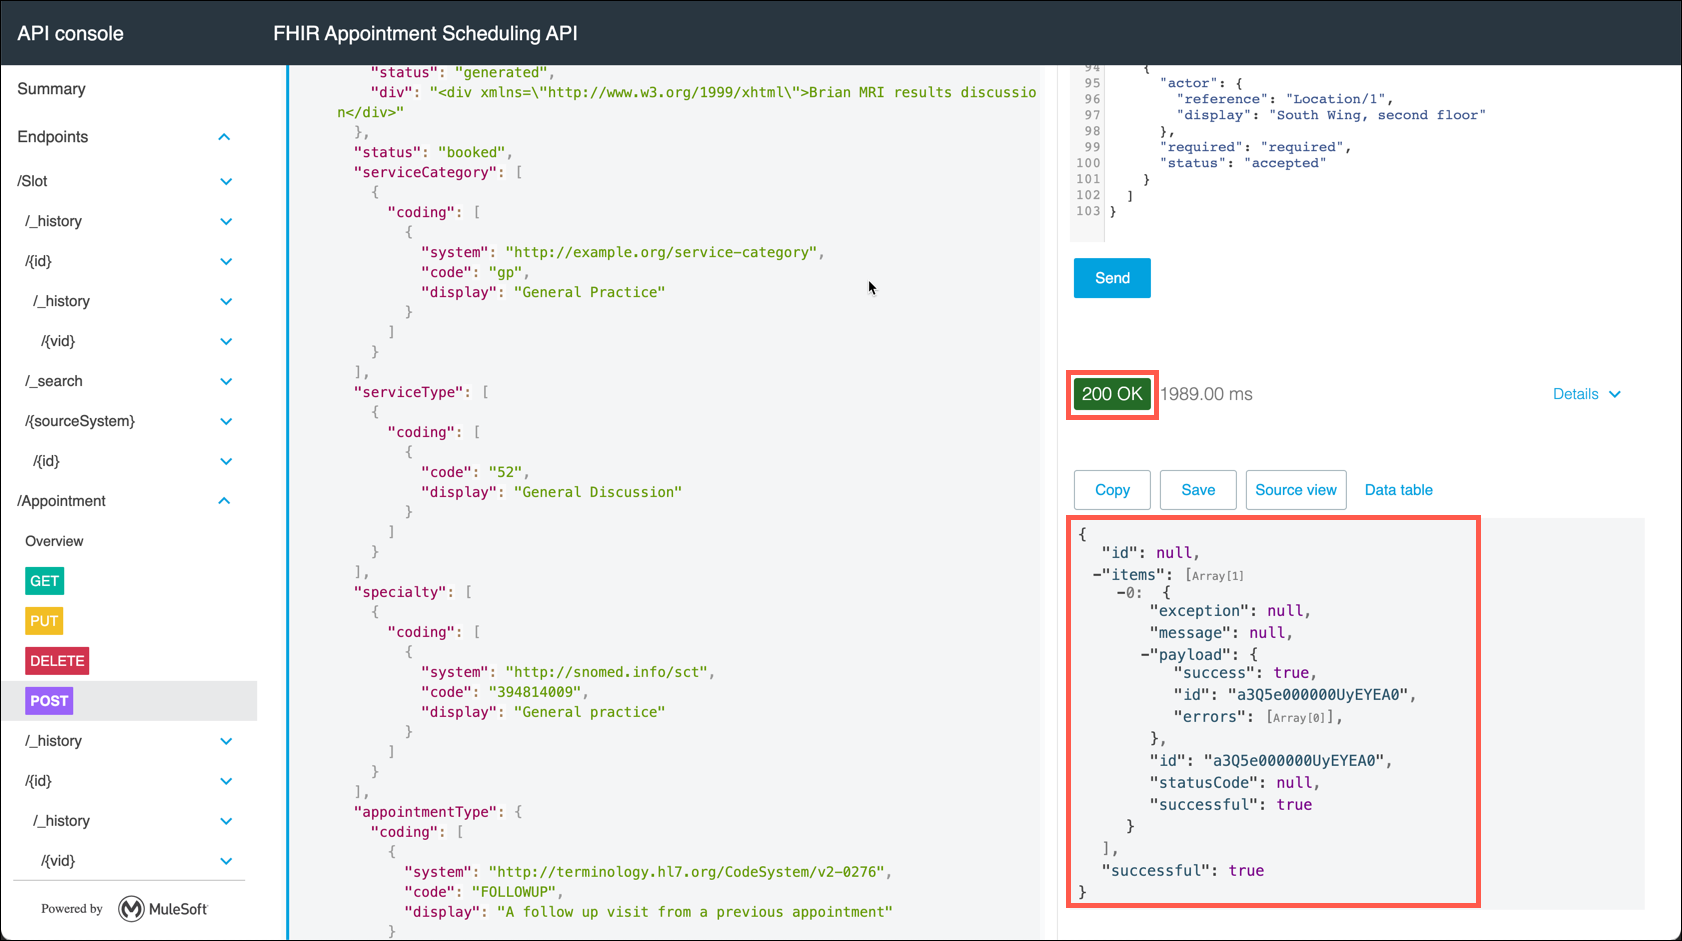
Congratulations! You have successfully tested your new API.
Summary
In this lab you have seen how to create a Process API that utilizes the two System APIs that you had created in previous lab exercises. Please proceed to Lab 8 in the HLS Industry Module.